Table of Contents
You can automate OpenAI image generation in n8n by sending text from a trigger or data source into an OpenAI node, selecting Image > Generate an Image, and then passing the resulting binary file or URL to a storage, publishing, or review step. The important part is not just generating the image: a dependable workflow also protects the API key, validates the input, prevents duplicate runs, and saves the output before a temporary URL expires.
The walkthrough below uses n8n's built-in OpenAI node. Interface labels can vary by n8n version and account, so use the model and options actually shown in your node rather than copying an old model list.
What you need
- An n8n Cloud workspace or a maintained self-hosted n8n instance.
- An OpenAI API project with billing configured, or another credential option explicitly offered by your n8n Cloud plan.
- A small set of test prompts that contains no confidential or personal data.
- A destination for the image, such as cloud storage, WordPress, email, Slack, or a human-review queue.
Keep the API key in n8n's credential store; never place it in a prompt, Code node, workflow name, exported screenshot, or public workflow JSON. The n8n OpenAI credential guide explains the current fields. If you are still choosing an automation platform, TipsMake's workflow automation comparison covers n8n's strengths and the operational work involved in self-hosting.
Build the image-generation workflow
1. Add a safe test trigger
Create a new workflow and begin with Manual Trigger. This prevents the automation from generating images repeatedly while you configure it. After testing, replace or supplement the trigger with a webhook, schedule, form, database event, Google Sheets row, or content-management event.
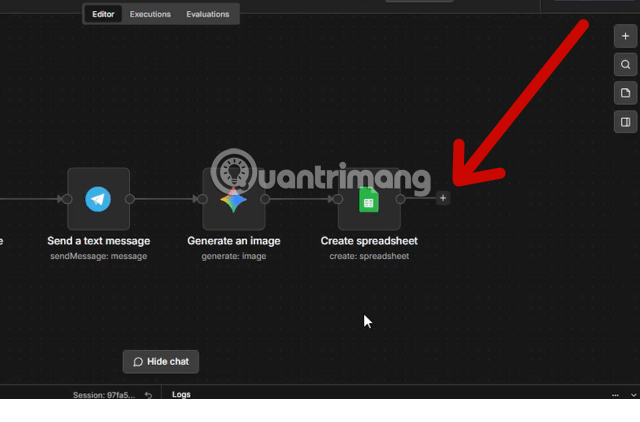
Click the plus button on the canvas to add the next node.
2. Select the OpenAI action
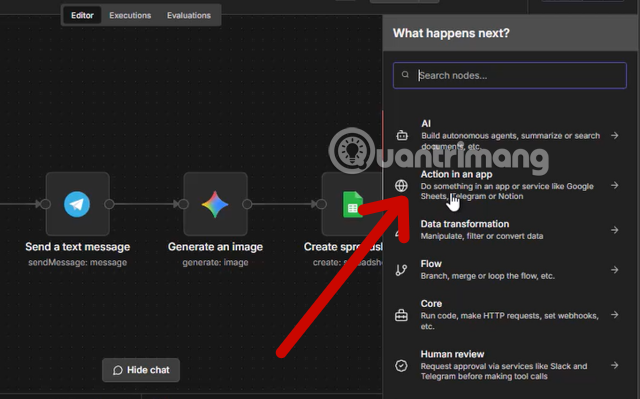
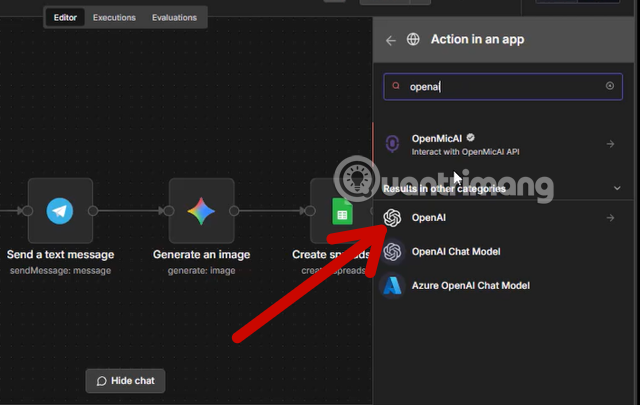
Choose Action in an App if that menu appears, then search for OpenAI. Select n8n's built-in OpenAI node rather than an unverified community node with a similar name.
3. Choose the image-generation operation
Set Resource to Image and Operation to Generate an Image. Do not confuse this with Analyze Image, which describes an existing image, or Edit Image, which also requires one or more input files.
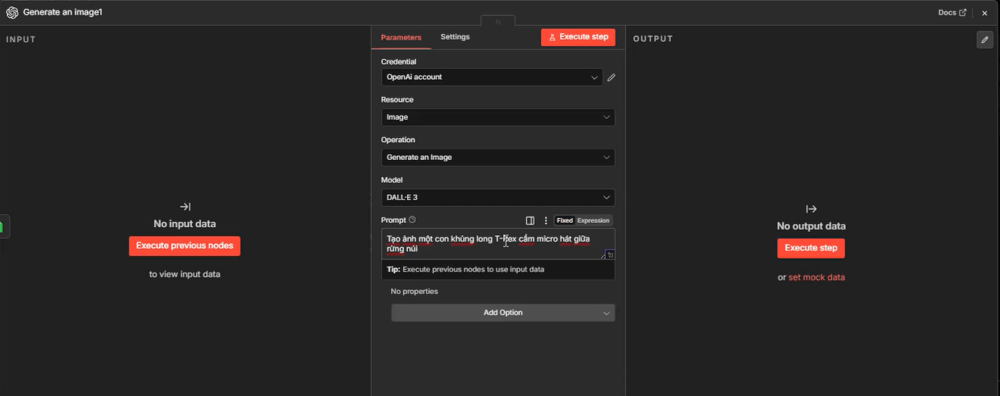
The current n8n image-operations documentation lists the parameters supported by each operation. Model availability and fields can change, so the node's dropdown and official documentation are more reliable than a tutorial screenshot.
4. Create or select the OpenAI credential
Open Credential to connect with, select an existing OpenAI credential, or create one. For an API credential, generate a project-scoped secret at the OpenAI API keys page and paste it only into n8n's credential dialog. An organization ID is normally needed only when the account belongs to multiple organizations.
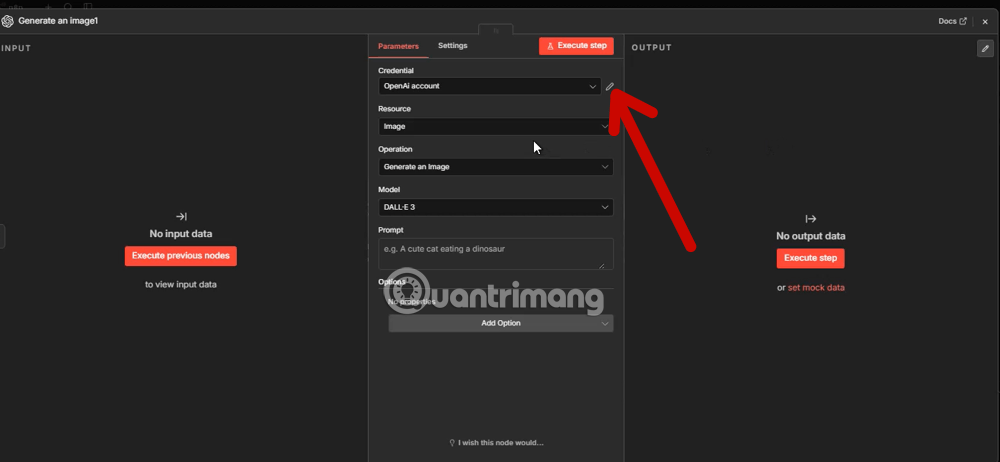
A ChatGPT subscription and OpenAI API billing are separate products. Do not assume that access to image creation in ChatGPT includes API usage. Set project budgets or usage limits where available, and use a restricted project key for this workflow.
5. Select a model and output format
Choose one of the image models exposed by the node for your account. Then review the available options:
- Resolution or size: match the destination's aspect ratio instead of generating a large file and cropping it blindly.
- Quality: higher settings can increase processing time and cost; use a lower-cost setting for workflow tests.
- Style: some model families expose model-specific controls, while others expect those directions in the prompt.
- Response type: binary data is usually safer for an automated pipeline. If the node returns a URL, copy the file to durable storage promptly because generated-file URLs may be temporary.
- Output field: note the binary property name, commonly
data, because the next node must read the same field.
6. Write a dynamic prompt
A useful prompt combines a fixed brief with data from an earlier node:
Create a horizontal editorial illustration for this article:
Title: {{ $json.title }}
Summary: {{ $json.summary }}
Visual direction: one clear subject, uncluttered background, natural lighting,
room for a headline on the left, no logos, no watermark, no invented text.
In n8n, expressions such as {{ $json.title }} read values from the current input item. Use the expression picker to select a field rather than typing an uncertain path. Preview the incoming JSON and confirm that the field is present for every item.
A reliable prompt usually specifies:
- the main subject and action;
- the intended use, such as blog cover or square social post;
- composition, camera angle, background, lighting, and color direction;
- space that must remain clear for text or interface elements;
- elements that must not appear, such as logos, watermarks, or fabricated labels.
A long list of buzzwords such as “8K, masterpiece, ultra-detailed” is not a substitute for a clear composition. Start with a short, testable brief and add detail only when it changes the output.
Map data without broken expressions
Suppose a Google Sheets node supplies a product name in a field called product_name. The prompt can reference it directly:
Studio product photograph of {{ $json.product_name }} on a light neutral surface.
Soft side lighting, centered composition, realistic materials, no brand marks,
no text, square crop.
Before running a batch, add an If node that rejects empty, excessively long, or unexpected values. If text comes from a public form or feed, treat it as untrusted data: place it in a clearly delimited part of the prompt and do not let it override workflow rules or expose credentials. TipsMake's guide to reducing sensitive data shared with AI services explains why input review still matters even when an API is used.
Execute the node and inspect the output
Select Execute step with one sample item. Inspect the result panel before adding downstream actions:
- Confirm that the node completed successfully and identify whether the output is binary data or a URL.
- Open the image and compare it with the source title and prompt.
- Check text, faces, hands, logos, product details, and visual artifacts.
- Record the model, size, and prompt used so a poor result can be reproduced and corrected.
- Verify that the next node reads the correct binary field or URL property.
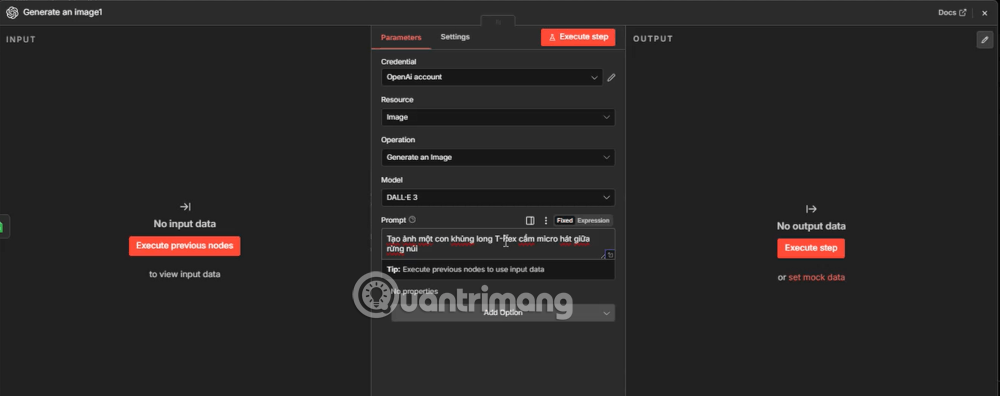
For editorial or commercial publishing, keep a human approval step between generation and publication. TipsMake's overview of current AI image and automation tools also includes a practical permission checklist.
Save, publish, or route the image
Connect the OpenAI node to the destination required by the workflow. Examples include:
- Cloud storage: upload the binary field and save the permanent file URL or ID.
- WordPress: create a media item first, capture its media ID, then attach it to a draft post.
- Email or chat: send the file to a review channel rather than directly to the public.
- Database: store the source record ID, prompt, output location, generation status, and review decision.
Use a deterministic filename such as {{ $json.article_id }}-cover.png. Before generating, check whether that record already has an approved image. This idempotency guard prevents a webhook retry from creating and billing multiple images for the same item.
Add error handling before activation
- Rate limits: process batches at a controlled pace and respect retry guidance rather than retrying immediately in a loop.
- Invalid credentials: stop the workflow and alert an owner; do not expose the key in logs or notifications.
- Billing or model errors: record the error and route the item for review instead of silently switching to a different model.
- Missing input: reject the item before the OpenAI node.
- Temporary output: fail the workflow if the file cannot be copied to permanent storage.
- Duplicate events: store a unique source ID and check it before generation.
- Unsafe or unsuitable output: require a reviewer to reject, regenerate, or replace the image.
A practical production workflow
- A CMS creates a draft article and sends its ID, title, summary, and image requirements to n8n.
- An input-validation node checks required fields and removes unsupported markup.
- A lookup confirms that an approved cover does not already exist for that article ID.
- The OpenAI node generates one image from the mapped prompt.
- A storage node saves the binary output under a deterministic filename.
- A review task sends the image, source title, and prompt to an editor.
- Only an approved image is attached to the draft; rejection returns the item for prompt revision.
- The workflow logs the outcome and cost-related metadata needed for monitoring.
This design still saves repetitive work, but it avoids the fragile “generate and publish automatically” shortcut. Test with a few records, review every branch and retry path, then activate the workflow only when failed and duplicate executions are handled predictably.
Related Articles
 5 exciting projects to help you explore the power of7 minutes read
 What Is ChatGPT Images 2?6 minutes read
 Everything You Need to Know About Openai7 minutes read
 GPT - 4o API Guide: Getting Started with OpenAI's API15 minutes read
 What Are Workspace Agents?6 minutes read
 How to Create a Table of Contents Automatically in Word7 minutes read
Reader Comments 0
Sign in with email or Google to join the discussion.