Table of Contents
Learn how to create a Table of Contents Automatically in Word with clear steps, practical tips, and troubleshooting guidance for common issues.
Create a list of images, tables, and charts in Word
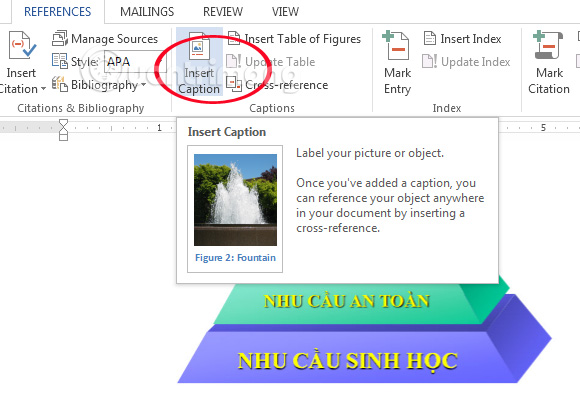
Step 1:
Before you actually start with the table and image categories, add a description to each item. For images, to add a description, right-click each image and select Insert Caption . For tables and charts, go to REFERENCES > Insert Caption .
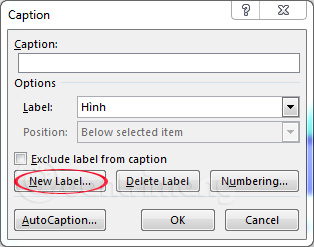
Step 2 :
Choose an existing label, or click New Label to add a new one. By default, Word has three labels: Figure, Table, and Equation. If you are using the Vietnamese version, simply select Figure, Table, or Chart without adding a new one.
Enter a name for the newly added label:
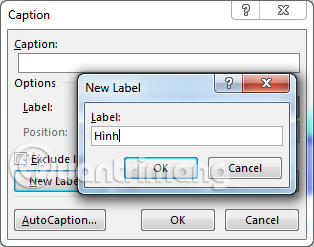
Then press OK .
For charts and tables, you do the same, just remember to put the correct category type into the Label you created.
Step 3:
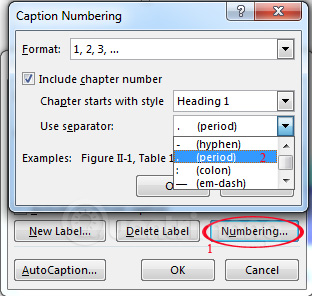
Choose a numbering style in Format, such as 1, 2, 3; a, b, c; or Roman numerals. If you want to number in the format 1.2, 2.1 (to indicate which section the image belongs to and its number within that section), select Include chapter number , in Chapter starts with style select Heading containing the image, and in Use separator select . (period) . However, this requires selecting the correct Heading and ensuring that the Word document already contains Heading numbers. Heading numbers must be entered from Home > Numbering (i. e., automatically numbered; if you enter them manually, it will display as 0.1). Otherwise, there will be errors in the table of contents display. You can correct them manually, but this can be quite complicated if there are too many images or tables. Then click OK twice.
Step 4:
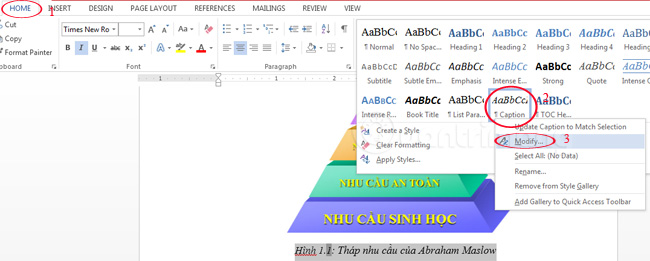
The word "Image" (Label Name) will appear below (or above, depending on your choice). You just need to edit it to match the image name you want. The format of this description may differ from the rest of the post. To edit it, do the following: Highlight the description line > Home > expand the line AaBbCc,., select the area circled in blue (with the word "Caption") > Modify . Here, you can choose the font, font style, and font size to suit your needs.
Step 5:
Do the same with the remaining images and tables in the lesson.
Step 6:
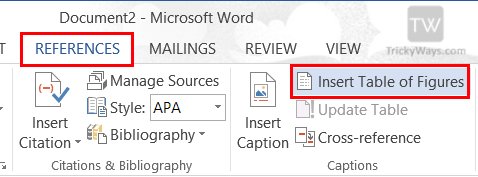
Click where you want to insert the table of figures. This is usually at the beginning of the document or on the last few pages. You shouldn't press the spacebar repeatedly to move to the next page; instead, place your mouse cursor at the last word of the previous page, go to Page Layout > Break > Page to insert a page break. Next, in the References tab, select Insert Table of figures .
In the Caption label section, select the label you want to create a category for; here, I've chosen Chart.

In Formats, select Distinctive , and Print Preview shows you a preview of how the table of contents will appear when inserted. You can change it to suit your document's requirements.
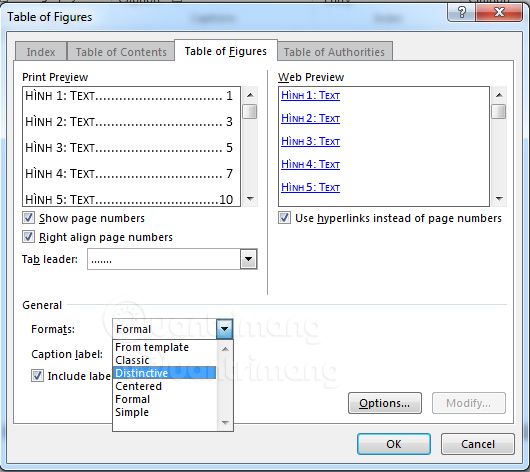
Finally, select OK to insert the table of contents into the document.
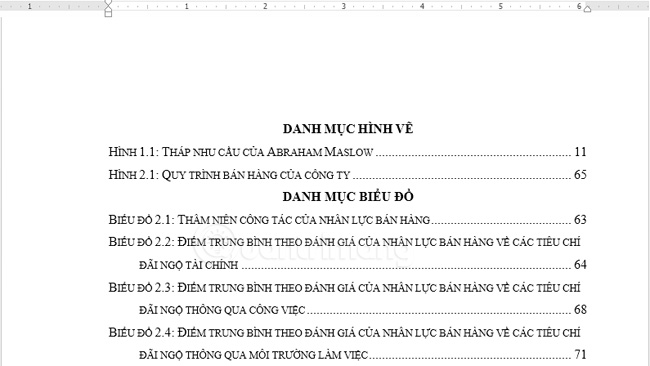
Repeat this step if you have multiple labels that need categorization. In this guide,, I inserted images and charts; the results are shown below:
If you're not satisfied with the font or formatting, right-click the category, select Font, and change it accordingly.

Update the list of tables and figures
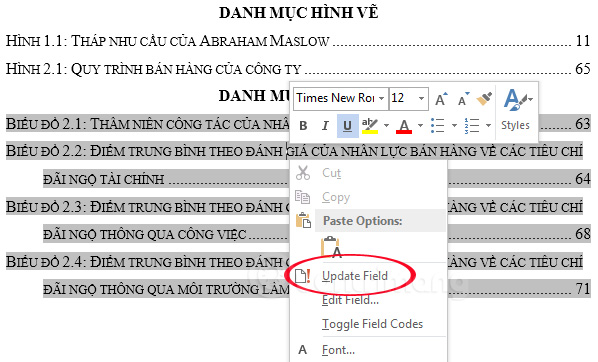
Whenever there are changes in the document, the position/page number of the data will naturally change, and then you need to update the data table. To update, click the table list and press F9 or right-click the list and select Update Field .
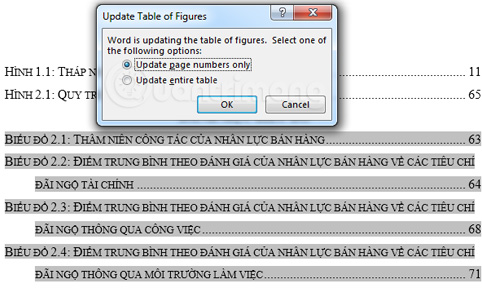
There are two options for updating the table of contents: update page numbers only and update the entire table. If you only want to change the page numbers, choose the first option; if you want to edit the names of images, tables, or charts, choose the second option.
Some notes on text formatting for dissertations
- Font: Times New Roman
- Font size: 13-14
- Chapter titles should be in capital letters, using Heading 1.
- Subsections of a chapter are numbered in the format 1.1, 1.2 (Chapter number. Section number), subdivided into no more than 4 levels (1.1.1.1, 1.1.1.2),.
- Page numbers are in lowercase Roman numerals i, ii, iii,. up to the Introduction.
- Starting from the Introduction, pages are numbered in the format 1, 2, 3,.
- Table of contents and list of tables are placed at the beginning.
- References are listed at the end (before the Appendix).
- The appendix is unnumbered and placed at the end.
- Image title is below the image.
- The chart title is below the chart.
- The table name is placed above the table.
Hopefully, This guide will be helpful to you in your work and studies. If you encounter any difficulties in using the software, please leave a comment below so we can assist you.
Frequently Asked Questions
How can you create a Table of Contents Automatically in Word?
Learn how to create a Table of Contents Automatically in Word with clear steps, practical tips, and troubleshooting guidance for common issues.
How do you create a list of images, tables, and charts in Word?
Step 1: Before you actually start with the table and image categories, add a description to each item.
What should you know about update the list of tables and figures?
Whenever there are changes in the document, the position/page number of the data will naturally change, and then you need to update the data table.
Was this article helpful?
Your feedback helps us improve.
Related Articles
 How to Create an Automatic Table of Contents in Word 2019/2016/2010/200712 minutes read
 How to Create Automatic Table of Contents in Word 20164 minutes read
 Create Automatic Table of Contents in Word for Word 2007, Word 20106 minutes read
 How to Creating a Table of Contents Automatically in Word3 minutes read
 How to Create Automatic Table of Contents Effectively in21 minutes read
 Create Automatic Table of Contents in Word 20039 minutes read
Reader Comments 0
Sign in with email or Google to join the discussion.