Fix high Ping error on Windows 10, 11 effectively
To fix and minimize this problem, follow the article on how to fix high Ping error on Windows 10 and 11 below.
What Causes High Ping?
'Ping' is the term for the amount of time it takes for your computer to send and receive data from the server you are connecting to. So faster internet connection will result in faster data transfer, hence lower ping? That's not true!
In fact, not only the network speed but also many factors that make the ping high, leading to the phenomenon of lag.
Some causes of high ping:
- Slow or interrupted internet connection
- Router related problem
- The computer is not optimized
- Applications running in the background are using network resources
- Too many devices connected to the network.
Some effective ways to Fix High Ping error on Windows 10, 11
Method 1: Test Internet speed with SpeedTest tool
Sometimes, the network problem comes from the Internet service provider. What you need to do is test the network speed to see if it has fallen from the original agreement.
Visit SpeedTest's website. Click Go to measure the network speed. Alternatively, you can choose Change Server to change the connection server.

Based on metrics of Ping, download and upload speed, you can understand the status of your network. If you're not getting the network speed you expect, contact your Internet service provider to have them answered.
Method 2: Connect to a wired network
If you are using the Internet through a Wi-Fi connection, try switching to a wired connection (Ethernet). Wi-Fi is good, but not as stable as a wired connection.

Wireless connections can cause latency issues and packet loss. Multiple devices connected to the wireless network will cause the signal situation in each device to conflict with each other. Connecting your computer directly with a cable will ensure a stable connection and lower ping.
Method 3: Close apps in the background that use a lot of network resources
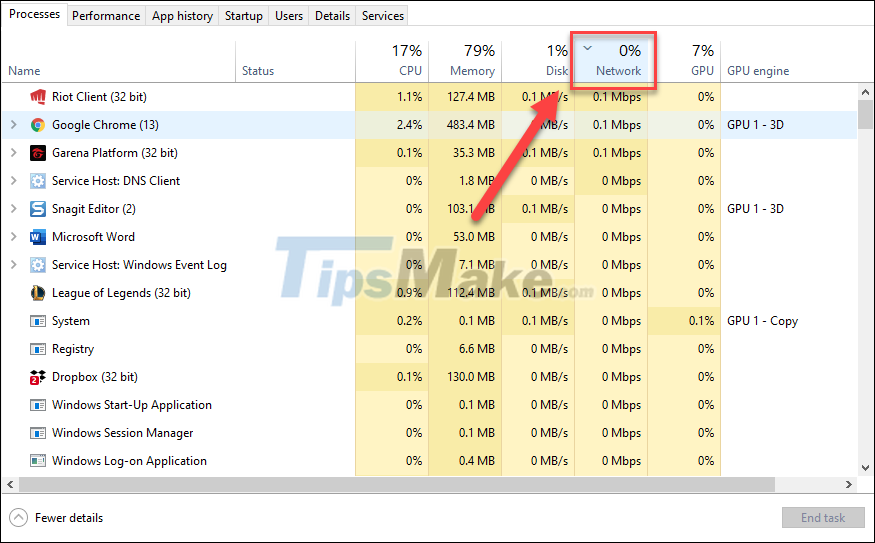
Applications in the background can eat up your Internet bandwidth, affecting the network experience of the main applications. You can quickly identify such applications in the Task Manager.
Step 1: Press Windows + X, then select Task Manager in the pop-up menu.

Step 2: In Task Manager, click the Network tab. This will sort the apps that consume the most bandwidth to the top of the list.

Step 3: Select the application that is taking up a lot of network resources and then click End Task.

Method 4: Change the server or use ping reduction software
Today's major online games all have servers located in different regions of the world. If you are in Vietnam and trying to connect to a North American or European server, you will definitely experience high ping. Meanwhile, closer servers like Singapore or HongKong will help you have a more stable network connection.

If you find that you're connecting to a remote server or using a VPN, try to change the server to a closer area. A very useful tool is GameServerPing that will help you check the ping of the game servers. Just go to the website and click on the game you are playing to check it out. The tool will indicate the best server you should connect to.

Theoretically, software that helps reduce ping will try to connect your network to the game server through an optimized connection. These software are only useful when you are looking to play games with servers in remote areas. In essence, they are low latency VPNs. For example, if you have a need to connect to a game server in North America, software that helps reduce ping will help you get the best connection for that purpose.
The most popular ping reduction support software today are ExitLag, PingZapper and WTFast.
Method 5: Install Windows Update
Surely you are no stranger to the automatic update mode of Windows. But you may not know: updates when downloaded can reduce internet bandwidth and cause high ping.
On Windows 10, you can set a bandwidth limit for system update downloads, making it less of a network resource hog.
Step 1: Press Windows + I to open Settings.
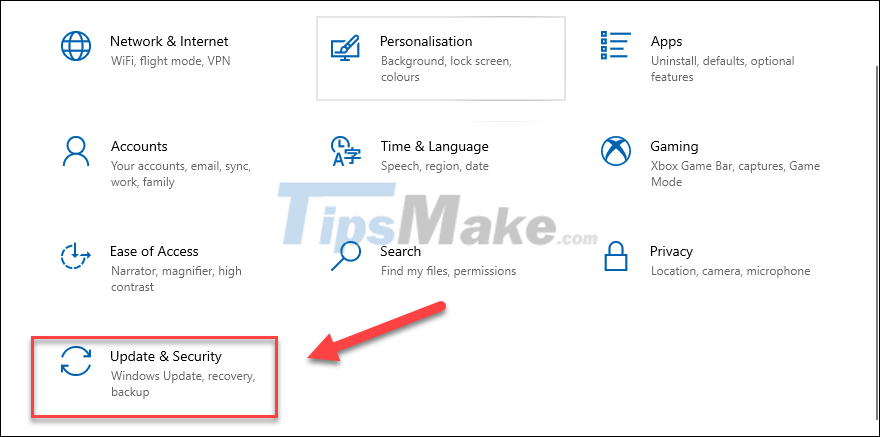
Step 2: Go to Update & Security.

Step 3: Open the Delivery Optimization tab in the right menu, then select Advanced Options.

Step 4: In the Download Settings section, select Percentage of measured bandwidth.

Step 5: Check the box Limit how much bandwidth is used for downloading updates in the background. Next, drag the slider down to 10% or less.

Method 6: Turn on Game Mode in Windows 10
On Windows 10, you can enable Game Mode to prioritize your gaming experience. When enabled, this feature minimizes factors that affect the game as well as the network connection.
Step 1: Press Windows + I to open Settings.
Step 2: Select the Gaming box.

Step 3: Open the Game Mode tab and toggle the switch to On.

The above are solutions to help you limit high Ping phenomenon on Windows 10, 11 computers. Even though you know these tips, you should still contact your Internet service provider for specific and thorough support. to more. Good luck!