Table of Contents
This guide provides a clear, practical overview of enable the adware removal feature found in Windows defender, with useful context, important details, and straightforward takeaways for everyday readers.
However, only Windows 10 Enterprise (the most advanced version of Windows 10) has the feature enabled, but for other versions such as Home, Pro, this feature is hidden and not allowed. user use.
So how to enable Potentially Unwanted Application feature in Windows 10 Home, PRO version? Please refer to the following tutorials:
Potentially Unwanted Application Activation Instructions
[UPDATE]: For updated versions of Windows 10 in 2020, enabling PUA protection on Windows 10 is already available, do the following:
+ Step 1: Open, press Windows + I to open Windows Setting.
+ Step 2: Next you go to Update & Security => and select Windows Security.
+ Step 3: Then you find App & browser control page and open Reputation-based protection.
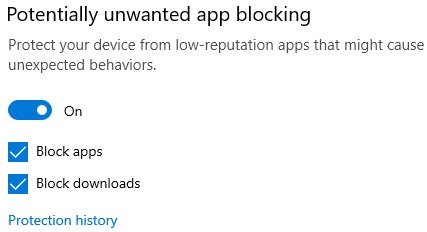
Okay, but if you are using an older Version, please do as below.
+ Step 1: First, open the Run dialog box (Windows + R) and enter the command regedit => and press Enter to execute.
+ Step 2: The interface of the Registry appears. Please go to the following link:
HKEY_LOCAL_MACHINESoftwarePoliciesMicrosoftWindows Defender
Then right-click Windows Defender => and select New => select Key to create a new Key with the name MpEngine. 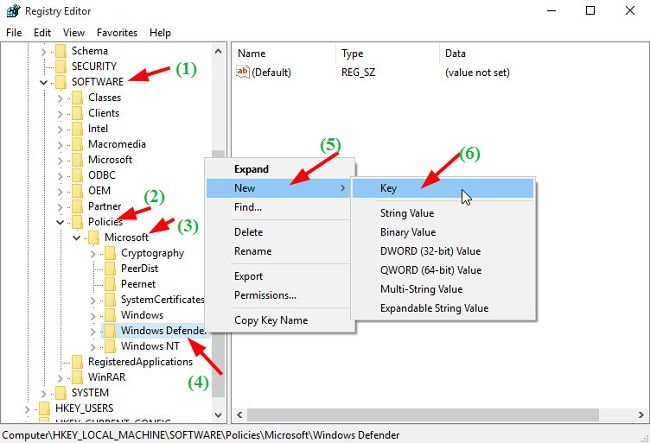
+ Step 3: Click MpEngine => then right click on the space on the right and select New => select DWORD (32-bit) Value => and enter with the name MpEnablePlus.

+ Step 4: Double click on MpEnablePlus and change that value to 1 => and click OK to execute.
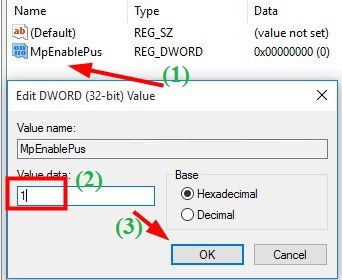
+ Step 5: Now you need to Restart your computer for Adware (Potentially Unwanted Application) removal to take effect.
OK, so from now on your computer is extremely safe with the PUA feature, the software will detect it to prevent you from downloading potential dangers from the internet to your computer. Computer security is best.
Conclude
So with just a few simple steps, you can successfully enable the anti-adware (PUA) feature on Windows 10 already.
This is a very cool trick that I think you should apply immediately to your computer. Instead of looking for other anti-virus software, you should equip the adware removal tool available on your computer first.
Hope the article will be useful to you, wish you success!
Key Takeaways
Use the information above as a practical reference for enable the adware removal feature found in Windows defender. Review each step carefully, confirm any requirements, and choose the option that best fits your situation.
FAQ
What does this guide explain about Enable the Adware Removal Feature Found in Windows Defender?
It explains the main concepts, practical considerations, and useful steps related to enable the adware removal feature found in Windows defender without requiring advanced knowledge.
Who can benefit from learning about Enable the Adware Removal Feature Found in Windows Defender?
This information is useful for readers who want a clear overview, practical guidance, and reliable steps related to enable the adware removal feature found in Windows defender.
What should I check before applying this information?
Review the requirements, confirm that your device, software, or situation matches the instructions, and back up important data before making major changes.
Related Articles
 What Is Adware? Top 5 Best Adware Removal Software5 minutes read
 How to Enable Sandbox Feature on Windows Defender3 minutes read
 How to Use the Bitdefender Adware Removal Tool to Remove Adware4 minutes read
 Enable // Disable Periodic Scanning Feature on Windows 105 minutes read
 What Is Windows Defender? What Are the Advantages? How to5 minutes read
 How to Fix Errors Cannot Open Windows Defender on Windows 7/8/1013 minutes read
Reader Comments 0
Sign in with email or Google to join the discussion.