Enable / disable Periodic Scanning feature on Windows 10
With Windows 10 build 14352, Microsoft provides and integrates a new security feature that will be available on the official Anniversary Update version. This feature is called Periodic Scanning. Periodic Scanning is an option of Windows Defender, which allows Defender to add other antivirus solutions.
Table of Contents
With Windows 10 build 14352, Microsoft provides and integrates a new security feature that will be available on the official Anniversary Update version. This feature is called Periodic Scanning. Periodic Scanning is an option of Windows Defender, which allows Defender to add other antivirus solutions.
Therefore, if you want users to install more programs, other antivirus software such as Avast, Kaspersky, Norton AntiVirus . to protect the system more safely.
When installing Windows 10, the operating system will automatically provide Windows Defender as an antivirus program. By default Windows Defender is enabled, and it is difficult to disable this program.
When installing Windows 10, the operating system will automatically select Windows Defender as the antivirus program for the system. By default Windows Defender is enabled, and it is difficult to disable this program.
In Settings => Update & security => settings, Windows Defender provides you with items to manage security options:

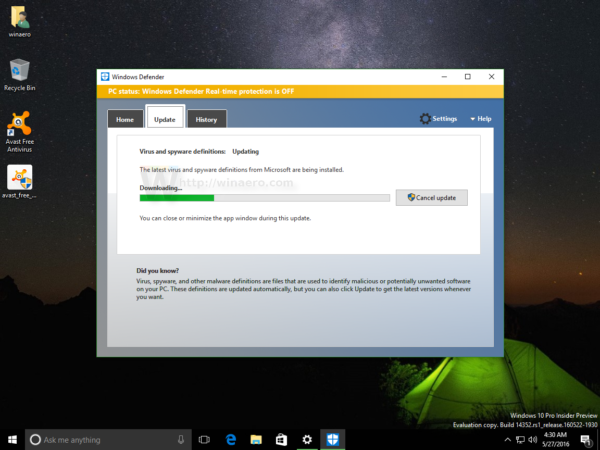
However, when users install other antivirus programs and software, Windows Defender will disable it automatically. All settings related to Windows Defender will be disabled and the Real-time protection option will change to Periodic Scanning :

Note that this new option only appears if Windows 10 can detect antivirus programs and software that you have installed, which means that antivirus programs must be compatible with Windows 10.
By default, Periodic Scanning is disabled. When enabled, Windows Defender will act as a virus scanner next to the main antivirus programs on your system. This will improve the security and safety of the system.
If Windows Defender detects threats, users will see a message appear on the screen.
When the Windows Defender application is disabled in the Periodic Scanning mode, the application's user interface is still active and the user can use it to view the update history, scan history and actions against threats. threatening.

1. Enable / disable Periodic Scanning feature on Windows 10
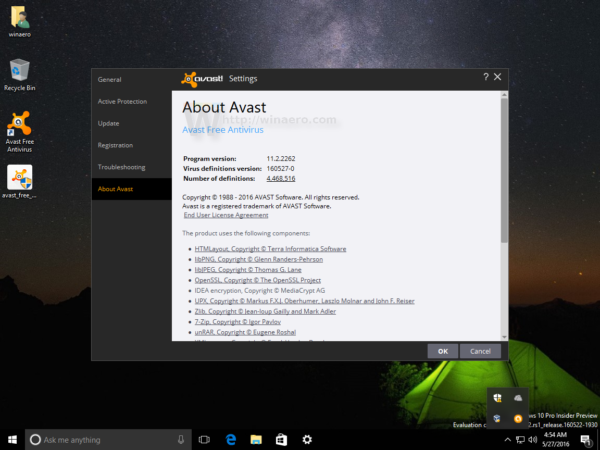
Suppose in this case you have installed the 3rd antivirus software. In the example below is Avast! Free.
1. Press the Windows + I key combination to open the Settings application on your Windows 10 computer.

2. On the Settings window, click on System - Update & security .

3. Next, select Windows Defender from the list of left frame options.
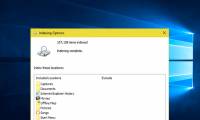
4. Enable Periodic Scanning on Windows 10 by activating Periodic Scanning option (switch the slider to ON):
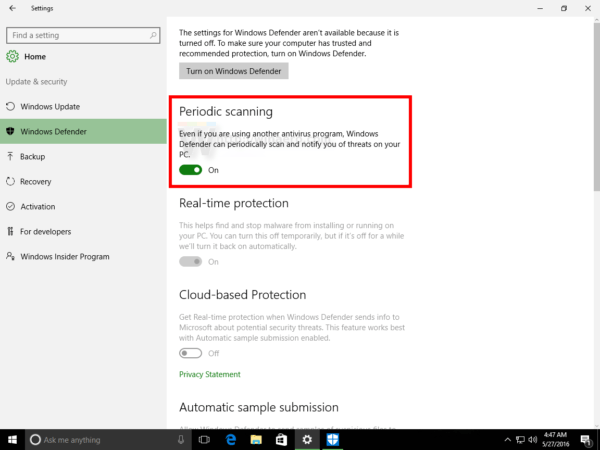
If you want to disable Periodic Scanning on Windows 10, simply disable the Periodic Scanning option (switch the slider to OFF).

You can refer to the video tutorial of activation steps, disable Periodic Scanning feature on Windows 10 below:
Refer to some of the following articles:
- When and how to defragment hard drives on Windows 10?
- If you want to master Windows, master these shortcuts
- Clear the Windows 10 Update Cache to free up memory space
Good luck!
Was this article helpful?
Your feedback helps us improve.
Related Articles
 Trick to enable / disable Windows Updates on Windows 10 quickly and easily3 minutes read
 How to enable / disable the Archive Apps feature in Windows 103 minutes read
 How to enable and disable the standby screen mode in Windows 102 minutes read
 How to enable / disable the Indexer Backoff feature in Windows3 minutes read
 The periodic tables have the weirdest shapes in the world not everyone knows3 minutes read
 Instructions to enable or disable SmartScreen on Windows 103 minutes read
Reader Comments 0
Sign in with email or Google to join the discussion.