Disk Quotas configuration in Windows 2003
Are you looking for means of managing storage space allocated to users? You can use Disk Quotas. This article gives you an overview of Disk Quota in Windows 2003. We have reviewed the reasons why ch & u.
What is Disk Quota, when should it be used and how to configure it in Windows 2003?
Are you looking for means of managing storage space allocated to users? You can use Disk Quotas. In this article we will find out what disk quota is and when to use it, and how to configure it in Windows 2003.
About Disk Quotas
Unfortunately, Windows NT Disk Quotas does not exist. This is a big disappointment for Windows administrators. Launched from Windows 2000, Disk Quotas provides computer administrators with the ability to monitor and control the user's hard disk space usage. The only problem is that they don't really have an effective way to manage disk quotas. Scripting, reporting and remote usage methods are both limited and ambiguous. Windows 2003 provides a better way with all the features and ways to manage disk quota easily for large businesses.
Disk quotas are used in conjunction with NTFS, Group Policy and Active Directory technologies. Disk quota is used on NTFS file system. Group Policy is a tool to set up disk quota with a specific set of users and computers. Active Directory is used to collect a list of group users that will be created. It is important to note that these disk quotas can only be used with NTFS. If the file system is FAT or FAT32, you cannot use it.
Disk quotas are configured on a per-disk basis and cannot be set at the file or folder level. Each disc has its own settings and does not affect other disks. For example, you can simply partition the hard drive into two volumes (drives C and D for example) with individual settings on each drive. Disk quota can also be configured according to users and different user groups have different sets of limits. Administrators (using Administrator accounts) should not support disk quota from the beginning, but by default there is no limit to them.
There are countless reasons why you want to use disk quota: limit the amount of disk space used by servers, limit the number of servers or monitor user disk space usage without actually applying quotas. You may wonder, why do you need to monitor user disk space usage? The answer is if you have a fileserver system that sets up multi-user mode and everyone uses it daily to store temporary files, you can be sure they all remember to delete the file when the server is in it. No longer needed? The answer must be no. And when you forget to delete, that means the amount of free disk space will decrease. At some point the hard drive is full, users will be denied inserting files until the old files are deleted. By using disk quotas to monitor user disk space usage, you can be notified when the disk is full, need to increase allocation space or notify your users to delete files on the server. In addition, setting a warning level quota also allows the system event log to be recorded for your review.
Set up Group Policy
The most practical means when configuring disk quota in bulk is through a domain level group policy. It will help create automatic settings on one of the disk sets you want to use quotas and record the necessary elements to configure for each individual disk.
Open the Group Policy Object Editor ( gpedit.msc ), then go to Computer Configuration > Administrative Templates > System > Disk Quotas . In the right pane you will see a list of policies that can be used. Double-click on the ' Default Quota Limit and Warning Level Properties ' setting.
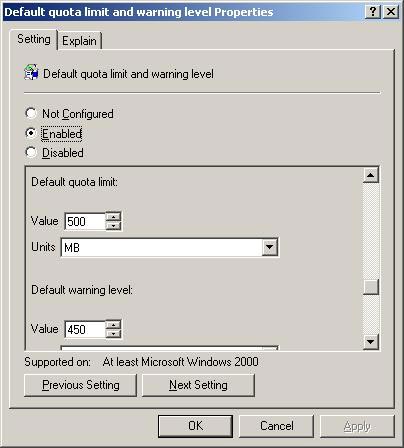
Figure 1 : Default Quota Limit and Warning dialog box Properties
The default quota limit is the maximum total space assigned to each default quota, and the lower the warning level, the total permitted space reaches a certain threshold before making a warning. Usually set to 90-95%.
You can configure other settings by clicking them in the right pane. If you want these changes to be applied immediately, check the ' Disk Quota Policy Processing ' box and select ' Process Even If The Group Policy Objects Have Not Changed ' from Administrative Templates > System > Group Policy .
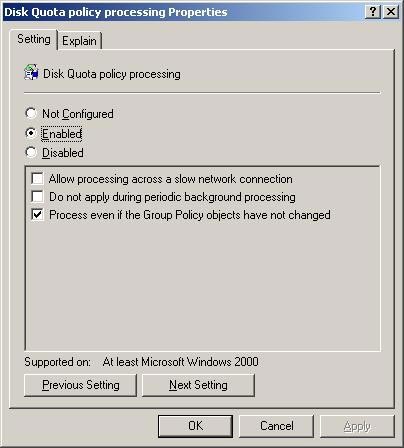
Figure 2 : Disk Quota Policy Processing dialog box
You can also use the gpupdate utility to configure update group policy. Done by going to Start > Run , typing gpupdate . Once done, it will refresh the policies for computers and users.
Any changes made in Group Policy will correspond to the Quota properties tab of each disk you want to configure in the domain. These options appear with gray borders and cannot be edited.
Configure Disk Quota and the Disk Quota Entries
Using Computer Management, you can configure disk quota for local or remote disk from a central location. Open Computer Management , there are three options: either right-click My Computer and select Manage , or type compmgmt.msc in Run , or select Computer Management from the Administrative Tools folder.
Select the computer you want to manage from the root node. To select a remote machine, right-click the ' Computer Management ' button, select ' Connect to another computer . ' and point to the computer you want to manage. Now, go to Storage > Disk Management and select the disk you want to configure from the right pane. Open the Properties dialog box, click on the Quota tab and click on the options you want to use.

Figure 3 : Disk Quota Properties dialog box
The red green traffic light icon at the top indicates the status of the disk quota. Red means quotas are not used, orange means changes are being made (when rebuilding disk information) and blue means that disk quotas are allowed to use. The status information section is displayed as text displayed on the right of the icon.
Check ' Deny disk space to users over the quota limit ' so that Windows restricts users from adding data to the allocated disk space when the quota limit is used. Users will not be able to add data until this space is released.
As you can see in Figure 3, the quotas limit for new users has a gray border. This will be displayed after setting up a disk quota in Group Policy, and overwriting any custom settings on the Quota tab of the disk. In this case we limit the disk space to 500 MB and set the warning level to 450 MB.
You can choose unlimited space but only monitor their use on each disk partition by unchecking the ' Deny disk space to users over quota limit ' box and giving a notification when the user overrides Excessive alert within quotas. Whenever a user exceeds this limit, the Warning event log will be written to the Application Event Log and displayed in Event Viewer.
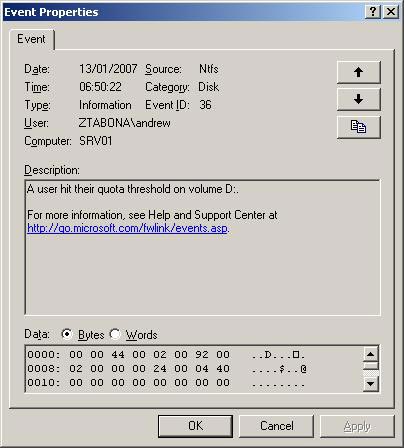
Figure 4 : A warning log of disk quotas
There is a known issue in the previous Service Pack of Windows 2003 that the Warning event logs are displayed incorrectly as an Information log in Event Viewer. Only for the Quota Entries application will it be shown as a Warning.
When you press the Apply button on the Disk Quota Properties Dialog dialog box , you are informed that the disk will be rescaned to update the statistics and this process may take a few minutes. Simply press OK to continue, disk quotas will be used for the disk.
Quota Entry
Click the Quota Entries button on the Disk Quota Properties Dialog dialog box , you can view the list of separate disk quota entries. In this area you can create, delete or manage quota entries for each specific user or group. If a user requires a larger amount of space than others, you can set it up here.
Enter Quota > New Quota Entry , Active Directory User Picker dialog box appears. Select the user on Active Directory and click OK . You will be given the option to limit disk space and set an alert level or unlimited usage.
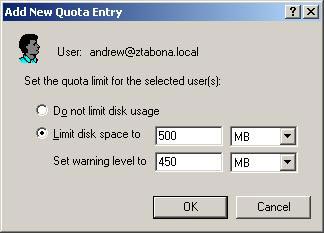
Figure 5 : Add a new quota
Select the appropriate settings then press OK , the user will be added to the list. You can monitor disk space usage by looking at the properties of each column. The ' Status ' column indicates whether or not the user is within their limits. If an alert is noted or the overload limit is exceeded, the icon will change according to each case.
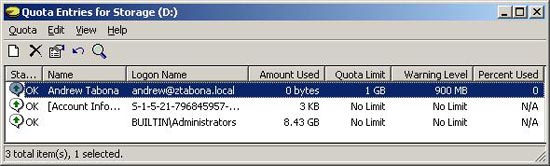
Figure 6 : View the list of Quota Entry
Conclude
This article gives you an overview of Disk Quota in Windows 2003. We have looked at why they are used and how to configure them.
Some administrators say they don't need to use Disk Quota, but there's no denying the fact that it's useful. Try it and test it yourself!