Decode all errors that appear on Google Play and how to fix them (Part 1)
For Android users, installing applications from Google Play seems simple, but many times you are dumb by the store returning errors with the whole code set, but you don't know why, also like how to fix them. Located in the far area, this is quite good, so please forgive everyone for watching and contributing.

Summary of common errors of Google Play on Android and how to handle
1. Fix Play Store error: This item isn't available in your country
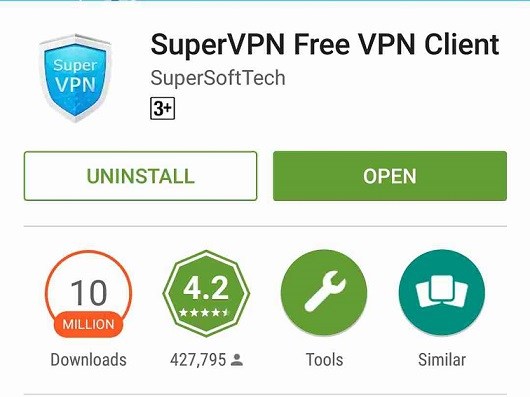
1. To fix this Item isn't available in your country on Google Play Store, first open the Google Play Store app, then enter the VPN keyword into the Search box of Google Play Store to find the VPN, download and Install on your mobile device.
You can use SuperVPN application, however this application only provides 20 days of trial. Or in addition you can use other alternative VPN applications like TunnelBear VPN.
2. Install the application and wait until the application has finished loading. Click the 3 dots icon in the top right corner of the device screen, then select Select Location . From the list, click United States .

3. Next click on the Connect button in the middle and wait until the application creates a Private Network. You can see the remaining time to complete the connection.

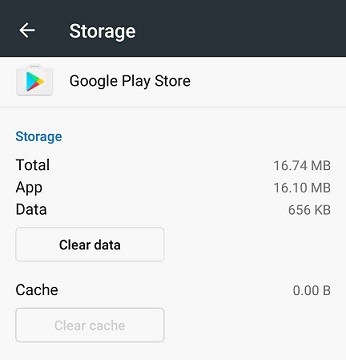
4. The next step is to delete the Play Store data.Go to Settings => Apps => Google Play Store => Clear Data to delete all the data you have set up on Play Store.
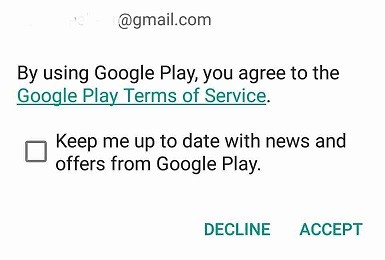
5. Open the Play Store application and click Accept . Now you can download and install blocked applications in some countries.
If you have done the above steps and still cannot fix the error, you can use another Email ID. You can add multiple Email IDs by going to Settings => Accounts => Add account .
Fix Play Store error: This item isn't available in your country completely
In addition to completely fix this error, this item isn't available in your country on Google Play Store, you can download and install the Google Wallet application.
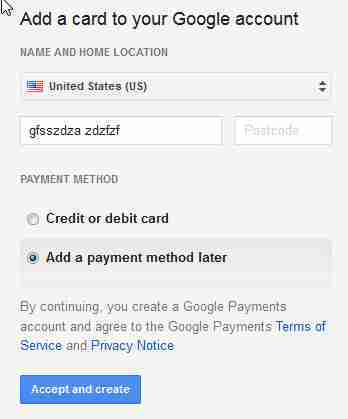
1. First access the Google Wallet website via your computer or mobile device. Sign in with Email ID you use on Play Store on your device. The website will ask you for your detailed payment and location. Select the location as United States.
2. Follow the national Postcode code.
3. The next step is to select Add a payment method later .
4. Click the Settings button in the right corner and edit your address with any random address in United States. You can skip this step, but you should adjust to avoid errors in the circumstances.
5. Download the Google Wallet app on Play Store. Don't forget to delete Play Store data and use the VPN application if you can't download Google Wallet, or the Play Store doesn't display the app.
6. Open Google Wallet and log in with the Email ID you edited.
2. Error 491
Cause: downloads and updates are not available
Solution 1:
Log out of your Google account, reboot the device, then log in to your google account, go to settings , select the apps section, scroll through the all tab , scroll down to google services , select clear data and then force stop .
Solution 2:
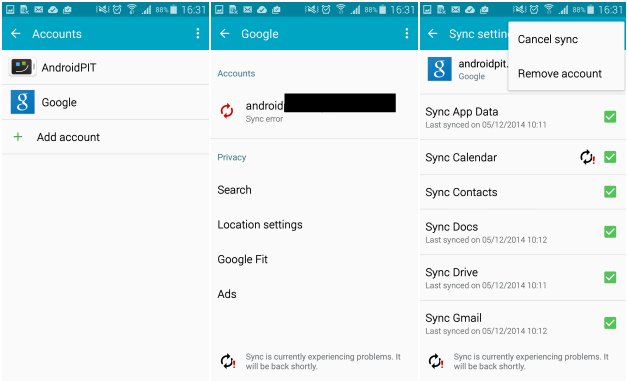
Navigate to Settings => Accounts => Google => your Gmail account, then delete the Gmail account. Next clear the cache and delete the data, restart your Android device. Finally, re-add your Gmail account again.
Solution 3:
Restart your Android device.
Solution 4:
Go to Settings => Apps => All => Google Play Store , find and click Clear Cache and Clear Data .
3. Error 498
Cause: download from google play store is interrupted
Solution 1:
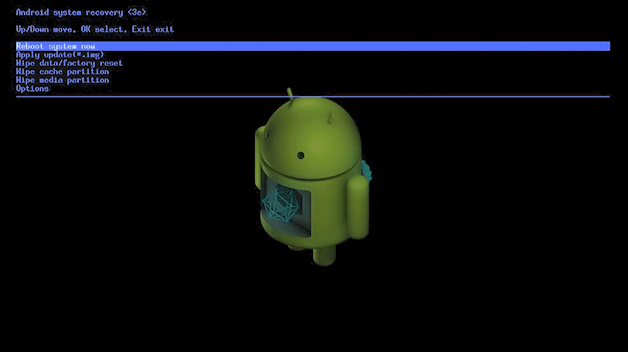
The reason may be that the device cache is full, so you should delete unnecessary applications (files) . Boot the device into recovery mode (press volume - power button and home button at the same time - for example for samsung devices | or volume button - and power button - for example for other Android devices) , then select wipe partition cache .
Solution 2:
Go to Settings => Apps => Google Play (under All section), find and click Clear Cache and Clear Data.
Solution 3:
Try reconnecting Wifi, then reload the app to see it.
Solution 4:
Go to Settings => Account => Add new account => Select Google , then add your Google account.
Solution 5:
If your Android phone or tablet has been rooted, you can uninstall Google Play, then download and install Google Play again.
4. Error 919
Cause: download the application but download is complete, the application does not open to install.
Fix: Your device is full, delete files ( photos, music, movies ) or unnecessary applications.
5. Error 413
Cause: downloads and updates are not available. If you use a proxy, it may cause an error with google play store.
Remedy: Go to settings , select apps , swipe through all , pull up google services , select clear data and select force stop . Do the same thing, google play store app and delete Internet browser cache.
6. Error 921
Cause: the application cannot be downloaded.
How to fix: delete the cache of google play store, if not, delete all application data , but doing so means you also clear the settings / settings you did. Finally remember to remove (exit) your Google account, restart the device, and then re-enter your Google account for reuse.
7. Error 403
Cause: do not download the app when 2 google accounts have ever purchased apps on 1 device.
How to fix:
Solution 1:
Go to google play store with the right google account, remove that application, then "buy" again.
Solution 2:
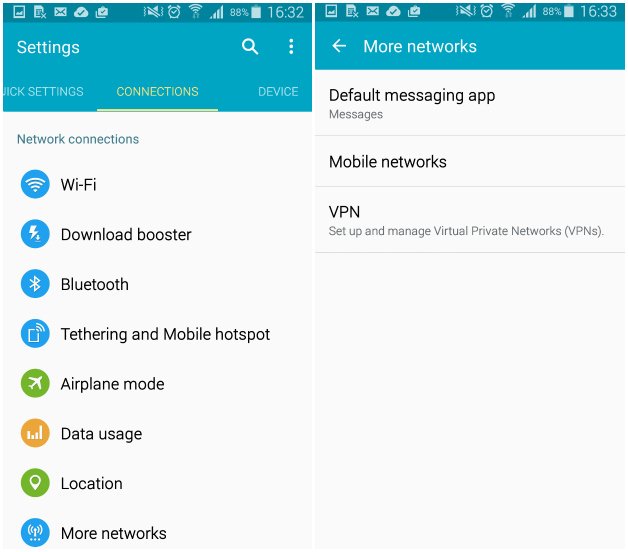
Delete the proxy you have installed by going to Settings and selecting Wireless and Networks (or More networks), then selecting Mobile Network.
Select APN (Access Point Name), then select Clear Proxy .
You can restore the proxy later.
Solution 3:
Another solution is to delete the entire search history on Play Store by selecting Settings and selecting Clear search history .
Solution 4:
Create a new Google account for use on Play Store.
Access Google Play Store then select Menu button. Select A ccount then select New Gmail account , then proceed to reinstall the application and finish.
8. Error 492
Cause: failed to download because of cache dalvik.
Remedy: go to settings , select apps , drag to all , scroll down to google services , select clear data and then force stop . Do the same with google play store app.
If you still cannot download, try another method: {only apply if you have rooted the device} to custom recovery mode , or data wipe / factory reset ( if you do that, you will delete the data, remember to backup ).
9. Error 927
Cause: failed to download because the app is being updated.
Solution 1:
Wait for the app / game update process to complete, and reload later.
Solution 2:
Go to Settings => Apps => Google Play , then find and click Clear cache and Clear data .
Solution 3:
Go to Settings => Apps => Google Play , find and click Force stop.
Solution 4:
Go to Settings => Apps => Google Play , find and click Uninstall updates .
Solution 5:
Navigate to Settings => Accounts => Google => delete Gmail account. Use another Gmail account to login. Then force the application to stop, clear the cache and data, finally add your Gmail account again.
Solution 6:
Sometimes in some cases insufficient memory capacity may cause 927 error. In this case you can restart your device to close all running background applications to free memory storage.
10. Error 101
Cause: I ca n't download the app because I installed too many apps.
Remedies: remove some apps, or use less apps ( redundant).
11. Error 481
Cause: Google account failed.
Remedy: remove the old account, use another account (or new registration).
12. Error 911
Remedy: many ways
- Delete google play store data
- If you are connected to Wifi and logged in using the web, the page may have expired, please login again, open google play store and update.
- Switch to another Wifi network then update
- If you use the updated Wifi network, try using 3G network (remember to turn off Wifi).
13. Error 919
Cause: ca n't install any app.
Remedy: change the settings in the app.
14. Error 920

How to fix:
- Turn off - open Wifi and try installing or updating the app
- Delete your Google account, restart your phone, re-enter your google account and try to install or update the app, otherwise try using another google account
- Delete the cache as well as the data of google play store, remove google play store updates, restart the phone, then open google play store and install the app
15. Error 941
Cause: error appears when updating.
Remedy: delete cache and data of google play store as well as download manager.
16. 504 errors
How to fix:
- Clear cache and data of google play store as well as google service framework
- Remove Gmail account, restart and re-add Google account
17. Error 495
How to fix:
- Clear cache and data of google play store as well as google service framework
- Remove Gmail account, restart and re-add Google account
18. Rh01 error
Cause: error when retrieving information from server.
How to fix:
- Clear cache and data of google play store as well as google service framework
- Remove Gmail account, restart and re-add Google account
19. Error rpc: s-5: aec-0
Cause: error when retrieving information from server.
Remedy: Delete cache and data of google play store, google service framework and download ( download manager ).
20. Error -24
Cause: installing the app may not be unclear for the reason (or being on kitkat).
How to fix:
- Use the file manager ( rooted ) to access / data / data
- Find the name of the application you want to install
- Delete the folder with that name
- Try reinstalling the app earlier
21. Rpc error: aec: 0]
Remedy: remove google account as well as synce accounts, delete playstore data, restart.
22. Error RPC: S-3
Cause: error when retrieving information from server.
Solution 1:
Remove your Google account, restart it, then log in to that Google account again, or use another Google account.
Solution 2:
Go to Settings => Apps => Google Play , find and click the Clear Cache and Clear Data option .
Solution 3:
Restart your Android device.
23. Google Play Store Error Error DF-BPA-09 'Error Processing Purchase
Google Error Play Error Processing Purchase DF-BPA-09 occurs when a user tries to download the application to the device.
How to fix:
On your device access Settings (settings).
Click the App or Applications Manager (depending on your device).
Swipe to column All (all).
Scroll down until you see the Google Services Framework .
Finally select Clear data then select OK.
24. Error 194
This error occurs when you try to download a game or application on Google Play Store.
How to fix:
The best way to fix this error is to delete cache data on Google Play Services and Google Play Store:
Go to Settings => Apps or Application Manager .
Scroll through All (all) then scroll down to find the Google Play Store app.
Next click Clear data .
Take the same steps but replace Google Play Store with Google Play Services.
Finally try downloading the game or app you want to download.
25. Error code 505
This error occurs when two or more applications have the same permissions
How to fix:
To fix this, you must find which application has permission to overlap with the permission for the application you are downloading, then remove the application.
To do this you can find the APK file that you are trying to download the device and install, then try to restore the application using Lucky Patcher.
Lucky Patcher will display a list of conflicting applications. That's the application you need to uninstall.
26. Error Package File Invalid
This error occurs when Play Store fails.
How to fix:
Solution 1:
Go to Setting => Apps => All then select the applications that caused the error, then select Clear cache and Clear data .
Then visit Google Play Store again.
Solution 2:
Install the application via the Goolge Play Store website.
Solution 3:
Turn off Wifi, use mobile data to download or update (update) the application.
Solution 4:
Go to Settings => Apps => All => Google Play Store and select Clear cache and Clear data . Implement the same Google Services Framework.
Solution 5:
Delete your Google account, then restart the device and then proceed to add your Google account again.
27. Error 961
This error occurs when downloading and installing Android apps from Play Store.
How to fix:
On your device go to Settings select Applications then swipe left to view all applications.
Scroll down to find and select Google Play. Here select Clear cache .
If the problem persists, follow the same steps and select Clear data .
28. Error -18
Before getting into work:
Power off your device before removing the memory card.
The Android operating system creates a file called smdl2tmp1.asec. This is the cause of the -18 error.
You can delete smdl2tmp1.asec file, but Android can recreate smdl2tmp1.asec.
Error -18 occurs when smdl2tmp1.ase file is corrupted.
How to fix:
Step 1:
Remove the memory card in your device, then insert it into the card filter on the computer.
Without a laptop or card filter, you can plug the device directly into the computer.
Step 2:
Find smdl2tmp1.asec by link:
/sdcard/.android_secure/smdl2tmp1.asec
Then delete smdl2tmp1.asec.
Step 3:
Download the app on Google Play Store to your Android device.
29. No connection error (no connection) on Google Play Store
To fix No connection error on Google Play Store, you can apply one of the solutions below;
Solution 1:
Go to Settings => Apps => All => Google Play Store , click the Force Stop button, then click Clear Cache and Clear Data .
Solution 2:
Sometimes the cause of the error No connection may be because you changed your Gmail password but forgot to change the new password on Google Play Store. Then you just need to add the password that you just changed.
Solution 3:
Check if the date and time settings on your device are correct.
Solution 4:
Perform factory data reset. To do this, first backup your entire data because the factory data reset process will erase all your data, personal settings and 3rd applications.
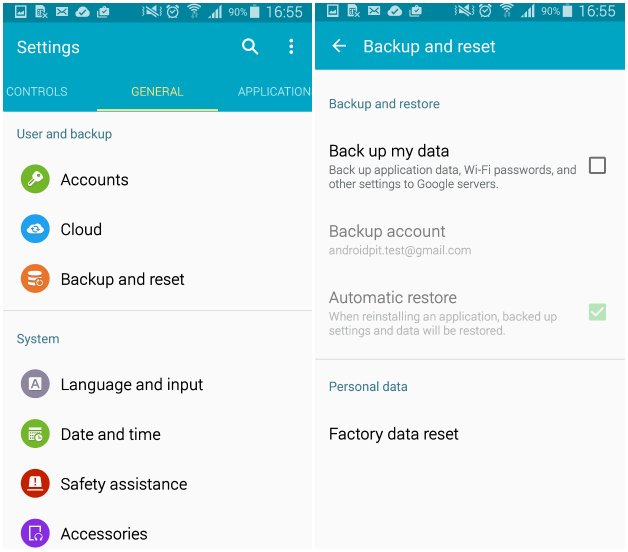
Go to Settings => Backup & Reset , find and click Factory data reset .
30. Error authentication
Like other errors on Google Play, to fix Authentication errors on Google Play, you can apply some solutions below:
Solution 1:
Go to Settings => Account => Google => Delete your Google account. Then proceed to restart your Android device and add your Google account again.
Solution 2:
Go to Settings => Apps => All => Google Play Store , find and click Clear Cache and Clear Data.
Solution 3:
Uninstall Google Play updates. To do this, go to Settings => Apps => All => Google Play Store , then find and click Unistall updates . Next go to http://www.apkmirror.com/ to download the latest version of the application and install it.
31. Google Play Store error does not work
If Google Play Store is not working properly, the cascshm crashes, or the app cannot be downloaded ., you can apply some of the solutions below to fix the error:
Solution 1:
Clear the Google Play cache.Go to Settings => Apps => Google Play , find and click Clear Cache.
Solution 2:
Delete Google Play data.Go to Settings => Apps => Google Pla y, find and click Clear Data.
Solution 3:
Clear cache and Google Play Services data.
Solution 4:
Go to Settings => Apps => Google Play Store , find and click Uninstall updates . Next go to http://www.apkmirror.com/ to download the previous version of Google Play to your device and install it.
Solution 5:
Go to Settings => Accounts , then select Google under Manage accounts. Select your account, then click the 3 dot icon to open the Menu, then click Remove on the Menu. If you have more than one Google account, then you will have to delete all of these accounts.
Once completed, go to Settings => Accounts => Add Account , select Google and add your account again.
Solution 6:
Perform Factory data reset. First perform backup of your data, then go to Settings => Backup & Reset , select Factory data reset and confirm the process.
32. Fix "Download unsuccessful" error on Google Play Store
There are many ways to fix unsuccessful Download errors on Google Play Store, here are some ways you can apply to fix errors:
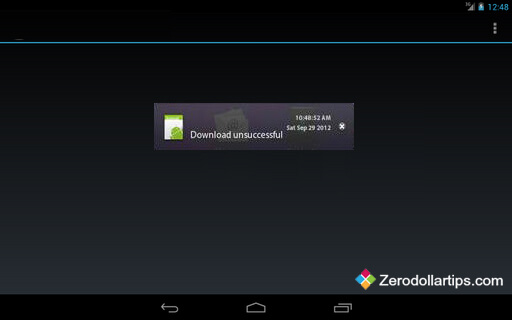
32.1. Restart the Android device
- First unlock your Android device screen.
- Next press and hold the Power button until the menu appears.
- From this menu, select the Power off option and wait until your Android device is completely turned off.
- After the Android device is turned off, wait about 10 seconds.
- Finally press and hold the Power button to open your Android device.
- Check if the unsuccessful Download error on Google Play Store has been fixed?
32.2. Clear the cache of your Android device
If you apply the above method and still not fix the unsuccessful Download error on Google Play Store, you can apply the solution is to clear the Android device cache.
- First open the Settings application, then click on Applications (or Apps).
- Next, click Manage Applications and click the All tab.
- Scroll down to find and click Google Play Store.
- Select the Clear cache option to clear the cache on your Android device.
- Next go back and open Download Manager. On some devices, this option is Downloads.
- Select Clear data .
- After clearing cache data, you can also delete additional Google Services Framework, Google Apps, Google Hangouts and Checking Service data.
- Has the last unsuccessful Download error check been fixed?
33. Error 963
The cause of the error:
The cause of error 963 on Google Play Store may be due to:
- Some issues about cache Google Play Store.
- An error may be caused by an SD card on your mobile device.
- If you have updated to the latest version of Google Play Store, during the download or update application from Google Play Store, you will likely encounter error 963.
Solutions:
33.1. Clear the cache of Google Play Store
To fix 963, the first solution you can think of first is to clear the application cache. To do this, follow the steps below:
Step 1:
Visit Settings => Apps (or Applications) => select the All option to see a list of all applications installed on your device.
Step 2:
Next select Google Play Store from the list of applications and then click Clear Cache and Clear Data.

Step 3:
Alternatively, you can select the application with error 963 to clear the data and application cache to fix the error.
After the cache and data has been cleaned up, you can try downloading and reinstalling the application you want to install again.
33.2. Unmount SD Card
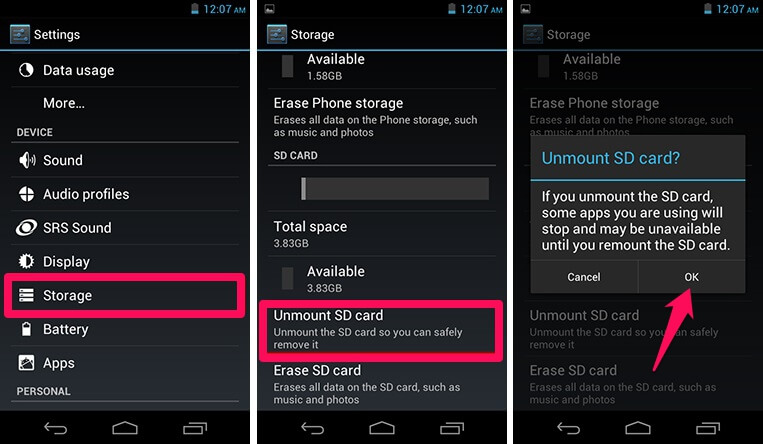
If the error 'App cannot be downloaded due to error. (963) ' still exists, you can apply Unmount SD Card solution to fix the error.
Step 1:
To Unmount SD Card on your Android device, first open the Settings => Storage application . Here you select the Unmount SD Card option and click OK to confirm.
Step 2:
Try reloading or updating the application you want to download or update again.
Step 3:
If you can download or update the app successfully, you can Remount SD card on your Android device by going to Settings => Storage => Mount SD card .
If the application you installed on the SD card has problems, you can move the application to the device's internal memory by going to Settings => Apps => All => Select the application you want to move and select Hãy chuyển vào bộ lưu trữ.
33.3. Uninstall the Google Play Store Updates
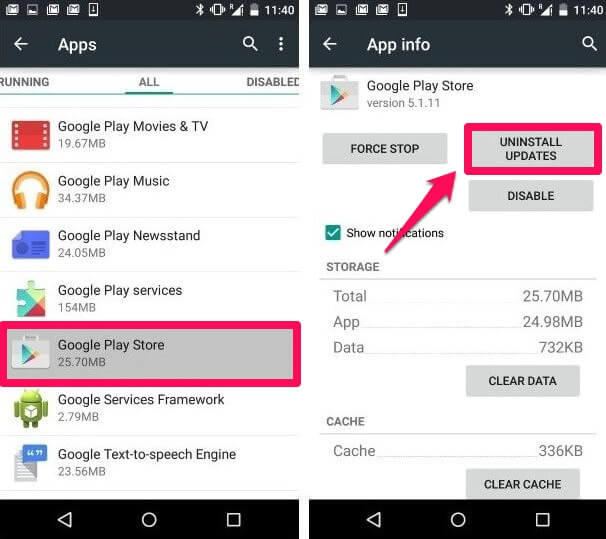
Suppose that if you have applied the above two solutions and still cannot fix the 963 error, then the last solution you can apply to fix the error is to uninstall the Google Play Store Updates.
To uninstall Google Play Store Updates, go to Settings => Apps => Google Play Store => Uninstall Updates .
After uninstalling Google Play Store Updates, you can reload or update the application.
34. Error 505
While downloading or updating an application on the Google Play Store, some users receive an error message: Unknown error code during Application install: -'505 ' .
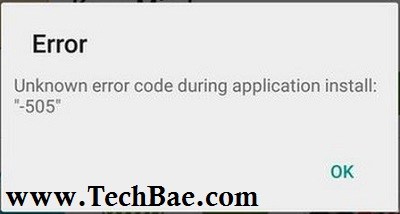
The cause of the error:
- Most of the causes of the error are because you download the application version that is too outdated.
- The application error is not compatible with the Android operating system version.
- Maybe the cause is cache conflicts or application crashes.
- In addition, the 505 error may be due to a Google account synchronization problem.
Solution to fix errors:
34.1. Restart your Android device
In most cases, the easiest way to fix the Google Play Store error is to restart your Android device. If you have restarted your Android device and still cannot fix the 505 error, you can apply some of the following solutions below.
34.2. Clear cache and data for Google Play Store, Google Service Framework and Download Manager
The cause of 505 error may be due to cache conflicts or data crashes, so you can apply the solution to clear the cache and delete data from Google Play Store, Google Framework and Download Manager to etch error recovery. To do this, follow the steps below:
- Go to Settings.
- Click the App or Application Manager.
- Next swipe to the right to open the All card .
- Scroll down to find and press Google Play Store .
- Next click Clear cache and Clear Data to clear cache and Google Play Store data.
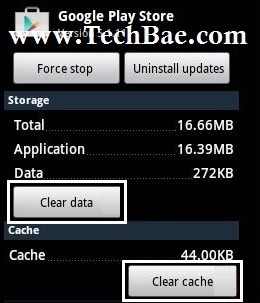
- The next step is to go back and find Google Service Framework and Download Manager, take the same steps to clear the application cache and data.
34.3. Reconfigure your Google account
Sometimes the cause of 505 error may be due to a Google account sync problem, so you can try to apply a solution that reconfigures your Google account to fix the error.
- Go to Settings.
- In Account section, click Google.
- Next click on your Google account and select Remove Account .
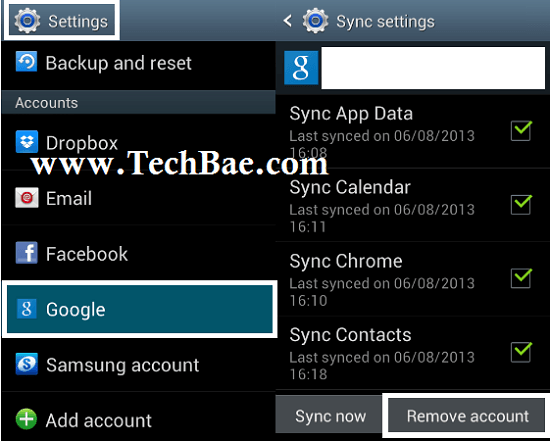
- Finally restart your Android device and add your Google account again.
34.4. Factory Reset your Android device
Note: Before proceeding to Factory Reset, you should back up important data on your device because the reset process will wipe all data and settings on your Android device.
To perform factory reset of your Android device, follow the steps below:
1. Before performing the reset process, you should perform a backup of your data.
2. On the Android device, open Settings.
3. Find and click Backup & reset.
4. In the Personal Data section, click Factory data reset.
5. Read the information on the device screen carefully and click Reset phone .
6. If setting the lock screen, you will have to enter a pattern, PIN or password.
7. If required, click Erase everything to erase all data in the device's internal memory.
8. After the process is complete, select the option to reboot your device.
35. Error 924
Causes of errors:
The cause of error 924 on Google Play Store may be due to:
Wifi or mobile data on your Android device has been turned off, so there is no network connection and Google Play Store cannot download or update the server, resulting in an error: 'App can't be updated. Đang thử lại, và nếu vấn đề đã tiếp tục, get help troubleshooting. (Error code: 924) message. '
Solution to fix errors:
35.1. Solution 1
Ensure that your Android device is connected to the Internet (Wifi or use mobile data).
Also, in some cases, slow network speed may be the cause of the error.
35.2. Clear the cache
1. Go to Settings => Applications (or Apps) => Select all applications.
2. Select Google Play Store, then click Clear Data and Clear Cache.
3. Select Download Manage r and click Clear Data and Clear Cache.
35.3. Factory Reset
The final solution to troubleshooting 924 is Factory Reset.
Note : Before proceeding to Factory Reset, you should back up important data on your device because the reset process will wipe all data and settings on your Android device.
To perform factory reset of your Android device, follow the steps below:
1. Before performing the reset process, you should perform a backup of your data.
2. On the Android device, open Settings.
3. Find and click Backup & reset.
4. In the Personal Data section, click Factory data reset.
5. Read the information on the device screen carefully and click Reset phone .
6. If setting the lock screen, you will have to enter a pattern, PIN or password.
7. If required, click Erase everything to erase all data in the device's internal memory.
8. Sau khi quá trình hoàn tất, chọn tùy chọn khởi động lại thiết bị của bạn.
36. Sửa lỗi 490
Nguyên nhân gây lỗi:
Lỗi 490 xảy ra trong quá trình bạn tải ứng dụng trên Google Play nhưng bị lỗi và không thể tải ứng dụng về được.
Trên màn hình thiết bị, bạn nhận được một số thông báo lỗi như hình dưới đây:
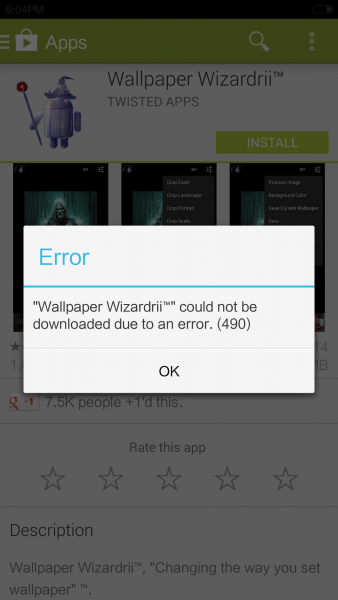
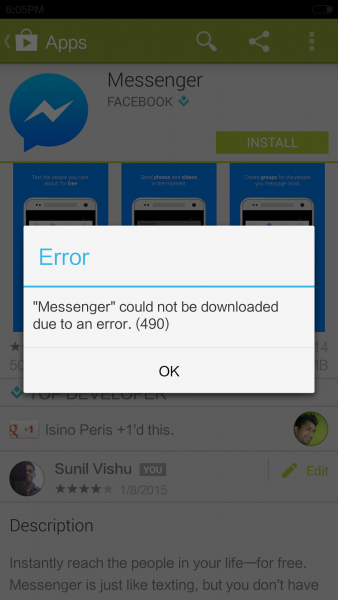
Nguyên nhân gây ra lỗi có thể là do kết nối mạng Internet bị sự cố gì đó.
Giải pháp khắc phục lỗi:
Để khắc phục lỗi này bạn có thể áp dụng một số giải pháp dưới đây:
- Cần đảm bảo rằng thiết bị của bạn kết nối với mạng Internet ổn định. Lời khuyên cho bạn là nên sử dụng kết nối mạng Internet khác, không phải kết nối mạng mà bạn đã kết nối từ trước.
- Nếu vẫn còn xảy ra lỗi, bạn truy cập Settings => Applications => All tab , tìm kiếm và nhấn chọn ứng dụng Google Play sau đó nhấn chọn tiếp Clear cache và Clear data .
- Ngoài ra bạn cũng có thể nhấn chọn Uninstall Updates rồi sau đó thử tải lại ứng dụng xem còn lỗi hay không.
37. Lỗi 907 - App could not be downloaded

Giải pháp khắc phục:
37.1. Unmount thẻ SD card trước khi cài đặt ứng dụng
Giải pháp này là một trong những giải pháp hiệu quả nhất để khắc phục lỗi 907 trên Google Play Store.
1. Đầu tiên truy cập Settings => Storage => Cuộn xuống tìm và chọn Unmount SD Card.
2. Mở Google Play Store, tải hoặc update ứng dụng hoặc game bị lỗi 907.
3. Sau khi tải và cài đặt ứng dụng, game thành công, quay trở lại Settings => Storage => Tìm và nhấn chọn Mount SD card.
4. Nếu vẫn xảy ra lỗi, bạn hãy thử tháo thẻ SD card ra khỏi thiết bị Android của mình trước khi cài đặt ứng dụng.
37.2. Xóa bộ nhớ cache và dữ liệu
1. Vào Settings => Apps => All => Cuộn xuống tìm và chọn Google Play Store . Tiếp theo nhấn chọn Clear Cache và Clear Data.
2. Tiếp theo vào Settings => Apps => All => Cuộn xuống tìm và chọn Google Play Services . Tìm và nhấn chọn Clear Cache và Clear Data.
37.3. Gỡ bỏ cài đặt Google Play Updates
Kiểm tra xem phiên bản Google Play Store trên thiết bị Android của bạn đã là phiên bản mới nhất hay chưa. Để làm được điều này, bạn mở Google Play, nhấn chọn Menu (góc trên cùng bên trái) hoặc vuốt sang trái để mở Menu. Tiếp theo chọn Settings, cuộn xuống tìm phiên bản Google Play. Nếu phiên bản Google Play của bạn là 5.5. hoặc cao hơn, thì đó là các phiên bản mới. Nếu Google Play chưa được update, bạn sẽ phải chờ ứng dụng tự động update.
Tiếp theo tải và cài đặt lại ứng dụng, game bị lỗi 907.
Trường hợp nếu lỗi vẫn còn, bạn thực hiện theo các bước dưới đây để trở lại ứng dụng Google Play "gốc":
- Vào Settings => Apps => All.
- Cuộn xuống tìm và nhấn chọn Google Play.
- Nhấn chọn Uninstall Updates.
- Cuối cùng thử tải lại game hoặc ứng dụng xem còn lỗi hay không.
37.4. Di chuyển ứng dụng từ thẻ nhớ SD sang bộ nhớ thiết bị
1. Vào Settings => Apps => All.
2. Cuộn xuống tìm và chọn ứng dụng hoặc game bị lỗi trong quá trình update.
3. Chọn "Move to internal storage".
4. Mở Google Play Store, tải và update ứng dụng.
5. Sau khi cài đặt thành công ứng dụng hoặc game, bạn có thể di chuyển ứng dụng vào thẻ SD card.
Refer to some of the following articles:
-
Trick to recover lost data on Android device
-
Instructions for using USB Flash drive with Android device
-
Use Google to search for lost Android phones
Good luck!
You should read it
- ★ Summary of a way to fix Play Store error: 'Connection Timed Out' during the process of downloading and installing the application
- ★ Decode all errors that appear on Google Play and how to fix them (Part 2)
- ★ The simple way to fix Google Play Store errors often encountered
- ★ How to download applications on Google Play Store?
- ★ Some common error codes on CH Play and how to fix them