Table of Contents
This guide provides a practical overview of Google play error codes and fixes with clear explanations and useful details. It focuses on the information users are most likely to need.
In the article below, Network Administrator will introduce you some solutions to fix these errors on Google Play Store.
1. Error of RPC S-7 AEC-7

There are many causes of the RPC S-7 AEC-7 error on Google Play Store. The reason may be due to the process of downloading any application on Google Play Store and you have some problems that cause the app to be loaded.
To fix the error you can apply some solutions below:
1.1. Clear cache and data
The first solution and also the traditional solution to fix any errors on Google Play Store is to clear the cache and data on Google Play Store.
To do this thing:
- Access Settings (settings) => Apps (apps).
- Find and click Google Play Store .
- click Clear Cache And Clear Data .
- Perform the same steps with Google Play Services and Framework.
- Finally restart your Android device and check if the RPC S-7 AEC-7 error is still there.
1.2. Add a Google account
If the above solution does not fix the error, you can delete the existing Google account, then then re-add the Google account to see if the error is still there.
- Open the Settings App (settings) => Accounts (account) => Google .
- Delete your Google account.
- Clear cache and data (do the same as above).
- Next, add your Google account and check if the error is still there.
1.3. Uninstall the Play Store Update
Sometimes in some cases after the update (update) Google Play Store will have an incompatibility error with the device, or some other error, and this may be the cause of the RPC S-7 AEC- 7. Therefore, to fix the error, the wise solution for you is to uninstall the Google Play Store Update.
- Open the Settings => Apps => Google Play Store app .
- Find and click Uninstall Updates .
Finally check if the error is still there.
1.4. Reset Android device
If the error still occurs when you install any application, then you can reset your Android device to fix the error. If you are a Blue Stack user, you can update (update) the latest version or reinstall the app.
In many cases resetting the Android device will fix many serious errors.
1.5. Use alternative applications
Assuming that all of the above solutions have been applied and still fail to fix the error, the final solution for you is to install and use alternative applications.
- You can download the APK file of the app by searching on Google, downloading and installing. Before doing so, open the Settings => Security application And check Unknown Sources .
Tips for you are not background download apk from unknown sites or untrustworthy sites.
- Also you can download and install Android application directly from your computer to your Android device.
2. Error 'Check Your Connection and Try Again' on Google Play Store
Recently, many Android users reflect that in the process of accessing Google Play Store to download the app to the computer and install, on the screen they receive an error message: 'Check your connection and try again' . Although some solutions have been applied, the error has not been fixed.
To fix this error you can refer to 7 simple ways below:

To fix the 'Check your connection and try again' Error on the Google Play Store, you can apply some of the following solutions:
2. 1. Check the Wi-Fi connection
To fix the ' Check your connection and try again ' error on Google Play Store, the first solution for you is to Check whether the Internet connection Is stable or not. If your network connection is too slow or restricting access to the Internet will cause some errors, including the error ' Check your connection and try again '.
Therefore you should make sure that the Internet connection on your Android device is stable so that no errors occur.
2. 2. Check the setting date and time, access location
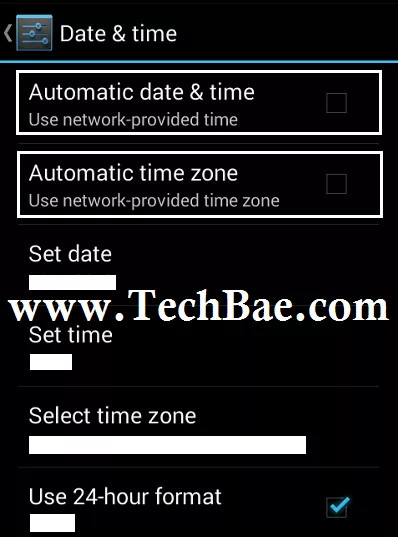
If your Android device sets the wrong date and time, one thing is sure that Google Play Store will block access on all connections. Therefore make sure the date and time on your Android device is set automatically. To do this, follow the steps below:
- Access Settings (settings).
- On the Settings window, find and click the Date and Time option .
- Here you select the option Automatic Date & Time And Automatic Time Zone .
- Next go back to the Settings window, find and click Location => Mode .
- Here you select High Accuracy or Battery saving mode .
- Finally check the 'Check your connection and try again ' error on the Google Play Store.
2.3. Check Proxy settings
To check the Proxy settings, follow the steps below:
- AccessSettings .
- Next find and click theWi-Fi Settings Option.
- Click the 3 dash line icon on the left of the Android device screen, then click theAdvanced Settings Option.
- Make sure Proxy Settings is set toNone .
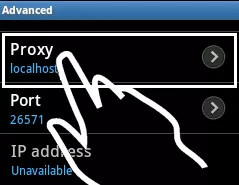
Finally check the ' Check your connection and try again ' error on the Google Play Store.
2.4. Delete the etc / hosts file (only applicable for rooted Android devices)
Note:
You can only apply this solution if your Android device is rooted.
To delete the etc / hosts file, follow the steps below:
- First restart your rooted Android device.
- Next use the Root Explorer file manager or File Manager, such as ES File Explorer to navigate to the Etc / hosts File and delete the file.
- Finally open Google Play Store and check the error ' Check your connection and try again '.
2.5. Reconfigure your Google account
In some cases, syncing your Google account may be the cause of the error. So to fix the error you can reconfigure the Google account you use to sign in on the Google Play store.
- Open the Settings App.
- Next find and click Accout (Accounts and sync), then click Google .
- Here find the synced Google account and delete it.
- Restart your Android device and reconfigure with another Google account.

Finally open Google Play Store and check the error 'Check your connection and try again'.
2.6. Change DNS Server
Make sure you are using a Wi-Fi connection.
- Open the Settings App (settings) => Wi-Fi .
- Click the Wi-Fi you connected, then select Modify network .
- Activate the Advanced options Option.
- Change IP settings to Static .
- Change DNS 1 to 8.8.8.8 .
- Change DNS 2 to 8.8.4.4 .
- Click Save .
- Open the Settings App, select Apps (or Applications).
- Switch to the All tab , find and clear the cache of Google Play Store, Google Play Services , and Google Services Framework applications .
- Finally open Google Play Store and check if the error is still there.
2.7. Perform Factory Reset your Android device
The final solution to fix the 'Check your connection and try again' error on Google Play Store is to perform Factory Reset on your Android device.
One point to note is that when Factory Reset is performed, All data on your Android device will be erased , so before performing the process it is recommended to back up your important data.
Follow the steps below to Factory Reset your Android device:
- Open theSettings App.
- Find and click theBackup and Reset option .
- Next find and click theFactory Data Reset option .
- A message appears on the screen. Your task is to clickReset phone .
- If you set a password or pattern, enter your password or pattern and click theErase everything Option.
- Wait for your Android device to boot, then reconfigure your Google account and open Google Play store to check if the error is still there.
3. Google Play Store error displays a blank screen
3.1. Clear cache, data and use (force stop)
Cache and corrupted data can cause many errors on the Android device. And probably this is also the cause of the screen error Google Play Store blank.
To fix the error you should clear the cache, data and force (force stop).
- Open the Settings => Apps => Google Play Store app.
- Find and click Force Stop,Clear Cache And Clear Data.
- Do the same with Google Play Framework and Google Play Services.
Finally re-open Google Play Store and check if the error is still there.
3.2. Uninstall the Play Store Update
In many cases Google Play Store Update may be the cause of a blank screen error of Google Play Store.
To fix the error, you should uninstall Google Play Store Update.
- Open the Settings => Apps => Google Play Store app.
- Find and click Uninstall Updates .
Finally check if the error is still there.
3.3. Check Software Updates on Android device
- Open the Settings App, find and click About .
- Click Software Updates.
- You should now see any updates (updates) if available.
- After the update is complete, check whether the error on the Google Play Store or not.
3.4. Disable or uninstall any security software or acceleration software
Sometimes security software or system acceleration software can cause errors on your Android device. The reason is because these applications run in the background and will automatically kill as many operations as needed on the device. If your Android device installs the program, then this application should temporarily disable or completely uninstall the app to fix the blank Google Play Store screen error.
3.5. Disable Proxy and VPN
If your Android device activates VPN or Proxy, you should disable VPN and Proxy, then check if the Play Store error is still there.
4. Error 103
Error 103 occurs because the network connection has a problem or the cache is faulty. During the installation or updating of any application, users will receive the error message 'App could not be downloaded due to an error (103) "on the screen.
To fix this error you can apply some solutions below:
4.1. Restart the network connection
One of the main causes of 103 error on Google Play Store may be due to a network connection problem. So if an error occurs, the first solution you can think of is restarting the network. If using Wi-Fi, please turn off Wi-Fi then then connect again.
If using mobile data, turn off mobile data then reconnect and check if the 103 error is still present.
4.2. Restart the Android device
Another simple solution to fix error 103 during the download process on Google Play Store is to restart your Android device.
4.3. Clear cache and data of Google Play Store, Google Services Framework and Download Manager
- Open the Settings Application .
- Next find and click Apps or Application Manager .
- Next swipe right to open the All tab.
- Here you scroll down to find and click the Google Play Store application.
- Now you will see 3 options: Force Stop , Clear Cache And Clear Data . Your task is to click each option.
- Next go back and find Google Service Framework And Download Manager. Follow the same steps as on Google Play Store.
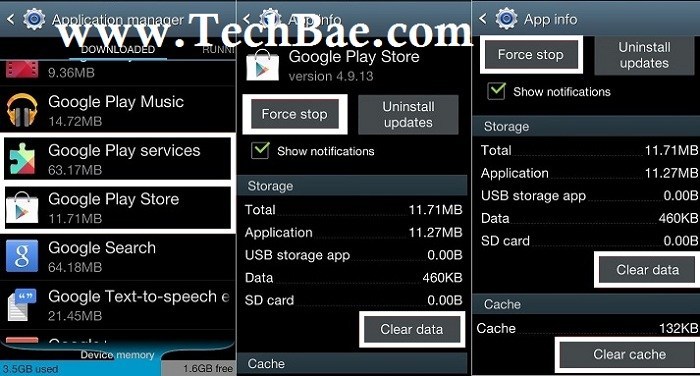
Finally check if the 103 error remains.
4.4. Reconfigure your Google account
The final solution to fix 103 error on Google Play Store is to reconfigure your Google account.
- Open the Settings Application.
- Next under Accounts , find and click Google.
- Click here to select and delete your current Google account.
- Restart your Android device and then add your Google account again.
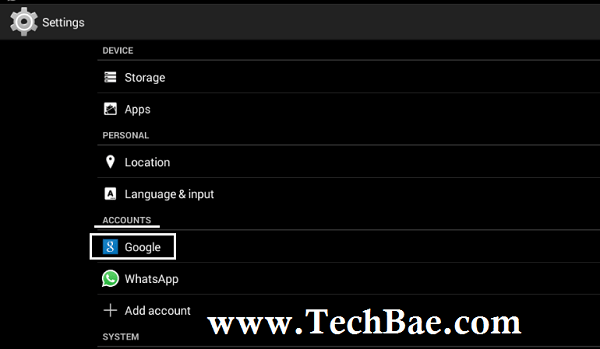
- Finally open Google Play Store and reinstall the app you want.
5. Error 923
Causes of errors
Error 923 usually appears when users tries to update (update) or install the app from Google Play Store. If this error appears on the screen, an error message appears: "App cannot be downloaded due to an error (923)" .
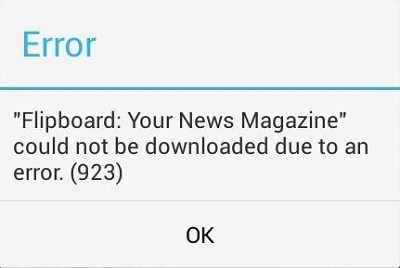
Some causes of error 923:
- Error cache.
- Google Play Store application is too old.
- Sync account error.
Solution to fix errors
5.1.Restart the Android device
In most cases if any error occurs on an Android device or on other devices, the first solution that users often think of is to restart the device. If you encounter error 923 on Google Play Store, you can try to apply the solution is to restart your Android device and check if error 923 still appears.
5.2.Clear cache and data for Google Play Store, Google Service Framework and Download Manager
This is the most useful solution to fix errors on Google Play Store. To clear cache and data for Google Play Store, Google Service Framework and Download Manager, follow the steps below:
- Open the Settings Application.
- Find and click Apps or Application Manager (depending on your device).
- Next swipe right until it opens to the All tab.
- Scroll down to find and select the Google Play Store application.
- Here you will see two buttons are Clear Cache And Clear Data . Click the 2 buttons to clear the cache and delete the Google Play Store data.
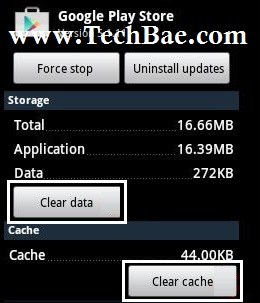
- Next go back to All tab And follow the same steps with Google Service Framework And Download Manager.
5.3.Update (update) Google Play Store application
One of the causes of 923 error is probably because the Google Play Store application on your Android device is too old. So try updating to the latest version of Google Play Store and check if the 923 error is still there.
5.4.Reconfigure your Google account
The final solution to fix 923 error on Google Play Store is to reconfigure your Google account.
- Open the Settings Application .
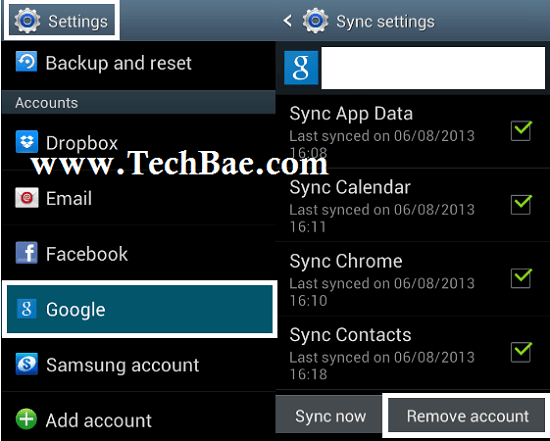
- Next on the Accounts Section, find and click Google.
- Click here to select your Google account and then select Remove Account.
- Finally restart your Android device and reconfigure your Google account.
6. Error 961
Causes of errors
In the process of downloading, installing or updating the app on the Google Play Store, on the device screen, the popup window displays an error message: Unknown Error Code During Application Install: '961'.
This error can occur on any application, whether it is a paid or free application.
Solutions
6.1.Clear cache and data for Google Play Store, Google Service Framework and Download Manager
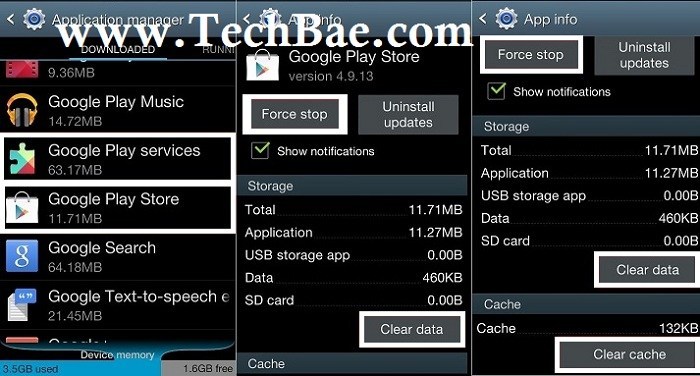
- Open the Settings Application.
- Find and click the App or Application Manager (depending on your device).
- Next swipe right until it opens to the All tab.
- Scroll down to find and select the Google Play Store application.
- Here you will see three buttons are Force Stop , Clear Cache And Clear Data . Click to select each button to clear the cache and delete the Google Play Store data.
- Next go back to All tab And follow the same steps with Google Service Framework And Download Manager.
6.2.Clear the system cache (System Cache) in Recovery Mode
With this solution, you will first have to start your Android device in Recovery Mode, then then delete the system cache. To do this thing:
- Turn off your Android device.
- Next, open the Android device by pressing and holding the Volume Up / DownButton And The Power buttonSimultaneously Until the Boot Selection Menu appears.
- Now you will use the Volume Down button To select the Recovery Mode Option.
- Next use the Volume up button To select the option that you will see the red exclamation icon in the triangle, near the Android icon.
- Press and hold the Volume Up / Down button simultaneously to open System Recovery.
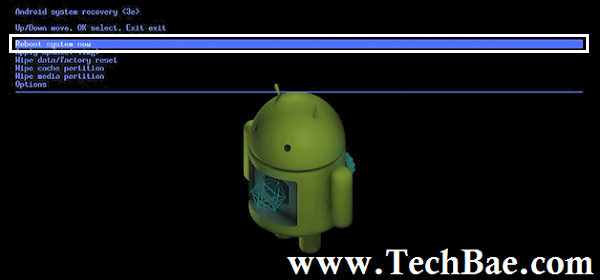
- Now use the Volume RockerButton And press The Power button To select the Wipe Cache Option.
- Use the Volume Rocker Button and press The Power button To select the Reboot System Now option .
7. Error DF-DFERH-01 while Retrieving Information from Server
Causes of errors
There are many causes of DF-DFERH-01 while Retrieving Information from Server on Google Play Store, of which the main reason is:
- Error cache on Android device.
- The Google Play Store app version is too old.
- Cache error or Google Play Store data, Google Service Framework and Download Manager.
- Google account synchronization error.
Solutions
7.1.Restart the Android device
As mentioned in solutions to fix some bugs on Google Play Store, the first solution users can apply to fix DF-DFERH-01 while Retrieving Information from Server is to restart Android device and Check if the error still occurs.
If the error still exists, you can apply the following solutions below.
7.2.Update Google Play Store application
The cause of DF-DFERH-01 Error While Retrieving Information from Server May be because your version of Google Play Store application is too "outdated". And using the old version may cause some errors, including the DF-DFERH-01 error while Retrieving Information from Server. To fix the error, you can update (update) the latest version for Google Play Store application and check if the error is still there.
7.3.Clear cache and data for Google Play Store, Google Service Framework and Download Manager
This is the most useful solution to fix errors on Google Play Store.
To clear cache and data for Google Play Store, Google Service Framework and Download Manager, follow the steps below:
- Open the Settings Application .
- Find and click Apps or Application Manager (depending on your device).
- Next swipe right until it opens to the All tab.
- Scroll down to find and select the Google Play Store application.
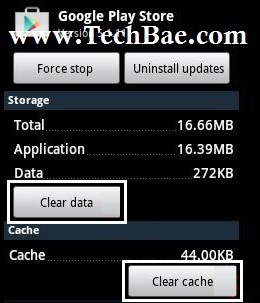
- Here you will see two buttons are Clear Cache And Clear Data . Click the 2 buttons to clear the cache and delete the Google Play Store data.
- Next go back to All tab And follow the same steps with Google Service Framework And Download Manager.
7.4.Reconfigure your Google account
One of the causes of DF-DFERH-01 error while Retrieving Information from Server on Google Play Store may be due to a Google account error. So to fix the error you can try to apply the solution is to reconfigure your Google account.
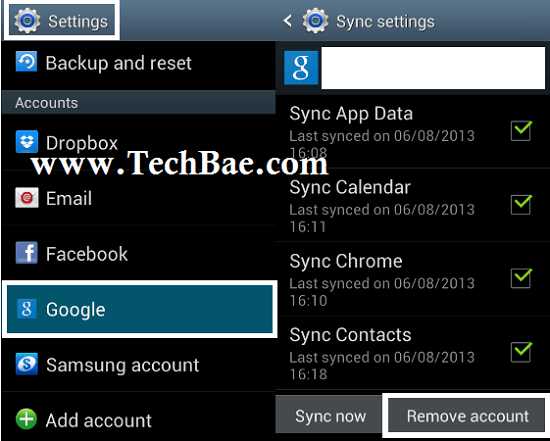
- Open the Settings Application .
- Next on the Accounts Section, find and click Google.
- Click here to select your Google account and then select Remove Account.
- Finally restart your Android device and reconfigure your Google account.
7.5.Perform Factory Reset your Android device
The final solution to fix 'DF-DFERH-01 while Retrieving Information from Server on Google Play Store is to perform Factory Reset on your Android device.
One point to note is that when Factory Reset is performed, all data on your Android device will be erased, so before performing the process it is recommended to back up your important data.
Follow the steps below to Factory Reset your Android device:
- Open the Settings Application (settings).
- Find and click the Backup and Reset option.
- Next find and click the Factory Data Reset option.
8. "Error Retrieving Information from Server RH-01" error
Solution to fix errors
9. Error "Retrieving Information from Server rpc s-7 aec-7"
Causes of errors
Solutions
Refer to some of the following articles
FAQ
What is the main benefit of Google play error codes and fixes?
The main benefit is a clearer understanding of the topic and a practical way to apply the information covered in this guide.
What should I check before using Google play error codes and fixes?
Confirm compatibility, review the required settings, protect important data, and use the latest supported version whenever possible.
What should I do if the result is different?
Repeat the steps carefully, verify permissions and version differences, and consult the product's official support documentation for changes not shown in the article.
Related Articles
 Google Play Error Codes and Fixes: Part 120 minutes read
 Google Play Error Codes and Fixes: Part 310 minutes read
 How to Fix Pending Pending Download of Apps on Google Play6 minutes read
 What to Do When Google Play Store Is Not Working?10 minutes read
 Some Common Error Codes on CH Play and How to Fix Them7 minutes read
 How to Fix 'Check Your Connection and Try Again' Error on7 minutes read
Reader Comments 0
Sign in with email or Google to join the discussion.