Customize Windows Explorer in Windows 7
Working with Windows, however often or not, means you will work with folders and files. The process of working with folders and files in Windows also means you have to work with Windows Explorer. That means you have to use Windows Explorer regularly, so why not give Windows Explorer a personal interface to it.
Table of Contents
In this article we will show you some ways to customize the look of Windows Explorer in your own way.
Working with Windows, however often or not, means you will work with folders and files. The process of working with folders and files in Windows also means you have to work with Windows Explorer. That means you have to use Windows Explorer regularly, so why not give Windows Explorer a personal interface to it. In this article we will show you some ways to customize Windows Explorer.
- Refresh the Windows 10 interface with 8 customizable tools
Learn about Windows Explorer
Windows Explorer is an application that displays the contents of hard drives and folders. You use it to navigate to all folders and files on your computer.
This feature makes Windows Explorer a file management application. In fact, Explorer has replaced the File Manager application found in Windows versions from Windows 3.0 (1990) to Windows 95. Since 1995, Windows Explorer has had a lot of adjustments, at times it was not. called Windows Explorer.
That was the time of 2001, when Windows XP was released. With XP, Microsoft decided to make Explorer more 'discoverable' and task-based. So instead of launching Windows Explorer as a separate folder, when you open the My Documents or My Music folder or My Whatever, they open Windows Explorer, although it points to private folders on the hard drive.
When you open the Windows 7 Start menu and click on My Documents, you will launch Windows Explorer that points to the My Documents folder.
With Windows 7, the name Windows Explorer is used again. You can still open the Documents folder, but you can also launch Windows Explorer separately. In fact, Windows Explorer is one of the default icons included in the new taskbar, as illustrated in Figure 1 below; Click the taskbar icon and you can open Windows Explorer. (You can also launch Explorer by opening the Start menu and selecting All Programs, Accessories, Windows Explorer).

Figure 1: Open Windows Explorer from the taskbar in Windows 7
Tip : If you right-click on the taskbar icon of Explorer, you'll see a list of most recently visited folders, click on a folder to return to that location.
When you launch Windows Explorer, it will take you to the new Library view - it is a view of 4 default Windows 7 libraries (Documents, Music, Pictures and Videos). As you can see in Figure 2, the Explorer version of Windows 7 also features a revamped navigation pane on the left, with five major sections: Favorites, Libraries, Homegroup, Computer and Network.
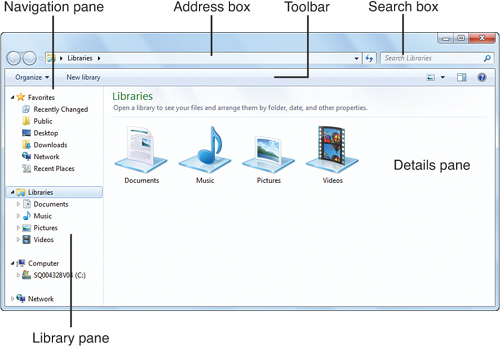
Figure 2: Welcome to Windows Explorer
The easiest way to navigate in Windows Explorer is to use the Favorites and Computer sections in the navigation pane. The Favorites section gives you direct access to your favorite folders (by default, they include Recently Changed, Public, Desktop, Downloads, Network and Recent Places, although you can customize your favorites list. This), while the Computer section allows you to access all folders and drives as well as subdirectories on your computer system. Click the arrow next to each item to expand the selection in the navigation panel; Click any item to display the device's content or folder in the details pane of the Explorer window.
The navigation and details panel are contextual toolbar. The content of the toolbar changes depending on what you choose in the navigation pane. For example, select Computer in the navigation panel when the toolbar will show you the options Organize, System Properties, Uninstall or Change a Program, Map Network Drive, and Open Control Panel; Select the Documents item, the toolbar displays the Organize, Share With, Burn and New Folder options.
One thing that doesn't change in the toolbar is the Organize button. Click this button to display the Organize menu, see the proof in Figure 3. This menu is specific to all file-related activities, such as Cut, Copy, Paste, Delete and, .

Figure 3: Organize menu of Windows Explorer
At the top of the Explorer window are two 'back' and 'forward' buttons and two boxes. The larger box is the address box, but Microsoft likes to call it breadcrumbs bar . This box shows the directory path, but you can undo it by clicking on any folder in the path; Click the arrow next to the folder, you will see the subfolders in that folder.
The second box above the Explorer window is the search box. As you guessed, you can use this box to search for files and folders in your system; Just enter the file or directory name (or part of it) and press Enter; Explorer will return you a list of items that match your search, see the illustration in Figure 4 below.
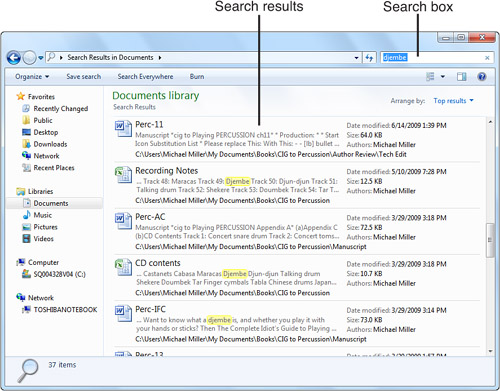
Figure 4: Search results of Windows Explorer
Display or hide other panels
There are a number of things you can customize in Windows Explorer. Let's start with the Windows Explorer window itself and other panels displayed.
By default, Windows Explorer displays navigation and detailed panels, as well as a small library panel, above the details pane that displays the current directory and library information. You can choose to display a preview panel to the right of the details pane to display the files you selected in the details pane first, as shown in Figure 5. This is quite a useful way, but it will be lost. go to navigation and browse, which may be the reason why it is turned off by default.
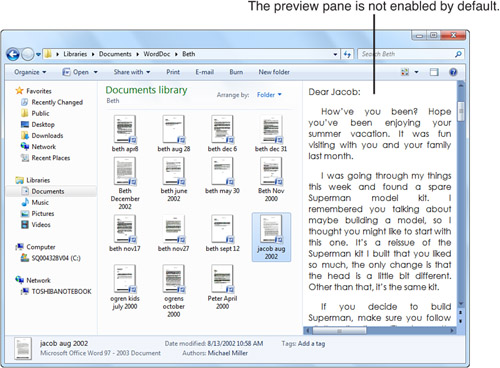
Figure 5: Explorer window with preview pane is displayed
To select which panel is displayed in the Explorer window, follow these steps:
- From within Windows Explorer, select Organize , Layout .
- Check the panel you want to display.
- Uncheck the panels you don't want to see.
Tip : You can display the preview panel by clicking the Show the Preview Pane button on the right side of the Explorer toolbar. Click this button again to hide the preview panel.
Display the menu bar of Windows Explorer
There is one more component that you can choose to display especially if you are a nostalgic person. Although Microsoft does an interesting job, put contextual activities on the Explorer toolbar, but some people still like to see an old style menu used as part of every Windows window. Although Microsoft has given up on these menus, we can show you an option if you want to.

Figure 6: Windows Explorer menu bar is not displayed in default mode
You can choose to permanently display the Windows Explorer menu bar by doing the following:
- From within Windows Explorer, select Organize , Layout .
- Check the Menu Bar option.
Tip : You can also temporarily display the menu bar at any time by pressing the Alt key on the keyboard. Pressing Alt again will hide this menu bar.
Change View mode in Windows Explorer
Do you like to see your files and folders displayed? Windows Explorer offers a lot of view options, including:
- Content , Figure 7, displays each item in a line with information about it - including the date of editing, size, author and type.

Figure 7: View by content
- Tile , Figure 8, is a grid of small icons for each item, with filename and size next to each icon.
Figure 8: View by title
-
Detail (details), Figure 9, a line listing each item with column names, edit date, type and size. An interesting thing in the detailed view is that you can categorize directory contents by columns; Just click on the column header to make the classification. You can also rearrange columns by clicking and dragging columns to a new location. You can also customize the columns displayed by right-clicking on the column header row and selecting or deselecting the file properties in the menu that appears. A very flexible view mode.
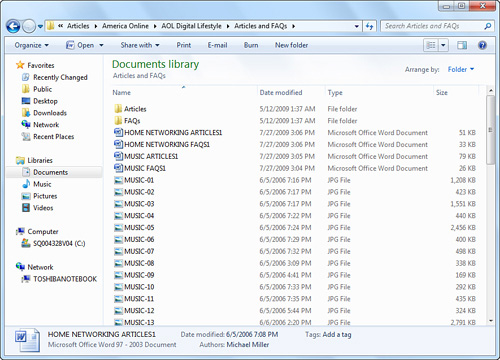
Figure 9: Detailed view
-
List (list), Figure 10, lists the contents of the directory, does not show details, only uses some necessary columns. This is the most area-saving view.
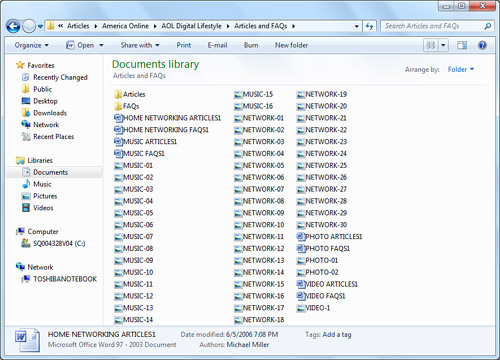
Figure 10: Viewing the file as a list
-
Icon, each file or folder will be displayed along with the icon and folder / file name, the icon is small (image 11) to large (Figure 12).

Figure 11: Viewing file with small icon
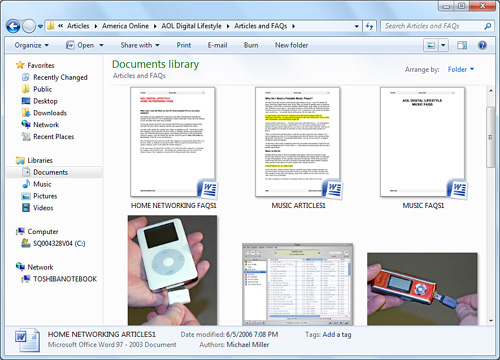
Figure 12: Viewing files with large icons
Note : In most view modes, file icons display thumbnails in the preview of the content in the file.
To switch views, simply click the Views button on the toolbar and select the mode you want, as shown in Figure 13. With view icon mode, use the slider to change the size of the icon, this size is complete. All may change so you are not limited to one or more rigid sizes.
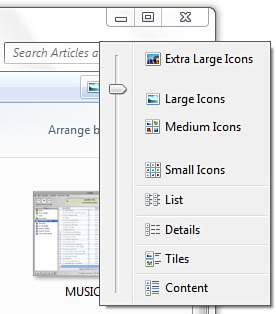
Figure 13: Change the view of Windows Explorer
Note : Displaying the view may slow down your computer's performance, especially when viewing photos (and folders containing images).
Sort and classify files and folders
Whichever mode you choose, you still have to find the best way to organize directory content - especially in folders with multiple files and subdirectories inside. But here you have a few options.
Sort content within the directory
You can arrange how folders or files within another folder are organized. By default, all content inside is sorted by directory, in this arrangement, files and folders appear as a separate item in the Explorer window. However there are a few other options here that you can choose from:
- Author - Author, content arranged by the person who created them, as shown in Figure 14; Double click on a stack to see all files in the directory created by that author.
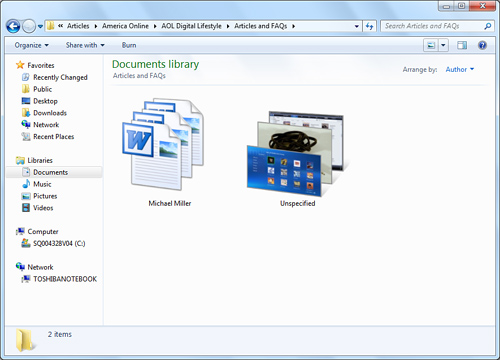
Figure 14: Sort files by author
- The date of change, the content is sorted by the date they were last changed, as shown in Figure 15.
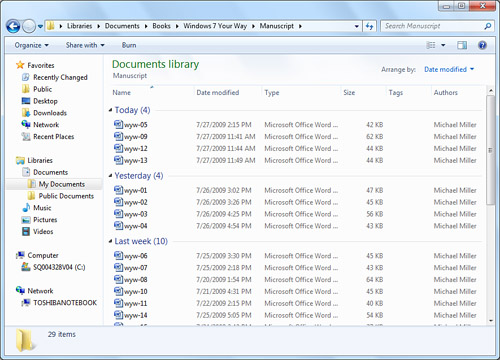
Figure 15: Sort files by the last change date
- Tag, content arranged by tags assigned to files. Since most files are not tagged by default, this option is less useful for most users.
- –Type type, where the files are sorted by file type, as shown in Figure 16; Double click on any cluster to see all file types of that type.
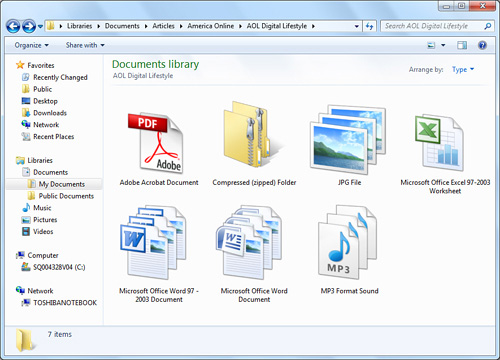
Figure 16: Sort files in style
- Name - Name, list files and folders alphabetically.
To change the way the content is organized within a certain folder, you need to make sure that the library pane is displayed; then click the Arrange By button and make your selection, as shown in Figure 17.
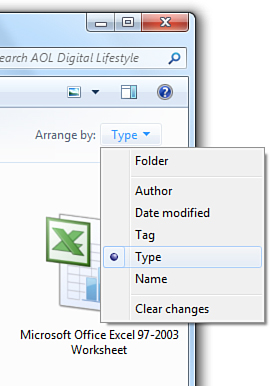
Figure 17: Sort folder contents
Categorize content within the directory
Sorting content within the directory is completely different from saving those content. You may want to categorize the directory contents by file name, file type, file size, or file date to be changed. Whether in any view you can also categorize the contents of the directory by following the steps below:
- Right-click an open area in the details pane and select Sort By .
- Choose the way you want to classify: Name, Date Modified, Type, or Size.
- Choose whether you want the content to be categorized in ascending or descending order.
Tip: To get more sorting options, select More from the menu that appears to display the Choose Details dialog box. Check the details you want to display, then click OK. You can then sort by them by repeating the steps described above; New details will be displayed in the Sort By list.
Show details
Let's go back to Details view, showing some details about your file. By default, the details shown are names, change dates, styles and sizes. However, Windows allows you to display a lot of other details, which can help you better manage your files.
To display more details in the additional column, right-click the column header row and choose one of the details listed in the menu that appears, or click More. This will display the Choose Details dialog box, shown in Figure 18. This dialog box will give you an array of details that you can display about items in this folder. The detailed product you want to display, then click OK.
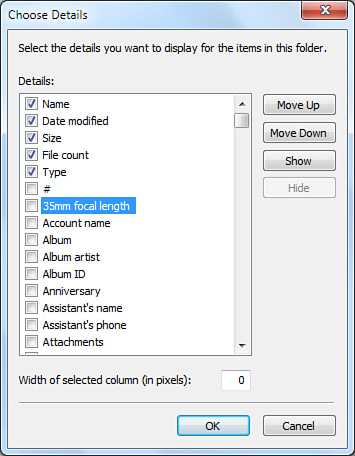
Figure 18: Displaying additional file details
Customize navigation panel
Another part of the Windows Explorer window can be personalized, which is the navigation pane. There are two things you can customize about this panel - which folders are displayed and which items are displayed in the Favorites section.
Show more folders
By default, the navigation panel will display 5 sections: Favorites, Libraries, Homegroup, Computer and Network. However, you can still display other folders such as Desktop, main user folder and Recycle Bin. To display these items, follow the steps below:
- From within Windows Explorer, select Organize, Folder and Search Options. (Another way is to open Control Panel and select Folder Options .)
- When the Folder Options dialog box appears, select the General tab, as shown in Figure 19.
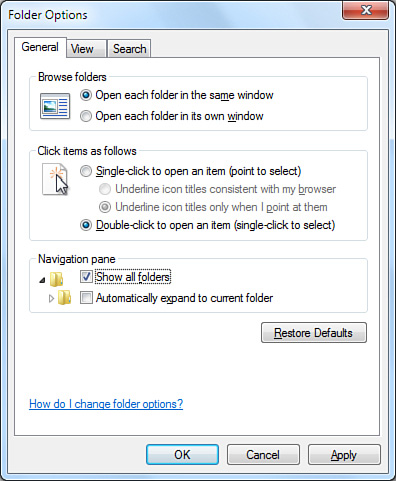
Figure 19: Adding items to the navigation panel
- In the Navigation Pane section, check the Show All Folders section .
- Click OK .
Add other items to the Favorites section
What about the Favorites section of the navigation panel, where your favorite folders are displayed? What happens when there are no favorite folders for you? What happens if you want to display more folders here?
It's easy to add items to the Favorites section. All you need to do is follow the steps below:
- From within Windows Explorer, navigate to and open the folder you want to display in the Favorites list.
- Right-click the Favorites item in the navigation panel and select Add Current Location to Favorites .
Tip : To delete a certain item from the Favorites list, right-click it and select Remove.
Add items to the New menu
You may or may not be friendly with the New menu of Windows Explorer. Only see it when right-clicking an empty area in the Explorer window; The results menu has a New option. As you can see in Figure 20, select the New option, then you have the option of creating new files with different types. This is a great way to create new documents directly from Windows Explorer quickly.
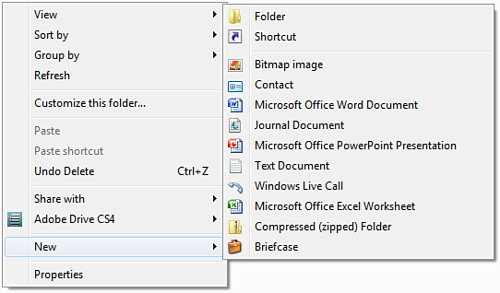
Figure 20: New menu of Windows Explorer
Many applications add items to the New menu when applications are installed. For example, Microsoft Office adds New items to its document types - Microsoft Office Word Document, Microsoft Office PowerPoint Presentation, Microsoft Office Excel Worksheet, .
You can even add multiple document types to the New menu, if you don't remember how to adjust the Windows Registry, this is how you can easily create new documents with the types that you work regularly.
To add options to the New menu, follow the steps below:
- Open the Start menu, enter regedit in the search dialog, and then press Enter.
- When the Registry Editor window appears, unlock HKEY_CLASSES_ROOT , as shown in Figure 21.

Figure 21: Use Registry Editor to add new file types to the New menu
- Right-click the key for the extension of the file you want to add to the New menu and select New , Key . Name the new key ShellNew .
- Right-click the new ShellNew subkey and select New , String Value . Name the new value NullFile .
Note: The file types shown on the New menu have a ShellNew subkey.
The next time you open Windows Explorer, when you right click and select New, you will see the option of the file type you want to add.
Tip: You can use Registry Editor to remove file types from the New menu. Just navigate to the lock for the file extension in HKEY_CLASSES_ROOT key, then right-click the ShellNew subkey and select Delete.
If you're like most other Windows users, you definitely use Windows Explorer a lot. However, how you use it depends entirely on how you configure everything. There are many configurations that can be introduced in this article so you can use Windows Explorer to display files and folders the way you want.
Was this article helpful?
Your feedback helps us improve.
Related Articles
 6 best apps to customize Windows 117 minutes read
 Is Explorer.exe a virus?4 minutes read
 How to fix Windows Explorer shows the drive twice3 minutes read
 What if Explorer crashes when opening large folders?2 minutes read
 Windows Explorer error repeatedly restarts and crashes, this is how to fix it5 minutes read
 What is Windows Explorer? How to open Windows Explorer3 minutes read
Reader Comments 0
Sign in with email or Google to join the discussion.