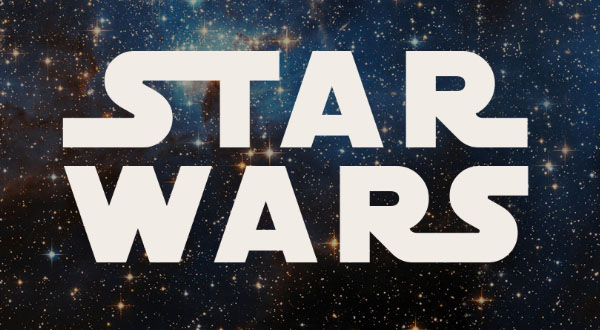
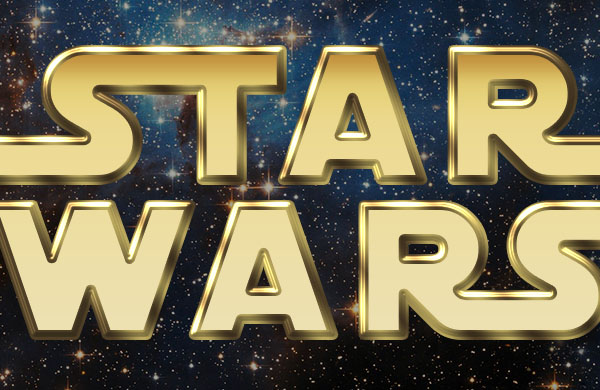
Create text effects like Star Wars movie Poster in Photoshop
In just 8 easy steps, you can create text effects similar to those in Poster in Star Wars movies in Photoshop. Please refer to the article below.
Table of Contents
If you want to create text effects like the words in Star Wars Movie Poster, make the image more vivid and sparkling. No need to get too much detail or download any other software, you can use Photoshop effects to create the desired text effect.
1. Create Background
Step 1:

Create a new Background with a length of 950 x 950 px. Then open the We own the sky image on the Background , create, edit and resize it as needed to make the Background Layer .
Step 2:

Double click the newly created image layer to apply the Color Overlay effect. Change the Blend Mode to Multiply and the Color code change to color code # a6a6a6 .
Step 3:

To darken the image a bit, click the Create new fill or adjustment layer icon at the bottom of the Panel and select Solid Color.
Step 4:
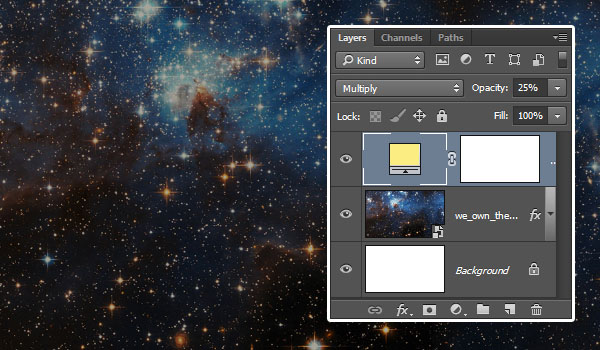
Use the color code # fced82 , then change the Layer 's Blend Mode to Multiply and the Opacity to 25%.
2. Create text
Step 1:
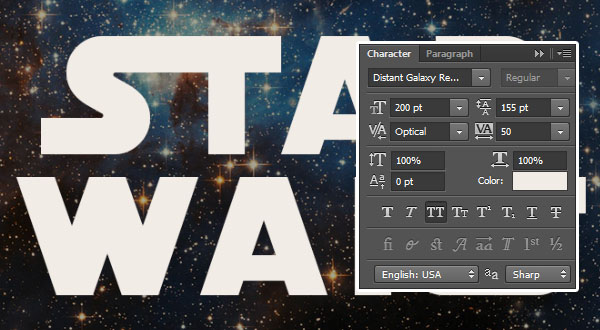
Create text using SF Distant Galaxy font. The letters S and T in the beginning and the end in capitalized text.
Open the Character Panel (Window> Character) to change some settings:
- Color code is # f2ece6
- Size is 200 pt
- Leading is 155 pt
- Setting Tracking to 50
Step 2:
Adjust the Kerning value for a few characters. Click on the section between the 2 characters and enter the value you want.
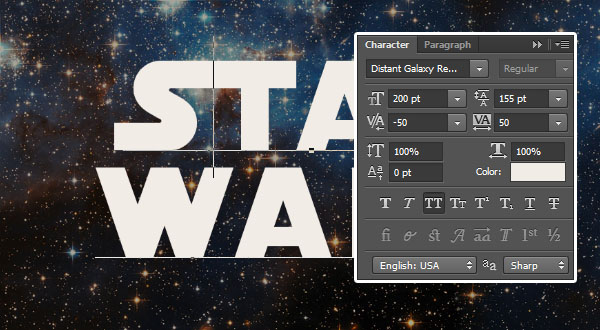
The value used in the above illustration is:
- ST : - 50
- AR (in both characters): 50
- RS : - 50
3. Adjust the text shape
Step 1:
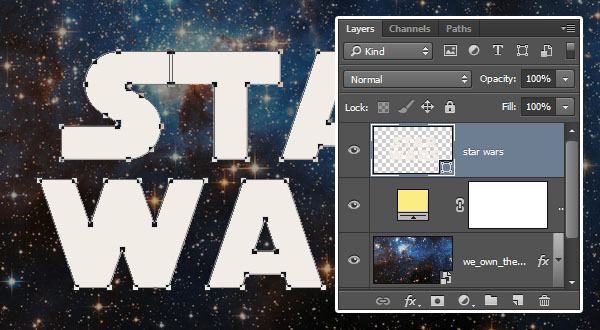
After you've created the text, go to Type and choose Convert to Shape.
Step 2:

Select the Direct Selection Tool , then hold and drag the mouse to select 2 anchor points at the end of the letter R.
Step 3:
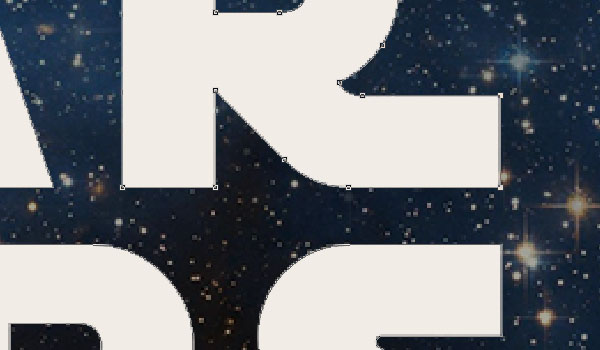
Press the right arrow key to move the points on the right until it aligns with the S at the bottom.
Step 4:
Select the left anchor point S , and press the left arrow key until it aligns with the letter W below.
Step 5:
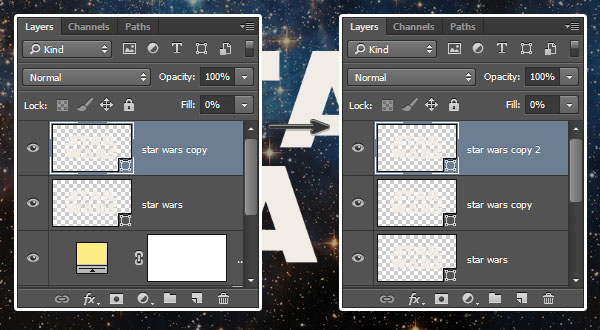
Duplicate the Shape layer , change the copy layer's Fill value to 0 and duplicate the layer again.
4. Create Style for the original Layer Shape
Double click the original Layer Shape to add the Layer Style below:
Step 1:

Select Bevel and Emboss and set:
- Style : Stroke Emboss
- Size: 3
- Gloss Contour: Gaussian - Inverse
- Check the Anti-aliased box
- Highlight Mode : Vivid Light
Step 2:
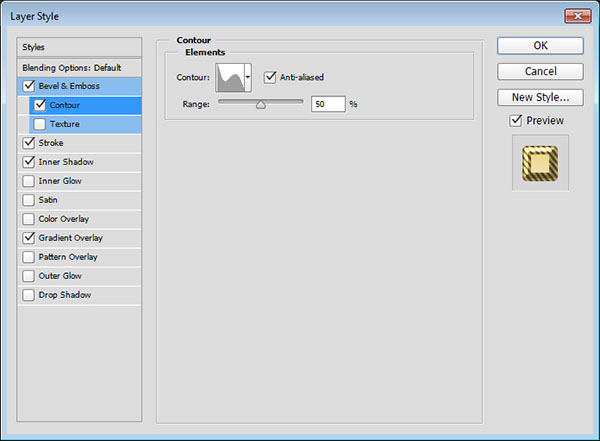
Select Contour and set:
- Contour : Rolling Slope - Descending
- Check the Anti-aliased box
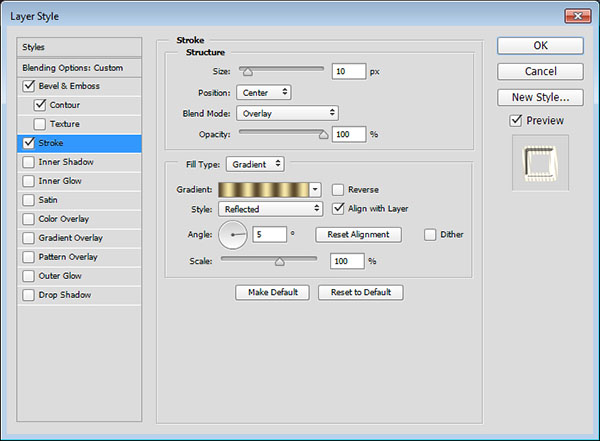
Step 3:
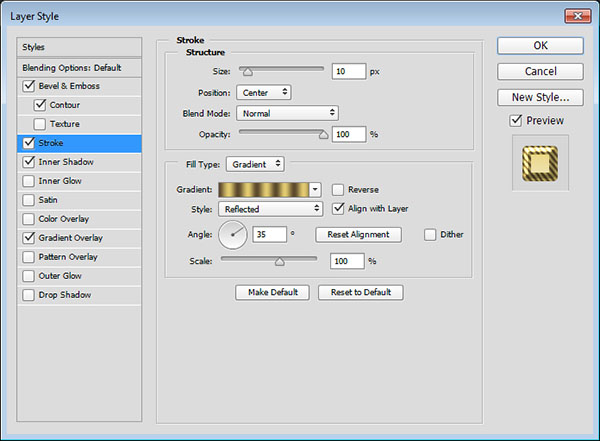
Select Stroke and set:
- Size : 10
- Position : Center
- Fill Type: Gradient
- Style : Reflected
- Angle : 35
- Use Golden Dial Top X11 to fill the Gradient , then click on the Gradient box to edit.
Double click on each light interval Color Stop , and use the color code # e1ca71 to replace the code # f5e5a6 .
Step 4:
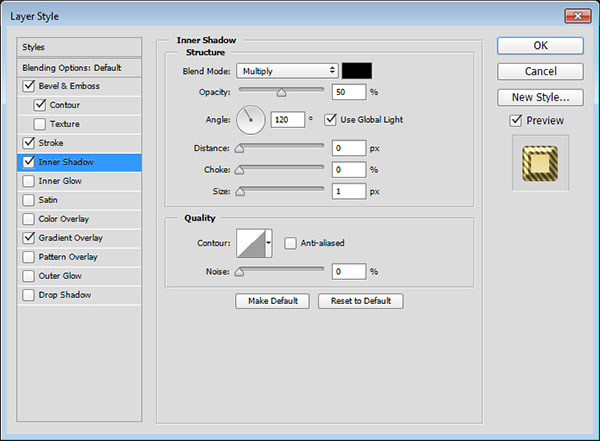
Select Inner Shadow and set:
- Opacity: 50%
- Distance: 0
- Size: 1
Step 5:
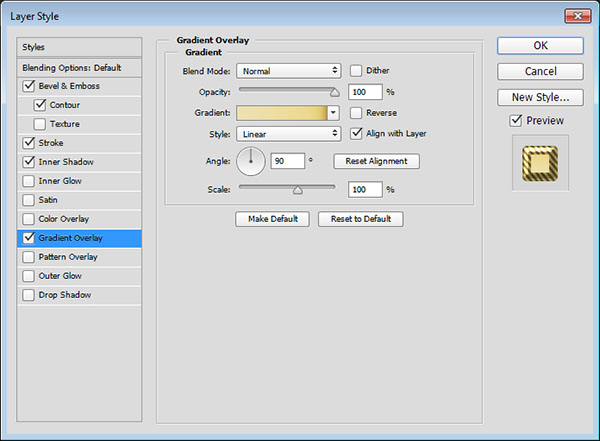
Select Gradient Overlay and set:
- Click your mouse on the Gradient box to create a Gradient
Step 6:

You can click below the Gradient bar to add Color Stops , each Color Stop you click to change the Color and Location values .
Or you can click Opacity Stop above the Gradient bar to adjust the Opacity and Location values.
Use value in Color - Location :
- # ede1b1 : - 5%
- # ecd98f: - 75%
- # e1ca71 : - 88%
- # be8936: - 100%
Finally, change the Location value of Opacity Stop to 5%.
After finishing:
5. Create Style for the first copy of the Text Layer
Double click on the first Layer Shape copy to add Layer Style:
Step 1:
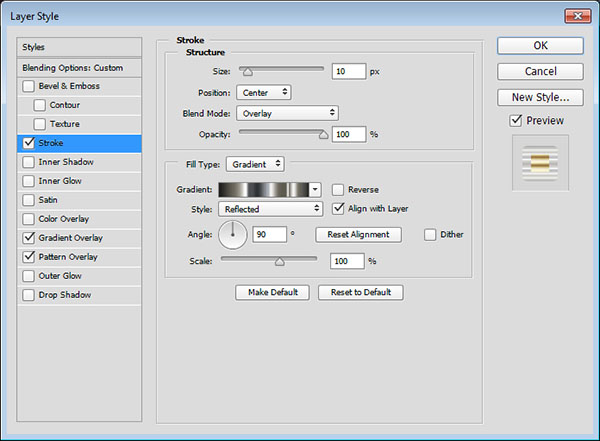
Select Stroke and set:
- Size : 10
- Position : Center
- Blend Mode : Overlay
- Fill Type : Gradient
- Style: Reflected
- Angle : 90
- Use faucet 110 to fill the gradient
Step 2:
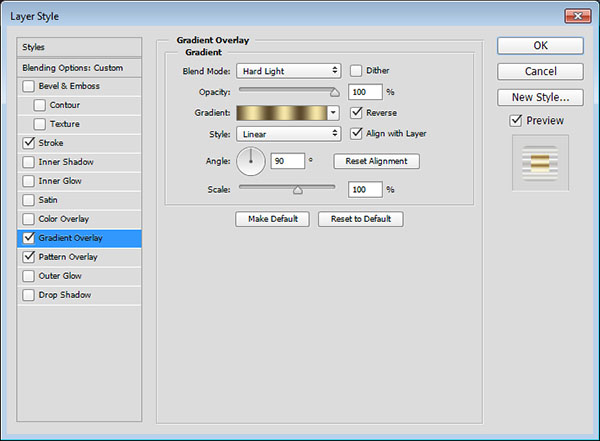
Select Gradient Overlay and set:
- Blend Mode : Hard Light
- Type in the Reverse box
- Use Gold Dial Tops X7 - angled to fill Gradient
You can click and drag the mouse inside the Gradient box to adjust the position of the text you want.
Step 3:
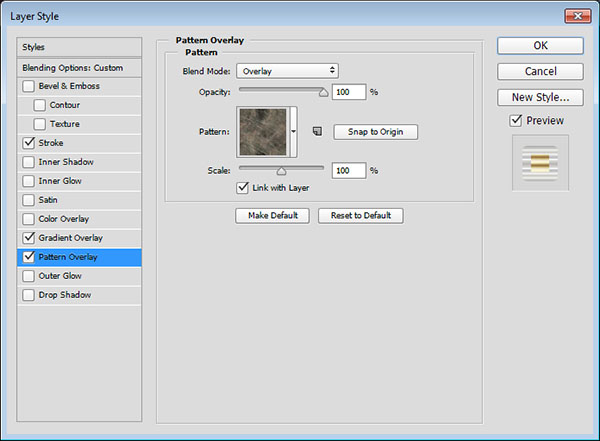
Select Pattern Overlay and set:
- Blend Mode : Overlay
- Pattern : metal_6-512px.jpg
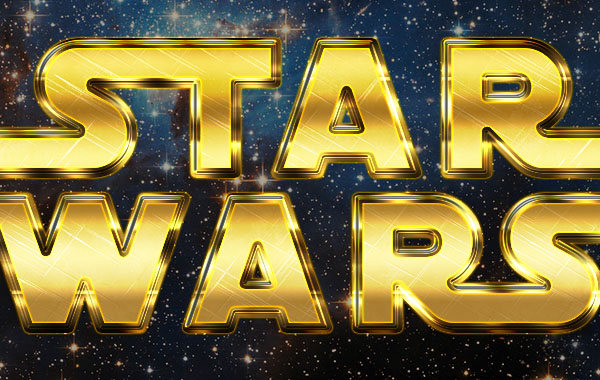
After completing the new layer editing will look like the image below:

6. Create Style for the second copy of the Text Text
Double click on the second Layer Shape copy to add Layer Style :
Step 1:
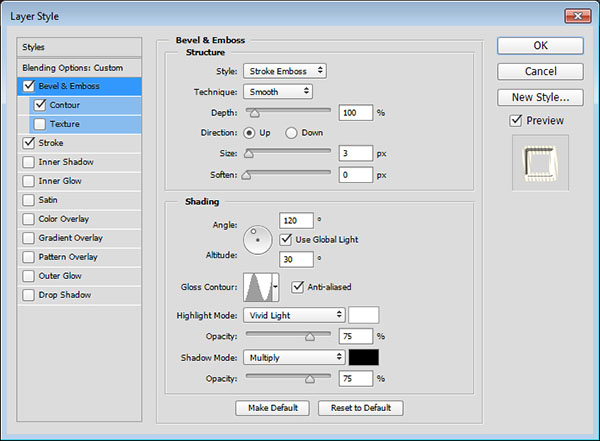
Select Bevel and Emboss and set:
- Style: Stroke Emboss
- Size : 3
- Gloss Contour : Ring
- Check the Anti-aliased box
- Highlight Mode : Vivid Light
Step 2:

Select Contour and set:
- Contour : Cove - Deep
- Check the Anti-aliased box
Step 3:
Select Stroke and set:
- Size: 10
- Position: Center
- Blend Mode : Overlay
- Fill Type : Gradient
- Style: Reflected
- Angle: 5
- Use Golden Dial Top X11 to fill the Gradient
After creating the Layer Style for the second copy of the Text Text , the Layer color effect looks more vivid.

7 Add the Outer Glow effect (create light behind the Layer).
Step 1:

Duplicate the second Layer Shape copy, then right-click and select Rasterize Layer Style.
Rename Rasterize Layer Style to Glow and change the Fill value to 0.
Step 2:

Double click on the Glow Layer to add an Outer Glow effect (create light behind the layer) and set it:
- Blend Mode: Linear Light
- Color : # e7bf2a
- Size : 3
The Text after adding the Outer Glow effect will look more sparkling.
8. Add Flares effect
Step 1:
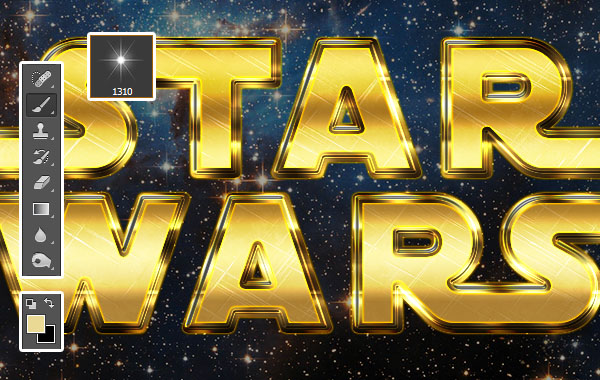
Set the Foreground color code to # ead994 , then select the Brush Tool , select S & F-12 in the Stars and Flares Brush Set.
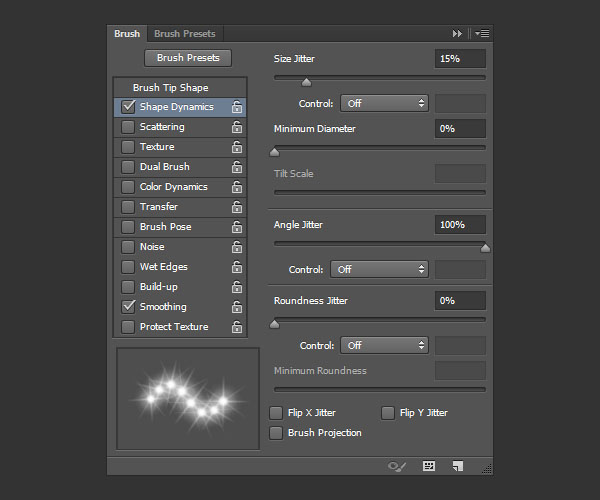
Step 2:
Open the Brush panel (Brush panel) (Window> Brush) and change the settings below the Shape Dynamics tab as shown below:
Step 3:
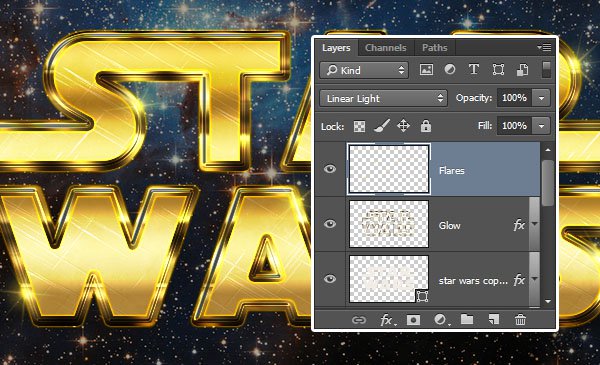
Reduce the Size of the Brush to the value you want, create a new layer above all the layers you created in the previous steps, name it Flares , and change the Blend Mode to Linear Light.
Explore more:
-
14 simple steps to create a snow effect for the photo
-
How to create snowflakes in Photoshop
-
Tutorial to create a sparkling snow effect using Photoshop Brush
Good luck!
Was this article helpful?
Your feedback helps us improve.
Related Articles
 How to create Intro in PowerPoint like Star Wars movie7 minutes read
 How to create movie posters in GIMP22 minutes read
 How to create a poster with the Text Portrait effect in GIMP10 minutes read
 How to create poster effect for photos in Photoshop11 minutes read
 Create light effects and shadows in Photoshop7 minutes read
 Transform your Facebook profile picture in Star Wars style2 minutes read
Reader Comments 0
Sign in with email or Google to join the discussion.