Backup and restore the Registry in Windows XP (The last part)
Anyone who has ever used a computer is certainly familiar with how to make changes within the system through middleware. Control Panel is a good example. Changing a setting within Control Panel means changing the contents of a particular Registry. The only thing you can't know is what Registry is and how it works
Review: Backup and restore Registry in Windows XP (Part 1)
Restore backup .reg file
There are four ways to restore the .reg backup file. As follows:
• Method 1 : From the Registry Editor's menu bar, choose File > Import . Then locate the recorded .reg file, select the file and click Open . The contents of the .reg file will be included in the current Registry. Then, there will be a dialog box confirming the status of information in the file successfully entered into the Registry. This method is less dangerous because it forces you to deliberately select the .reg file you want to import.
• Method 2 : In Windows XP, the mode automatically merges the .reg file into the Registry when double-clicking on the default file. This method is more dangerous, especially when you double-click the .reg file. But before entering the information there will be a dialog box that states the file name and asks if you are sure you want to add the contents of this file to the Registry and wait for your Yes or No answer. If you select Yes , another dialog box confirming that the information has been successfully entered into the Registry is provided. If you select No , the process ends, no information is added to the Registry.
• Method 3 : Locate the recorded .reg file and click on the file to open the context menu. Select Merge , a dialog box informing you of the file name appears, asking if you are sure you want to add the file contents to the Registry and waiting for your Yes or No answer. Similarly, if you select Yes , a new dialog box will appear informing you that the information in the file has been successfully entered into the Registry. If you select No , the process ends, no information is entered into the Registry.
• Method 4 : Locate the recorded .reg file and click on the file to open the context menu. Select Open With > Registry Editor , the dialog box displays the name of the .reg file. As above, it also asks if you are sure you want to add the file contents to the Registry and wait for your Yes or No answer. Similarly, if you select Yes , a new dialog box will appear informing you that the information in the file has been successfully entered into the Registry. If you select No , the process ends, no information is entered into the Registry.
The downside of backup methods uses .reg files
The experienced people in Registry editing agree that booting the file's data entry process into the Registry by double-clicking on the .reg file is extremely dangerous, even if there is a warning dialog. Many people have changed this default mode by opening it in Notepad. You can do the following: right-click on the .reg file> select Open With > Choose Program . , select Notepad from the list of programs that are launched. Check the option in Always Use The Selected Program To Open This Kind Office File and click OK . Now, every time you double-click on the .reg file, you will only open it in Notepad, much safer.
Although mentioned above ( Registry backup types ), I don't think it is worth mentioning the limitations of the backup type using the .reg file. The basic weakness of this type of backup is only summarized in two words: Merge (combination) or Replace (replacement). Suppose you somehow backed up a .reg file, to a safe place. Then start changing, editing the Registry, using Registry Editor. Unfortunately, your changes do not help the machine work as intended. You go back, using the backup file, desired after restoring the backup of the operating system again. But is it really that good or is your chances very fragile?
The answer is : yes, depending on what you edit. This is where Merge or Replace should be used. Let's take a look at some logical statements if / after:
-
[If] a value exists in the .reg file and also exists in the edited Registry [Then] that value will be changed in the Registry.
-
[If] a value exists in the .reg file but does not exist in the modified Registry [Then] that value will be added to the Registry.
-
[If] a value does not exist in the .reg file but exists in the edited Registry [Then] that value will not be removed or changed in the Registry.
-
[If] a value does not exist in the .reg file and does not exist in the edited Registry [Then] nothing is done in the Registry.
The third clause, the line marked in red, is where the backup problem or weakness is with the .reg file that appears. If any changes or modifications to the Registry are outside the scope of the backed up sections in the .reg file, everything is fine. But if you add a new key or value when editing, the problem will appear. The process of re-importing the backup file cannot replace or remove the part added to the Registry, because it is not in the backup file.
If you really guarantee that you will only be modifying or modifying existing values, not creating any new keys or values, you can use the .REG File type. But if you're not 100% sure, it's better to use the following Hive File Backups backup method.
Hive File Method
Except for the two limitations mentioned above, using .REG files for backup is still a good method. The second method mentioned here is to use the Hive File type, similar to .REG File but fix the drawbacks of .Reg File. It is usually better for you to use Hive File in the background. (See Figure 3 again).
Like .reg files, the actual backup procedure when creating hive files is also simple. In the Keys Pane box, right-click on each key you want to back up (here is Desktop), select [Export] , write the file name and select the backup file type. In Figure 10, the file name is for example Desktop, the file type is Registry Hive Files. When creating hive-type backup files, you need to add an extension for the created file. There are two most commonly used extension names: ".dat" and ".hiv". In the image below, we get the illustration with the .hiv extension, the full file name is Desktop.hiv.
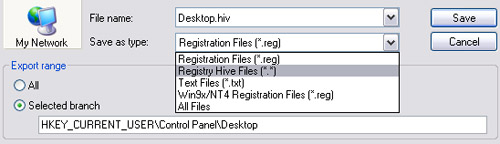
Figure 10
Notice the " Selected Branch " button describing which key is actually recorded. A quick check of this information can help you avoid a lot of annoying, even fatal mistakes if the backup is wrong. After clicking the Save button, the key will be recorded with the file name "Desktop.hiv" at the location you choose. You need to pay attention to the following points:
• When backing up the parent key, its subkeys are backed up. For example, in this case, the HKEY_CURRENT_USERControl PanelDesktop key is selected to back up, its subkey: HKEY_CURRENT_USERControl PanelDesktopWindowMetrics will also be backed up.
• Normally, users move the registry backup level higher than necessary. In this example, when the key to backup is HKEY_CURRENT_USERControl Panel , the HKEY_CURRENT_USERControl PanelDesktop key will be backed up. But there are also many other unexpected keys that also become part of the backup file. You can limit the desired lock level as close as possible by moving the hierarchy farther than necessary. The table below illustrates just how fast the .hiv file increases if the selected endpoint is not reasonable. Obviously the last option marked in red is the case to use. Not only does it require less memory space, it can also be imported quickly.
Entrypoint Key Size My recorded .reg file My Computer cannot be backed up with this method HKEY_CURRENT_USER 2.67 MB HKEY_CURRENT_USERControl Panel 176.0 KB HKEY_CURRENT_USERControl PanelDesktop 12.0 KB
Restore backup Hive file
To restore the backup hive file, do the following:
-
Open Registry Editor .
-
Locate the backup hive file entered in the Key Pane frame (left frame).
-
Go to File > Import .
-
Select the file type that is Registry Hive Files.
-
Locate the recorded hive backup file, click on the file> Open .
-
The dialog box shown in Figure 11 appears
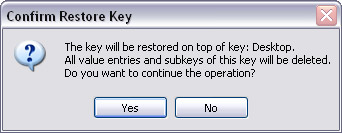
Figure 11
-
Confirm the information in the Confirm Restore Key dialog box. If yes, select Yes , if false, select No.
-
If you select Yes , a new dialog box indicates that the file has been successfully imported into the Registry. If you select No , the process ends, no information is entered into the Registry.
There are many lines in the above paragraph marked in red for warning purposes. Take a look at Figure 11 above and notice The Key Will Be Restored On Top Of Key: Desktop (The key will be restored to the top of the keys: Desktop). Now looking at Figure 12 below, there is also an almost identical line. The Key Will Be Restored On Top Of Key: Control Panel (The key will be restored to the top of the keys: Control Panel). Please carefully confirm the information before clicking Yes or No. Because all current key and subkey values may be deleted when restoring the old key, follow the specified key name (Desktop or Control Panel).
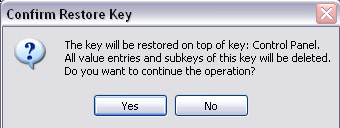
Figure 12
Recovering the wrong location for Hive File Backup will probably wipe out all important parts of the Registry and the system will almost be paralyzed. It is impossible to say which solution is the best for this situation. There is only one method to suggest that you should create a file name that records both the location you want to recover, for example in our case it may be HKCUControlPanelDesktop.hiv . Recover each backup file in different folders. In each folder, next to the backup file, it is recommended to create a small Notepad text file that details when and why at this backup file. Also record the Registry path for files to import.
System State backup method
Backing up System State is a backup of system state components such as Registry, Registry database of COM + class (COM + Class Registration Database) and boot files. Windows XP is equipped with a backup utility, Backup Utility. You can open it by: go to Start > All Programs > Accessories > System Tools > Backup . In the Advanced Backup Wizard window there is a setting parameter to back up System State to one of the machine's logical drives or another device of your choice. If the Registry is down, the System State backup will be used to restore the system.
Not all Windows XP has a default backup utility available. For example, in the Home Edition version if you want to use the Backup Utility, you must install it yourself from the Windows disk. The Professional Edition is available from the time you install the operating system for the machine.
System Restore
The last thing to note in Registry backup is how to use the System Restore utility, another utility available in Windows XP. System Restore is likened to a video camera, recording the complete image of your system at a point in time and storing it in a place called a restore point. This recovery point may be recalled at some point in the future, effectively overwriting any changes made on the computer since it was created.
Which backup method is best
It can be said that all the backup methods listed in this article are good. They provide us with certain levels of risk protection, do not require a large amount of time to complete the process and the security is quite stable. You can use several methods at the same time to complement each other if there is time and conditions allowed before editing the Registry parameters.
Typically, the most commonly used method is Hive File Backup or System Restore. Changes in Registry editing can occur after a long time, often without immediate impact on the system for us to know. System Restore can protect the entire system, instead of just single keys as in many other methods. If you pay attention to both the time and date issues when making modifications, the system recovery job will get better.
Now you have your best way to recover the Registry for each situation. Hopefully you no longer have to frown, frown or "freak out on the cloud" when you accidentally misstep a step with these pretty fastidious Registry.
Was this article helpful?
Your feedback helps us improve.
Related Articles
 Backup and restore Registry on Windows5 minutes read
 Backup and restore Registry in Windows XP (Part 1)18 minutes read
 How to Make and Restore a Backup of the Windows Registry2 minutes read
 Instructions to backup and restore Registry on Windows 10 by Restore Point3 minutes read
 Learn about the Windows Registry - Part I9 minutes read
 Backup and Restore Registry in Windows5 minutes read
Reader Comments 0
Sign in with email or Google to join the discussion.