Add 'spice' to Office 2010
Network administration - Even if the job is boring, you should not leave the documents boring . The latest version of Microsoft Office allows you to create beautiful documents like never before with a host of exciting new tools for beautifying documents, displaying images and embedding videos.
 No need to be a graphic expert, you can still use these features, the Live Preview and Undo commands of this software encourage testing by allowing you to take away an easy way. interface that I don't like. Experiment with these 9 simple features to add eye-catching to the documents you create.
(Note: You must save your document as an Office XML file format (such as .docx or .xlsx) to work with these new features).
Enjoy the fun with fonts
Using text effects for documents ( Word, PowerPoint, Excel ) : In Office 2007, Microsoft introduced the WordArt component, which allows users to create decorative fonts with effects like reflection, glow and outline. The words in this WordArt are essentially a type of image; It does not have the same behavior as text.

Office 2010's font group (Home tab) has a Text Effects button, which allows users to use WordArt effects for text without turning it into a picture. In the meantime, you can still edit text, check the grammar on it, change the basic font and perform other tasks that you can still do with regular documents.
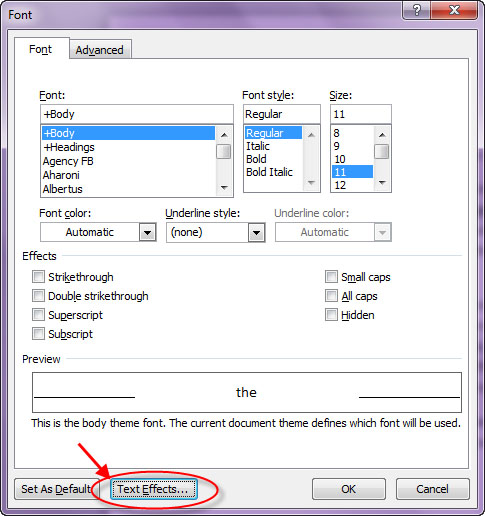
To get the set of effects that do not appear in the Text Effects gallery, click on the lower right corner of the Font group to launch the Font dialog box, then click the Text Effects button below to get a complete set. options.
WordArt features in Word and other Office applications still appear in the Insert tab. It allows you to create a text box and whatever you type in it also supports Text Effects. Such effects are also available for WordArt in PowerPoint 2010 and in Excel 2010.
Create a set of calligraphic fonts in your own way (Word, Publisher): If you want to give your document a sophisticated handwriting font interface, you can click on the bottom right corner of the Font group to launch The Font dialog box, then click the Advanced tab to access the settings that allow you to create some font styles like calligraphy.

By default, 20 art-style episodes will be listed; however, not all OpenType fonts have many different types, some fonts change very little with the style settings you use. You need to figure out which fonts work best. Microsoft encourages you to check out a set of new fonts, Gabriola , or with Calibri, Cambria, Constantia , or Corbel as four fonts already in previous versions of Word.
Some OpenType features available in Word 2010 are also available in Publisher 2010.
Tips for pictures

Crop and edit instantly (Word, Excel, PowerPoint, Outlook): With Office 2010's powerful image editing tools, you won't need to process image files in third-party applications before inserting them into the his documents. Place the cursor where you want the picture to appear, click the Insert tab, and the Picture button in the Illustrations group. Browse to the image you want to use, click it and click Insert . This procedure will place the image into your document while simultaneously activating the Picture Tool ribbon , which allows you to check all effect types via Live Preview (just hover your mouse over each effect to see how it shows.

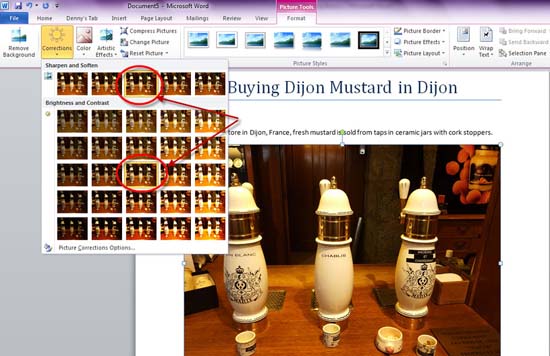
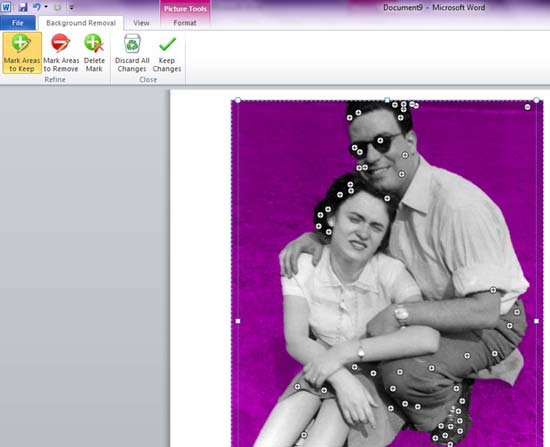
If you are interested in exposing the light and sharpness of the image, you can click the Correction button to conduct a series of changes in exposure and sharpness. Click the Cropping button to crop your photo; Alternatively, you can specify a fixed size or definition. Finally, click the Remove Background button to automatically remove other parts from the main part in an image.
Test art effects (Word, Excel, PowerPoint, Outlook): To experience artistic effects to turn your photos look like drawings, click the Artistic Effects button in Picture Tools ribbon, then Mouse over the effects you want to try. However, you need to wait a few seconds to preview some effects. To try different intensities and transparencies, select the effect and click the Artistic Effects Options button at the bottom of the preview gallery.
Insert an image into an instant (Word, Excel, PowerPoint, Outlook, Publisher, OneNote): New in Office 2010 allows you to insert a screenshot of any currently open window on the desktop with two mouse clicks. In the Insert tab, click the Screenshot button in the Illustrations group to appear a pop-up window displaying all open windows. Click on the window that you will capture and screenshot will appear in your document, ready for editing any of the image tools mentioned above.
You can even insert a part of the screen immediately. First, just close the Office application and open the screenshot you want to use. Then open the Office application again, click Screenshot in the Illustrations group of the Insert tab, but for now, click Screen Clipping at the bottom of the pop-up window. You will return to the desktop view the previous way; Now use the cursor to select the area you want to capture, then it will appear in your document.
If you've ever used a video clip in a PowerPoint presentation, make sure this clip disappears if you run a slide show on someone else's computer, in this regard you will appreciate the new video tools of PowerPoint 2010. By default, the local video file that you insert will be embedded in your slide show, so you don't need to worry about copying additional files for your .pptx presentation file.
Compression function : Obviously, when embedding video files, the size of the PowerPoint file becomes cumbersome. To avoid problems related to increased file size out of control, you can compress your videos to reduce their size. Click the File tab to access the Backstage View of the demo; By default, you will see the Info page, with Media Size and Performance inside it.
Click the Compress Media button, you will have several options for reducing file size (and video quality). Be sure to play back for compressed files; If you feel that the compression process has lost too much quality of the file, you can convert the file to a larger size.

Easy to open video on website: If the video you want to use is on a website, PowerPoint 2010 will allow it to play back the video more easily - if you run your show on a connected computer Internet. Copy the embed code from the site, open the Insert tab on the ribbon and click the Video button in the Media group at the top right. Then click Video from Web Site in the pop-up menu, paste the embedded code. (This feature is not available in 64-bit Office versions because Adobe did not create a 64-bit Flash version to support playback for videos).
Edit videos from within PowerPoint: You won't have to work with video files in third-party applications to prepare them for your slide show. The video editing tools included in PowerPoint 2010 will allow you to work on your videos right inside the application.
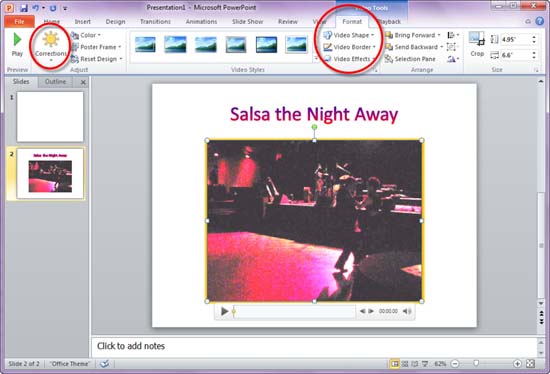
When inserting a video clip into a slide, two new Video Tools ribbon tabs - Format and Playback - will appear. Format has tools (similar to the tools in the ribbon tabs for image editing) that allow exposure and contrast to be displayed, display videos inside shapes such as stars and circles, next to It also allows creating frame effects such as soft edges, brilliance and oblique edges.
The Playback tab is where you can cut your clip (it works the name of a video file copy - the original remains unchanged), adds bookmarks so you can start playback wherever you want, the fade-in feature, fade-out or ability to specify repeat for video or back to the beginning.
Transitions and animations : In PowerPoint 2010, Transitions status transitions have a separate tab, which makes it easier for users to explore, test, and apply transitions to slides. . The live preview also applies here: To view the Live Preview, navigate to a transition you want to try.
New to animations is Animation Painter, which allows users to quickly copy an animation, then use them for objects on other slides.