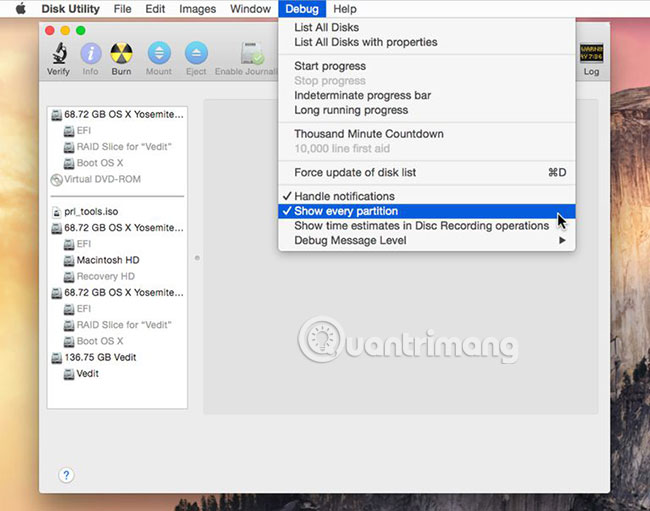
Activate Disk Utility's Debug menu
OS X's Disk Utility has a hidden Debug menu. When enabled, this menu can give you access to more Disk Utility features than you normally see. Although Disk Utility has a Debug menu for a long time, it is even more useful with the introduction of OS X Lion.
With OS X Lion, Apple added the Recovery HD partition on the boot drive. You can use HD Recovery to boot and run utilities like Disk Utility, reinstall OS X and even access the Internet to find solutions to problems that are encountered. However, the Recovery HD partition is hidden and not displayed in Disk Utility.
This can lead to some problems related to HD Recovery partition on different drives when you copy, replace the drive or reinstall OS X. It may also prevent you from moving the Recovery HD partition. Go to a new drive, if you need to replace a drive or just want to move everything around your drive.
Did you know how to activate Disk Utility's Debug menu?
- Items in the Debug menu
- OS X Yosemite and previous versions
- Activate the Debug menu in Disk Utility
- Disable Debug menu in Disk Utility
- Use Terminal for OS X El Capitan and later versions
Items in the Debug menu
Disk Utilities' Debug Menu has quite a few options, but most are designed for developers to use in test applications that can work with the Mac's storage system. Most items are 'harmless', such as List All Disks or List All Disks with Properties (List all drives with attributes). There is also control over how to display the progress bar, whether to enable thousands of minutes of countdown mode. The countdown only changes the Console log for Disk Utility to display 60,000 seconds or a thousand minutes. Again, this is really only for those who are developing storage products for Mac.

Average Mac users will find it more interesting with the following two commands in the Debug menu:
- Force update of disk list - As the name implies, this will cause Disk Utility to update the drives listed in the sidebar. This can be useful when you have attached or removed a drive while Disk Utility is open.
- Show every partition - As the name suggests, the command will display all partitions on the Mac drive even if they are hidden.
It is understandable why Apple wants to hide some Recovery HD partitions. For example, when you format a drive, the process will create a small 200MB partition that EFI BIOS needs to boot. These small EFI partitions do not contain any data that end users need and there is no reason to display them. But if you want to be able to access OS X Lion and later Recovery HD partitions to create a copy or backup, turning on the Debug menu in Disk Utility is the easiest way to display and work with this invisible partition.
OS X Yosemite and previous versions
With the release of OS X El Capitan, Apple finally decided to remove support for Disk Utility's Debug menu. This means that the Terminal commands below will only work for earlier OS X Yosemite versions.
Activate the Debug menu in Disk Utility
1. Exit Disk Utility if it is open.
2. Launch Terminal, set at / Applications / Utilities.
3. Enter the following command at the Terminal prompt :
defaults write com.apple.DiskUtility DUDebugMenuEnabled 1 4. Press Enter or Return .
5. Close Terminal.
The next time you launch Disk Utility, the Debug menu will be available.
If you want to turn off the Debug menu again, follow these steps.
Disable Debug menu in Disk Utility
1. Exit Disk Utility if it is open.
2. Launch Terminal, set at / Applications / Utilities.
3. Enter the following command at the Terminal prompt:
defaults write com.apple.DiskUtility DUDebugMenuEnabled 0 4. Press Enter or Return .
5. Close Terminal.
Don't forget that Disabling Utilities's Debug menu does not reset the menu commands to the default state. If you have changed any settings, you may want to put them back to their original state before turning off the Debug menu.
Use Terminal for OS X El Capitan and later versions
See if hidden drive partitions can still be performed in OS X El Capitan versions or more, simply use the Terminal application instead of the Disk Utility application. To see the full list of hard drive partitions, do the following:
1. Launch Terminal, set at / Applications / Utilities.
2. In the Terminal window, enter the following information in the command prompt:
diskutil list 3. Then press Enter or Return .
4. The terminal will display all the partitions currently connected to the Mac.
That's all you need to do to enable or disable the Debug menu in Disk Utility. Go ahead and see which features are available in the Debug menu, you may find the Show every partition and Force update of disk list the most useful.
Hope you are succesful.
You should read it
- ★ How to Create Disk Images with Disk Utility (Mac OS)
- ★ How to debug a Windows application with Process Monitor
- ★ Fix Mac hard drive with Disk Utility's First Aid feature
- ★ How to benchmark storage devices with Gnome Disk Utility
- ★ Google Chrome and Edge encountered strange errors, automatically generated random debug.log files on the desktop