How to benchmark storage devices with Gnome Disk Utility
Gnome Disk Utility can play many roles. It can be a source of information for all storage devices, as well as a solution to back up and restore them from images.
Gnome Disk Utility can play many roles. It can be a source of information for all storage devices, as well as a solution to back up and restore them from images. Gnome Disk Utility can also benchmark them to show you the actual performance of storage media. This may be a simple 2 or 3 click process, but many people don't know its existence.
Install Gnome Disk Utility
If you are using the GNOME desktop, you probably have Gnome Disk Utility installed on your computer. If not, provided that you use a Linux-based distribution of Debian, you can install it with the command:
sudo apt-get install gnome-disk-utility
The application is accessible from Accessories> Drives menu or if you want to launch it from the terminal, enter:
gnome-disk
Choose what to benchmark?
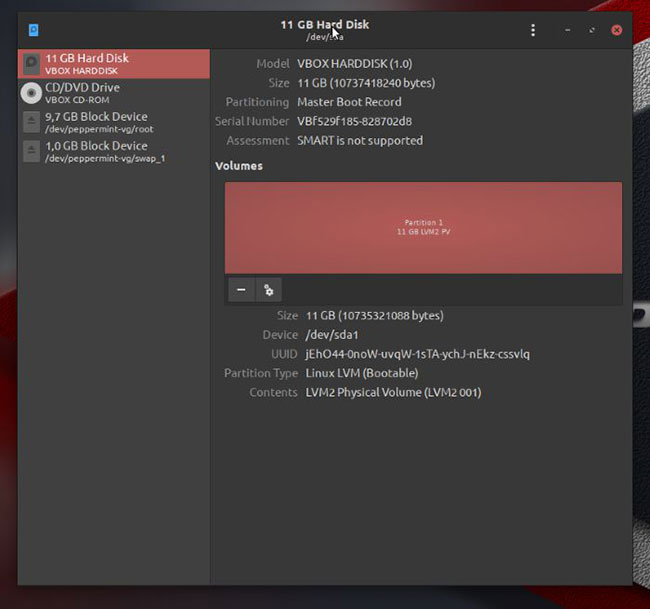
The application doesn't gain any advantages in terms of interface, but does exactly what it does - no more, no less. In the left panel of the window, you can see a list of all storage devices connected to the computer. Selecting one of them will update the right part of the screen, showing the status of the selected device, as well as a graphical representation of its content.
In the example case, you only see one color used throughout, because the (virtual) hard drive in this case is relatively small, so the article used it as a single object without splitting. into individual partitions.

Actions that can be taken
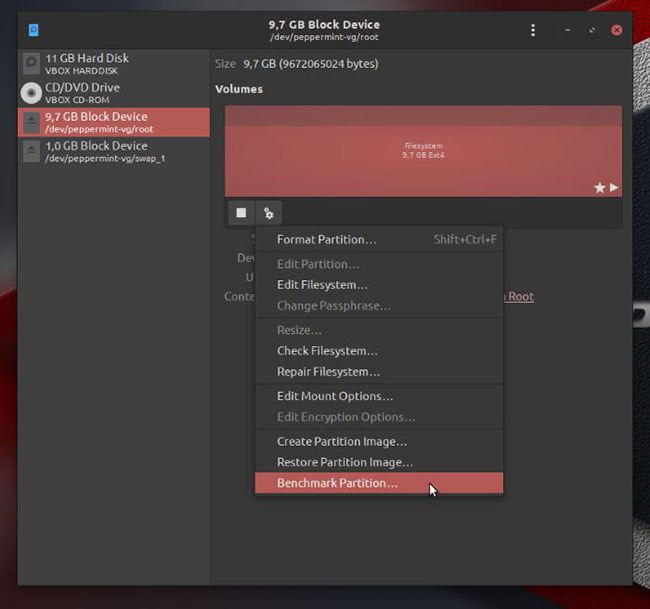
Once you've selected a storage device, clicking the button with two gears will bring up a menu of actions you can perform on the device. You can delete partitions, finish checking or repairing the file system, retrieve or restore backups and benchmark selected storage media.
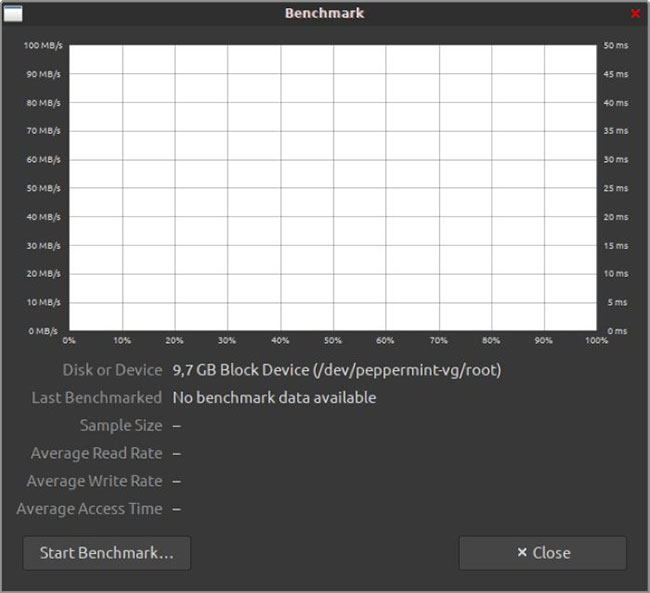
The graph is empty
After deciding whether you want to benchmark a device, a new window will appear on the screen and currently, it's empty. Click the 'Start Benchmark' button to start the benchmarking process.
It takes more time to achieve accuracy
Before Gnome Disk Utility starts measuring the performance of storage media, you need to determine the level of detail you want the process to perform. In the Benchmark Settings window that appears, you can increase the values for more accurate results. The more accurate results you want, the longer it will take the benchmark process to complete.
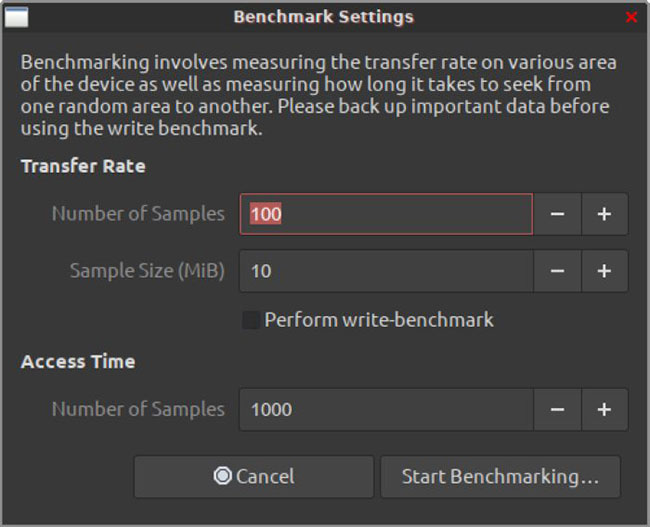
Recording requires exclusive access
The performance measurement process only assesses the ability of the device to read data. To measure device performance when recording, you need to enable the 'Perform write-benchmark' option . However, please note that for the application to write to the selected device, it is not mounted on the operating system. The application will be able to gain 'exclusive access' to the device for recording at work.
It is worth noting that unlike similar solutions, Gnome Disk Utility does not affect the contents of storage media during the writing test, so using this tool is considered safe. Of course, it is always a good idea to keep a recent backup of your data, especially before any processes work in any way on the storage media.

It may take a while to complete
Note that in order for the application to access a device and measure its performance, you will be prompted to grant it root access. Immediately after entering the password, Gnome Disk Utility will start refreshing the window you have previously seen with graphical representation and additional information about the performance of storage media.
If you have entered very high values related to the number of Gnome Disk Utility samples that will take into account or are benchmarking the performance of a 'gigantic' hard drive, this process can take a long time (in many cases up to few hours). Usually, if the storage media has no hardware problems, you don't have to wait too long to get an overview of its performance. A few minutes are more than enough to provide average values with relative reliability.
Do not delay the cancellation!
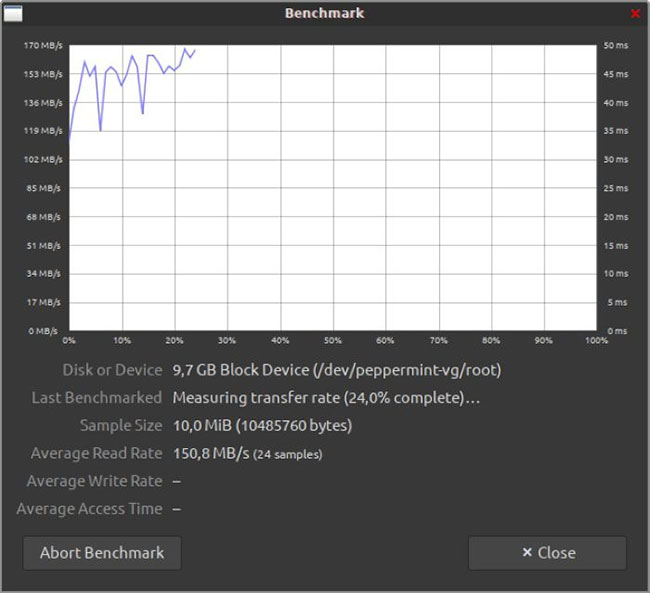
However, unfortunately, the application completes the measurements in turn, because if you try to measure many different things at the same time, that will affect the performance of the storage device. This means that if you click on the 'Abort Benchmark' or 'Close' buttons at the bottom of the window before the program completes the process, you get an overview of the first performance indicator: Average Read Rate.
For a more comprehensive view of the device's performance, you should wait or, if the procedure takes too long, cancel it, go back and reduce the values that determine the granularity of the benchmark process. , then restart the process.
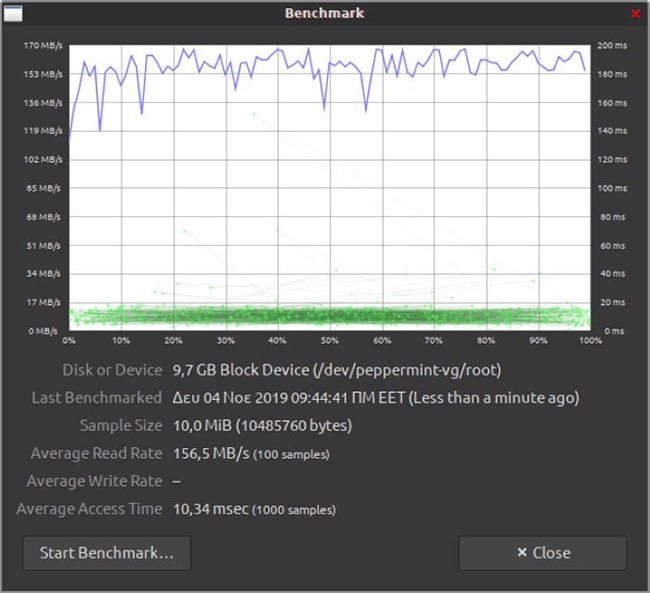
This way, you will get both Average Access Time and Average Write Rate values, if you have the option turned on to perform a writing benchmark.
- How to use Disk Utility to repair the hard drive and decentralize the drive
- Use Disk Utility to copy the drive on Mac
- Activate Disk Utility's Debug menu
- What's remarkable about the newly released GNOME 42?
- How to Create Disk Images with Disk Utility (Mac OS)
- 9 Useful Little-Known GNOME Extensions
- The latest features of GNOME 40
- Fix Mac hard drive with Disk Utility's First Aid feature
- What is RAM Disk? How does it work?
- How to view all connected storage devices on Windows 10
- The simplest way to speed up Linux startup: Disable unnecessary services.
- 9 Useful Little-Known GNOME Extensions
- What's remarkable about the newly released GNOME 42?
- How to integrate Google account into GNOME Shell
- How to disable automatic workspace in GNOME
- Differences in the types of desktop environments on Linux
- How to work with workspace in GNOME
- How to change icons in Gnome 3
- How to Change Themes on Ubuntu with Gnome Tweak Tool
- 4 interfaces and Linux distros that can be run on PinePhone
 5 beautiful and modern Linux desktop environments with macOS styling.
 5 New Linux Apps Users Should Install Right From the Start
 9 Useful Little-Known GNOME Extensions
 6 best Linux desktop environments in 2024
 Should I use Linux desktop KDE or GNOME?
 The 10 best features in GNOME 45