Table of Contents
This guide explains how to use Credential Manager in Windows 10, with clear steps, practical tips, and important checks before you begin.
In this tutorial, you will learn the steps to use Credential Manager on Windows 10 to manage all your login information.
Edit existing login information using Credential Manager
To update the password or username stored on Windows 10, follow these steps:
Step 1. Open Control Panel on Windows 10.
Step 2. Click User Accounts.
Step 3. Click Credential Manager.
Step 4 Click the Windows Credentials tab (or Web Credentials ).
Step 5. Select an account.
Step 6. Click the Edit button .
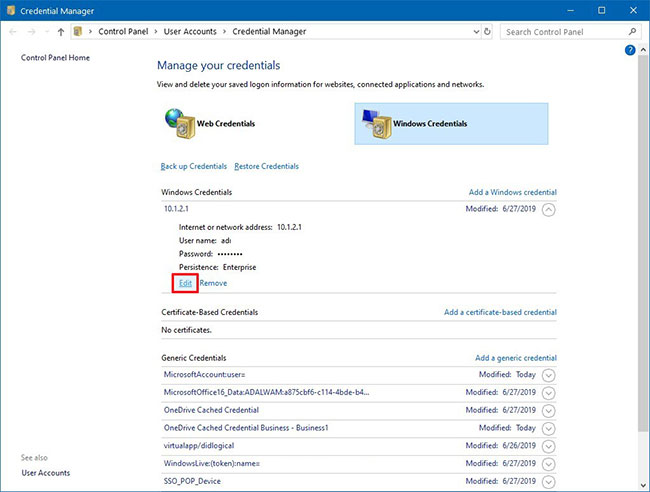 Click the Edit button
Step 7. Update your username and password as needed.
Step 8. Click the Save button .
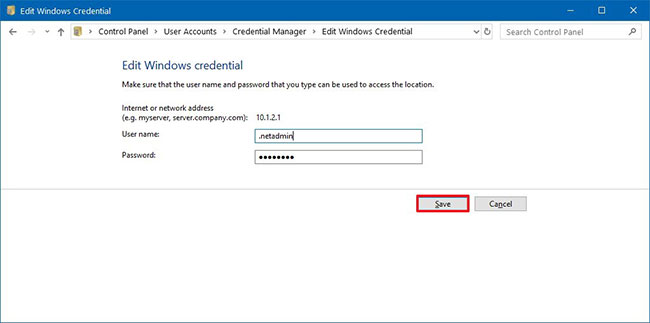 Click the Save button
When you complete the steps, the new login information will be updated, which means that there are no more login prompts if you initially saved the wrong username or password or the login information has changed.
Delete login credentials with Credential Manager
Delete account credentials that are stored on Windows 10, follow these steps:
1. Open Control Panel.
2. Click User Accounts.
3. Click Credential Manager.
4. Click the Windows Credentials tab (or Web Credentials ).
5. Select an account.
6. Click the Remove button .
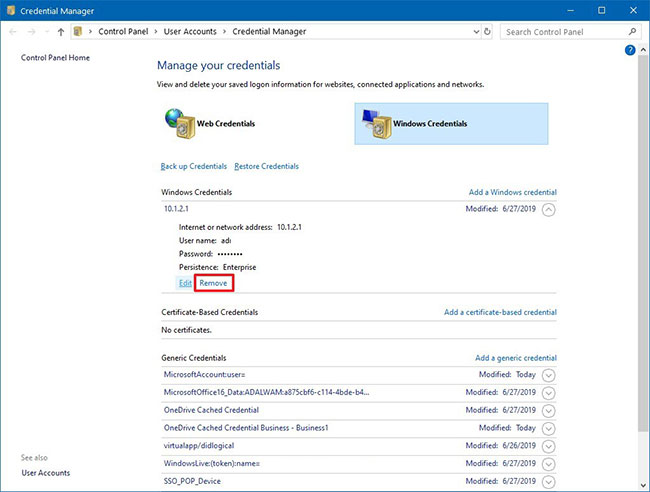 Click the Remove button
7. Click the Yes button .
After you complete the steps, the account login information will no longer be available on the device, meaning you will be asked to enter your username and password when logging in in the future.
Add new login information with Credential Manager
To add apps or network info on Windows 10, follow these steps:
1. Open Control Panel.
2. Click User Accounts.
3. Click Credential Manager.
4. Click the Windows Credentials tab .
5. Click the Add a Windows credential (or Add a certificate-based credential ) option.
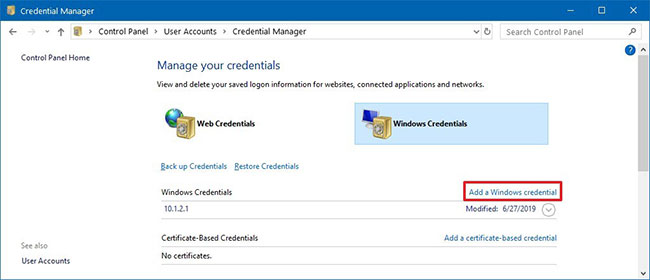 Click the Add a Windows credential option
6. Specify the Internet or network address corresponding to the application resource or network.
7. Specify a username and password for authentication.
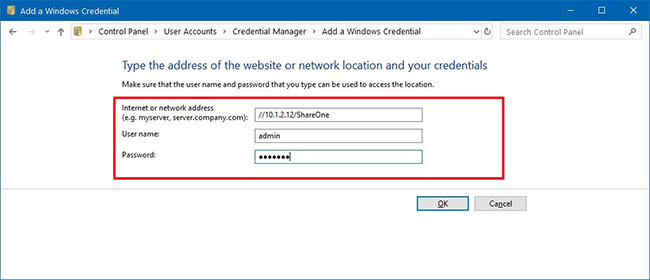 Specify a username and password for authentication
8. Click the OK button .
When you complete the steps, new account information will be added to the device to log in automatically the next time you access shared apps or networks.
Backup login information with Credential Manager
To export and back up all login credentials for applications and networks, follow these steps:
1. Open Control Panel.
2. Click User Accounts.
3. Click Credential Manager.
4. Click the Windows Credentials tab .
5. Click the Back up Credentials option.
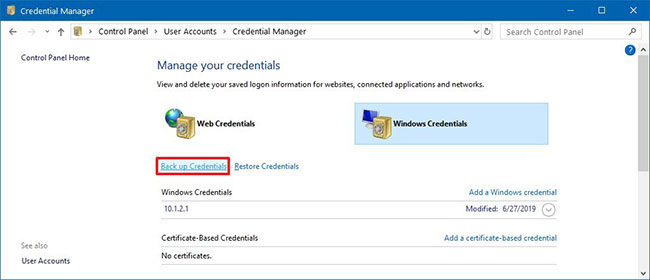 Click the Back up Credentials option
6. Click the Browse button to specify the destination for the backup.
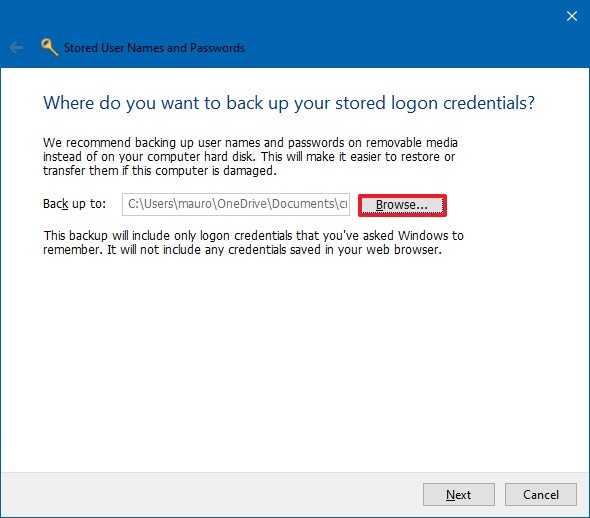 Click the Browse button to specify the destination for the backup
7. Specify a name for the backup file. crd.
8. Click the Save button .
9. Click the Next button .
10. Use shortcuts Ctrl+ Alt+ Deleteto continue.
11. Specify a password to protect the Credential Manager file on Windows 10.
12. Click the Next button .
13. Click the Finish button .
After completing the steps, you will end up with a. crd file containing all the web and Windows 10 information that you can enter into another computer or onto the same device after a 'clean' installation.
Recover login information with Credential Manager
To restore login information from a backup on Windows 10, follow these steps:
1. Open Control Panel.
2. Click User Accounts.
3. Click Credential Manager.
4. Click the Windows Credentials tab .
5. Click the Restore Credentials option .
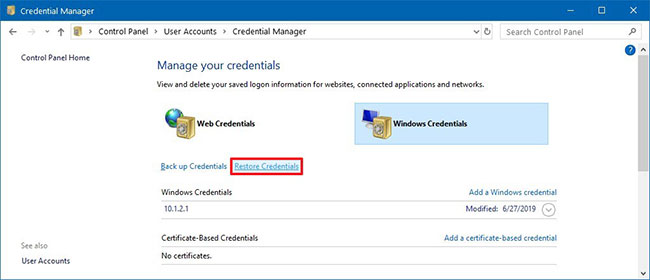 Click on the Restore Credentials option
6. Click the Browse button .
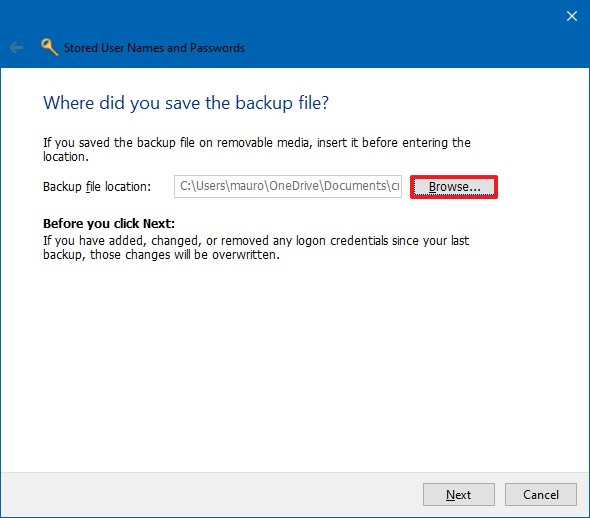 Click the Browse button
7. Select the. crd file with backup information.
8. Click the Open button .
9. Click the Next button .
10. Use shortcuts Ctrl+ Alt+ Deleteto continue.
11. Enter the password to unlock Credential Manager backup.
12. Click the Next button .
13. Click the Finish button .
When you complete this step, all your web, application and network information will be restored on the device.
Although this tutorial focuses on Windows 10, Credential Manager is available for a long time, which means the steps can also be applied on Windows 8.1 and Windows 7.
FAQ
What should I know about Credential Manager in Windows 10?
Focus on the key features, requirements, limitations, and practical use cases explained in this guide.
How do I get the best results with Credential Manager in Windows 10?
Follow the recommended steps, use current software or information, confirm compatibility, and review settings before major changes.
Are there any risks or limitations?
Potential limitations depend on compatibility, data quality, cost, privacy, support, and how the product or method is used.
Related Articles
 Why Can't This Built-in Credential Manager Feature in Windows7 minutes read
 Activate Credential Guard to Enhance Windows 10 Security5 minutes read
 Credential Dumping: What Is Deafing Credential?8 minutes read
 What Is Credential Stuffing? What Is the Difference Between8 minutes read
 All Problems About Using Task Manager6 minutes read
 Ways to Enable Task Manager in Windows 113 minutes read
Reader Comments 0
Sign in with email or Google to join the discussion.