6 simple steps to install Port Forwarding on the Router
Port Forwarding is widely used, especially offices, schools and families with many computers connected to the Internet. The following article The network administrator will show you how to set up a Port Forwarding on the Router.
Table of Contents
Port Forwarding is the process of forwarding a specific port from one network to another, allowing external users to access the internal network by using that port from outside through the router (opened NAT -Network Address Translation).
Port Forwarding is widely used, especially offices, schools and families with many computers connected to the Internet. The following article The network administrator will show you how to set up a Port Forwarding on the Router .

1. Port Forwarding
Address of the 'inside' section of the Network
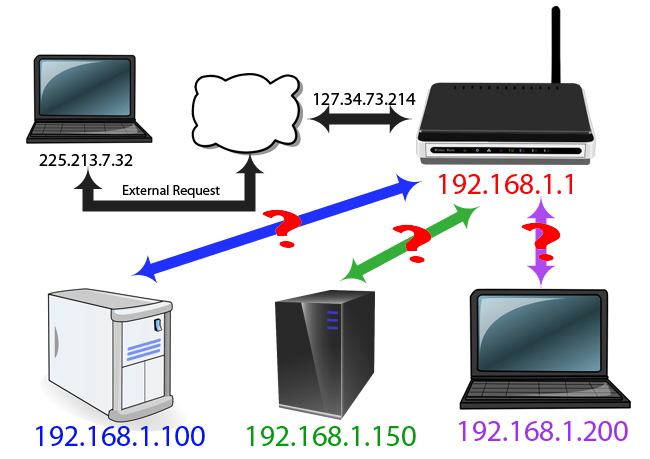
Here's how to make a simple Home Network map:

In the illustration, you can see that 3 computers have a unique IP address that connects to a Router. You can easily access other computers, but when all of these computers access the Internet, you must go through the Router.
The router has an IP address associated with your network. In addition, the router also has an external IP address (external IP) used when interacting with outside your network. Whenever your computer requires an Internet connection, it uses the same IP address as 127.34.73.214.
2. Port and Protocol
Port (Port) makes the process simpler. If the IP address is the same as the address of a certain building, the port is the same as the number of houses in each building.
When you visit a Web site, suppose you use port 80. The identity software on your computer will know that port 80 is used for the http server and meets your requirements.
If you send http on another port, assuming Port 143, the Web server will not recognize it and cannot respond to your request.
Secure shell uses port 22 and VNC uses port 5900. These ports may vary depending on different uses, just as many specific programs are used for many different purposes.
To avoid affecting other standard applications, it is best to use larger alternative configurations.
For example, Plex Media Server uses port 32400, Minecraft Server uses port 25565.
Each port can be used via TCP or UDP protocol . TCP or Transmission Control Protocol, is the most commonly used protocol.
UDP, also known as the User Datagram Protocol, is less used in applications, except for BitTorrent.
The address of the 'outside' part of the Network
What happens when devices outside the system require a connection?
Suppose if your computer requires a Home Network IP address 127.34.73.214, then connect to the Router. However, the router does not understand anything to resend your computer.
In this case you can configure the Router to forward the port. This means that depending on the requested port number, the Router may switch to other IP addresses.
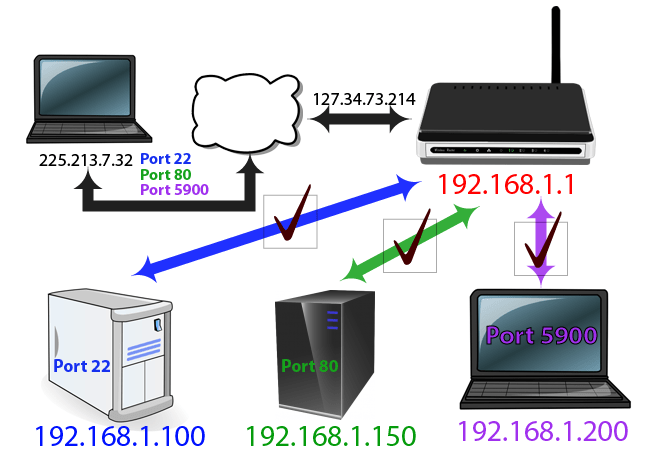
When you access the IP Home Network address using port 22, your router will know that the address in the "inside" section of Network is 192.168.1.100.
Then the SSH daemon installed on Linux will respond to you. At the same time, you can send requests through port 80, your router will send to the Web Server at 192.168.1.150.
Or you can remotely control your "sister" laptop via VNC, and your router will connect to the address 192.168.1.200.

When you access the Home Network via port 80 interface, you can tell the Router to send it to 192.168.1.150. The Web server will listen to port 80 and respond to you.
However, you can tell the Router when you access through port 10,000 that it must access another computer, address 192.168.1.250 and port 80.
3. Before configuring the Router
Before configuring the router, you need to pay attention to some of the following:
1. If you are using DHCP, the IP address of each device is likely to change in the future. In some cases, you must reset Port Forwarding.
So the best way is to reconfigure the static IP address of the 'server' (host computer).
Some routers have the ability to "reserve" or "specify" IP addresses via DHCP, so that the IP address will not be changed. However, not all routers are just a number.
How to give the device a static IP address
Equipment that wants to benefit from port forward needs to have a static IP address. This is necessary so that you do not have to change port forwarding settings every time you get a new IP address.
For example, if your computer is running torrent software, you will want to assign a static IP address to that computer. If your game console needs to use a specific port range, it will need a static IP address.
There are two ways to do this: From the router and from the computer. If you are setting up a static IP address for your computer, you can easily do that.
To set up a Windows computer using a static IP address, you must know which IP address is currently used.

- Open Command Prompt on computer.
- Enter ipconfig / all command .
- Record the following information: I Pv4 Address, Subnet Mask, Default Gateway and DNS Server . If you see multiple IPv4 Address entries, look for an entry with a header like ' Ethernet adapter Local Area Connection ', ' Ethernet adapter Ethernet ' or ' Ethernet LAN adapter Wi-Fi '. You can ignore anything else, like Bluetooth, VMware, VirtualBox and other non-default entries.
Now, you can use that information to actually set up a static IP address.
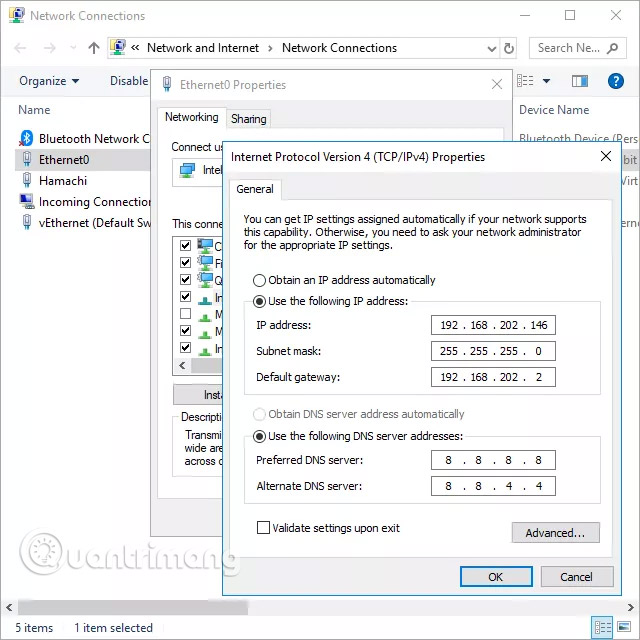
- From the Run (WIN + R ) dialog box, open the Network Connections with the command ncpa.cpl.
- Right-click or click and hold the connection the same as the name you specified in the Command Prompt. The example in this article will select Ethernet0.
- Select Properties from the context menu.
- Select Internet Protocol Version 4 (TCP / IPv4 ) from the list and click Properties.
- Select the Use the following IP address option:
- Enter all the same details you copied from Command Prompt, like IP address, Subnet mask, Default gateway and DNS servers.
- Select OK when you're done.
Note:
If you have some devices on the network that have IP addresses from DHCP, do not set the IP address as you found in the Command Prompt. For example, if DHCP is set up to serve addresses from a pool between 192.168.1.2 and 192.168.1.20, configure the IP address to use a static IP address outside of that range to avoid the phenomenon. IP conflict. You can use 192.168.1.21 or more in this example. If you're not sure what this means, just add 10 or 20 to the last digit of your IP address and use it as a static IP in Windows.
You can also set up your Mac to use static IP addresses, as well as Ubuntu and other Linux distributions.
Another option is to use the router to set up a static IP address. You can do this if you need a non-computer device, to have an unchanged address (such as game console or printer).
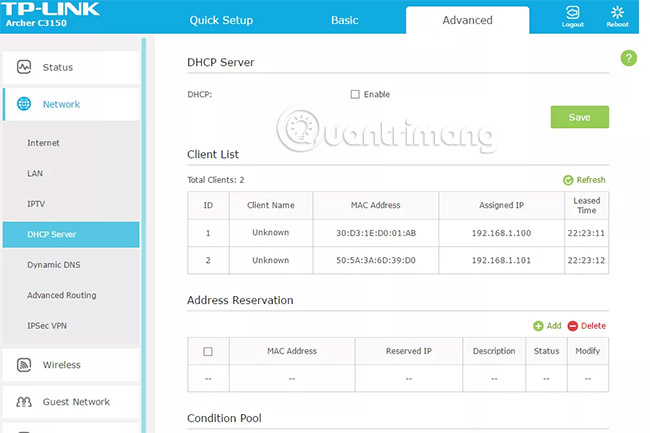
- Access the router with admin rights.
- Find "Client List," 'DHCP Pool, "" DHCP Reservation ", or similar settings. The idea is to find the list of devices currently connected to the router. listed along with its name.
- One of the above IP addresses should be associated with the device first because the router always uses it when the device requires an IP address. You may need to select an IP address from the list or select "Add" or "Reserve".
The steps above are very general because assigning static IP addresses is different for each router device, printer and gaming device.
2. When you access the external network, you must know the external IP address of the router.
You can easily discover the address of someone in the Network's 'inside' section by visiting whatismyip.com. This address is subject to change. One way to avoid changing your IP address is to redirect domain names, so when you visit myreallyawesomedoman.com, will the Home Network not care about changing IP addresses?
3. Some more information about Open Ports:
If port forwarding on your router does not allow certain programs or games to work on your computer, you may need to check if the firewall program blocked that port. Similar ports need to be opened on both the router and your computer so that the application can use it.
Tip: To see if Windows firewall is the cause of blocking a port that you have opened on your router, temporarily turn off the firewall and then check the port again. If the port is closed on the firewall, you need to edit some settings to open it.
When you open a port on the router, traffic can move in and out of it. This means that if you're going to scan your network for open ports, you'll see these open ports from the outside. There are websites and tools built specifically for this.
You can check if the port is open, if you want to avoid having to check the router, or maybe you have followed the steps above, but the program or game still does not work, and you want to check Check if the port is open correctly. Another reason, on the contrary, is to make sure that the port you want to close is actually closed completely.
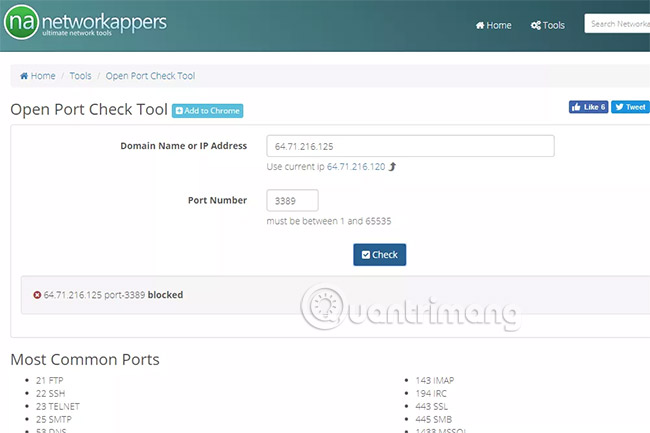
Whatever you are doing, there are a number of places to find a free port checker. PortChecker.co and NetworkAppers.com all have an online check port that can scan your network from outside. Advanced-Port-Scanner.com and FreePortScanner are useful for scanning other devices in your private network.
Only one port forward can exist for all instances of that port. For example, if you forward port 3389 (which is accessed remotely by the Remote Desktop program) to a computer with IP address 192.168.1.115, the same router cannot forward port 3389 to 192.168.1.120.
In cases like this, the only solution, if possible, is to change the port that the program is using, from within the software installation or through registry hacking. In the RDP example, if you edit the Windows Registry on your computer 192.168.1.120 to force Remote Desktop to use a different port like 3390, you can set up a new port for that port and use the effective Remote Desktop on two computers. from outside the network.
Using a custom port can activate your programs, antivirus software or Firewall. Therefore you must add extra rules on the host computer to allow external access to any one port you specify. However, the security risk will be threatened, so you should be careful and take appropriate preventive measures.
4. Some Router brands
- Cisco / Linksys:

You can view Port Forwarding under Applications and Gaming . Under Single Port Forwarding, you can add individual ports to specify the IP address.
Under Port Range Forwarding , you can easily switch the entire port range at the same time.
- DLink:

On DLink routers you can find Pord Forwarding installed in the Advanced section of the Port Forwarding tab.
- Netgear:
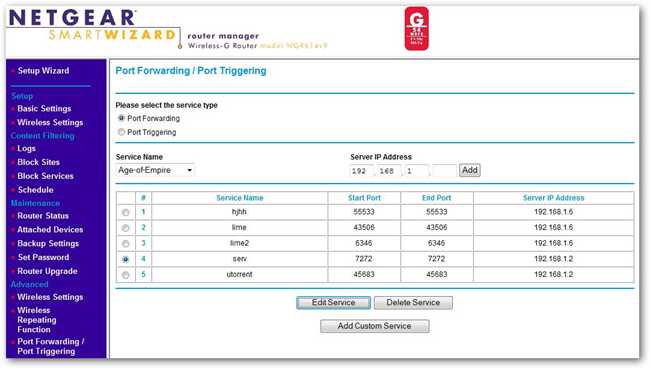
The Netgear router has a section menu. Search in Advanced then click on Port Forwarding / Port Triggering . If you use Smart Wizard, you can configure Port Forwarding here.
- DD-WRT:

Usually Port Forwarding in DD-WRT and applications, the 3rd Router Firmwares program belongs to NAT / Quality of Service section tag .
Note that when you click Save to save changes on the DD-WRT Router that will not take effect, you must select both A pply Setting .
5. Steps to set up Port Forwarding on the Router
Step 1: Enter your Router IP address in the address bar of the Web browser
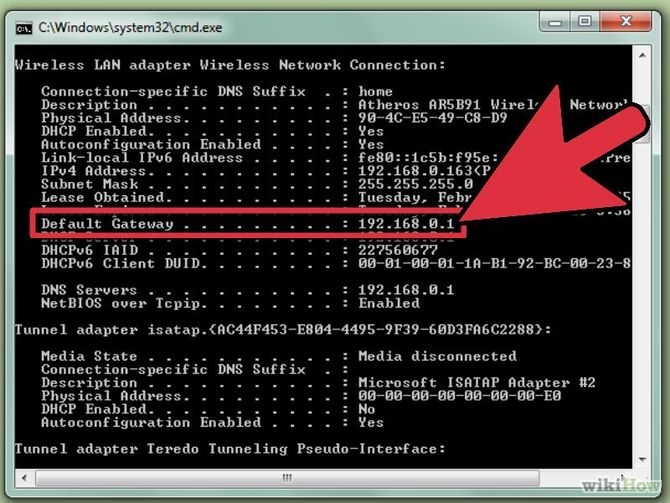
Enter your Router IP address in the address bar of your Web browser to open your Router configuration page. Most Router IP addresses are 192.168.0.1 or 192.168.1.1 or 192.169.2.1 . However, if you want to search your Router IP address for sure, follow the steps below.
- For Windows: Open the Command Prompt then enter ipconfig / all into the Search box. Your IP address is the same as the address in Default Gateway .
- For Mac: Open Terminal and enter netstat -nr .
- For Linux: Open Terminal and enter Route.
Step 2: Enter Username (username) and password
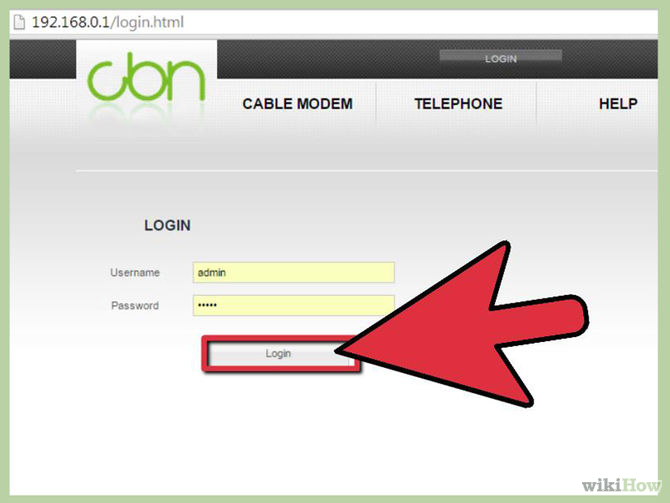
If you have already set up the Router protection configuration, just enter the User name and password you created then proceed to login (Login). If you have not configured the router protection, follow the steps below to login (Login).
- With Linksys Router , type "Admin" in both Username and Password.
- With Netgear Router, type "Admin" into the Username section and type "Password" in the password section.
- For other routers you can leave nothing in the Username section, the password part you type "Admin".
- Alternatively, you can access it on RouterPasswords.com, enter your Router line name to search for the default password.
If you don't remember the login information, you can press the Rese t button on the Router to reset all default information. Then search for the default information on the online settings.
More reference: Speeding tips for wireless routers
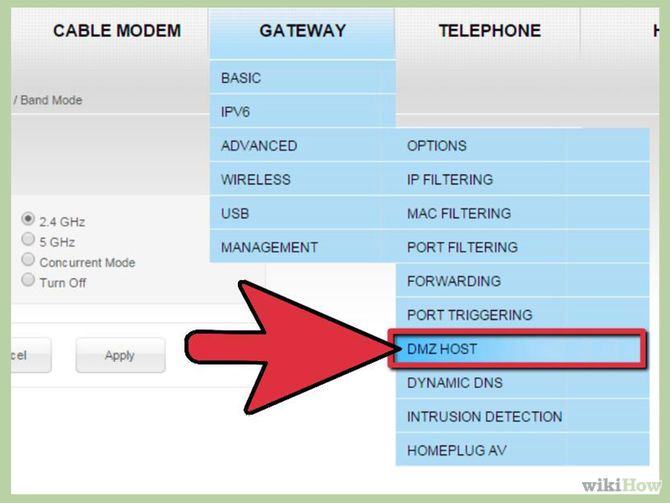
Step 3: Search for Port Forwarding

Each router is slightly different. You can usually search in Port Forwarding , applications (Applications), games (Gaming) or Virual Servers . If still not found, go to Advanced Setting to search for Port Forwarding.
Step 4: Find available configuration items
On many Routers there is usually a Dropdown Menu (the component that displays the content and is a main Main Menu, when you click it will display the submenus inside) there are configuration options available for many applications. If you want to open the Port for an application, select that application from the list.
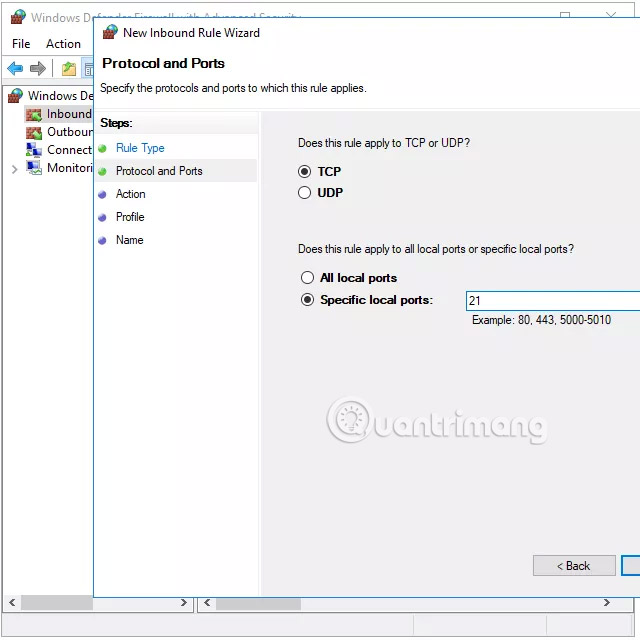
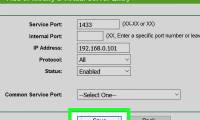
Step 5: Create a custom item
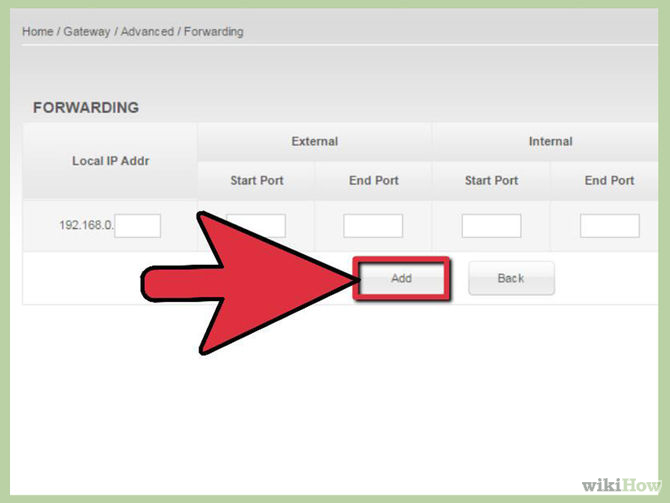
If the program you want to add is not listed in the list, you will have to create a Port Forwarding . For each router different steps will be slightly different although the information required on the routers is the same.
- Enter the application name or program you want to add
- Choose protocol: You can choose either TCP, UDP or both protocols. The protocol depends on the program you are Unblock. If not sure you can choose one of two TCP or UDP protocols .
- Select the Port you want to use. If you just want to open a Port , enter Start (start) and End (end) the same part number. If you want to open more Ports (about 5 Ports), you can enter the number 3784 in the Start section and 3788 in the End section .
- Select the internal IP address to assign to Port Forwarding . This IP address is the IP address that runs on the application you are Unblock.
Step 6: Save settings
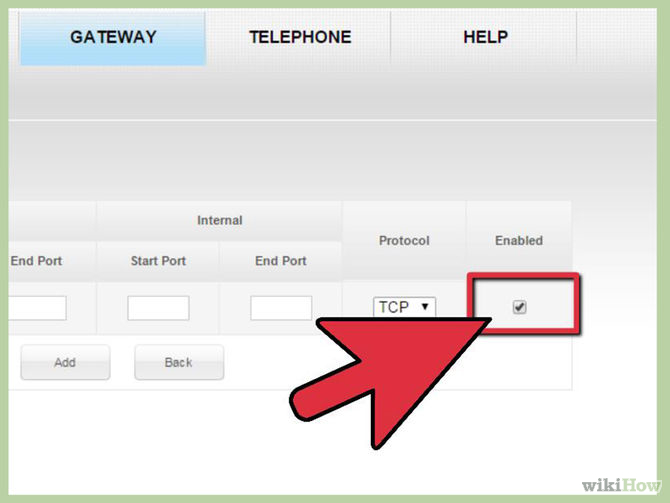
To save your settings, select Apply instead of Save . Then proceed to restart your Router .
Good luck!
Was this article helpful?
Your feedback helps us improve.
Related Articles
 How to set up Port Forwarding on Draytek router5 minutes read
 How to set up Port Forwarding on Netgear router4 minutes read
 How to Set Up Port Forwarding on a Router9 minutes read
 What is Port Forwarding?13 minutes read
 How to set up Port Forwarding in Windows4 minutes read
 3 reasons why you shouldn't use your router's USB port to back up data.6 minutes read
Reader Comments 0
Sign in with email or Google to join the discussion.