Table of Contents
This updated guide explains how to Set Up Port Forwarding on Draytek Router through clear steps, practical examples, and important checks that help prevent common errors.
How to Set Up Port Forwarding on Draytek Router
Step 1: Set a Static IP Address
It is important to set a static IP address in the device that you are forwarding port to. This ensures that the port will remain open even after the device restarts.
Follow the instructions: Use a static IP address in your network to know how to set a static IP address.
Step 2: Log Into the Router
Now, log into the Draytek router. The router has a web interface, so you can log in to it using a web browser like Chrome, Firefox, Internet Explorer or Edge. It doesn't matter which browser you choose to use.
1- Open a web browser and find the address bar.
2- In the address bar, enter the Draytek router IP address. The router's IP address can also be called the computer's default port.
By default, the IP address is set to: 192.168.1.1.
 Enter the Draytek router IP address
3- After entering the router's IP address, you just need to press Enter.
If you don't get the result mentioned above, you need to see if the router's IP address has been changed. To do this, follow the instructions in the article: How to find the IP Router address on Windows 10.
4- You will see a box prompting you to enter your username and password.
- The default Draytek router username is: admin.
- The default Draytek router password is: password.
5- Enter your username and password, then click the Login button to log in to the Draytek router.
Step 3: Find the Port Forwarding Section
Now, you need to find the Port Forwarding section in the router.
1- Click the NAT link near the left of the page.
 Click the NAT link near the left of the page
2- Now you will see a new menu. In this new menu, click Port Redirection.
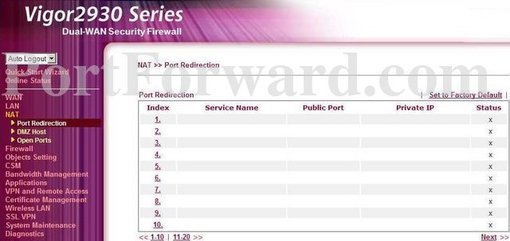 click Port Redirection
3- Click the Index Number link near the middle of the page.
 Click the Index Number link near the middle of the page
4- This router has two different parts that allow you to forward ports. One allows you to forward a variety of ports and the other allows you to forward a single port. To forward a series of ports, click Range. To forward a port, click Single.
 This router has two different parts that allow you to forward ports
Step 4: Create a Port Forwarding Entry
1- From the Mode drop-down box, select Single or Range.
2- Create a name to put in the Service Name box . This name does not have any effect on the forwarding function.
3- Select the protocol type for the ports you are forwarding from the Protocol box .
4- Select All from the WAN IP drop-down box.
5- In the Public Port and Private Port boxes, enter the port to forward.
6- Enter the IP address of the device you may need to forward the port to in the Private IP box. This may be the computer's IP address or the IP address of other devices on the network.
7- When you're done, click the OK button .
FAQ
What is the easiest way to Set Up Port Forwarding on Draytek Router?
Start with the requirements in this guide, then follow each step in order. Check the result after every major change so problems are easier to identify.
Can beginners follow these instructions?
Yes. The process is organized into practical steps, and you can repeat any step before moving forward.
What should I check if the method does not work?
Confirm your software or device version, permissions, settings, file format, and internet connection when the task depends on online services.
Related Articles
 6 Simple Steps to Install Port Forwarding on the Router17 minutes read
 How to Set up Port Forwarding on Netgear Router4 minutes read
 How to Set Up Port Forwarding on a Router10 minutes read
 What Is Port Forwarding?14 minutes read
 How to Set up Port Forwarding in Windows5 minutes read
 3 Reasons Why You Shouldn't Use Your Router's USB Port to Back up Data9 minutes read
Reader Comments 0
Sign in with email or Google to join the discussion.