5 ways to take screenshots on Macbook, using shortcut keys, taking screenshots with mouse cursor
TipsMake.com will guide you to take screenshots of Macbook using shortcut keys and Zappy application, which has built-in feature to write notes for screenshots.
Table of Contents
To take a screenshot on Windows, you just need to use the PrtSc key . On Mac, we can use the photo capture key combination, but if we want to annotate the screenshot, we will use photo editing software .
In this article, TipsMake.com.com will guide you to take a screenshot of Macbook using keyboard shortcuts and the Zappy application, which has a built-in feature to write notes for screenshots. The application also has the option to record screen videos if you need. Let's follow the way to take a screenshot of Mac below.
1. Take a screenshot of Macbook using the keyboard
On macOS you can take a screenshot of your entire screen or just a certain part. The screenshot will then be automatically saved to your Mac's desktop.
- ⇧ Shift + ⌘ Command + 3 ⇒ Take a screenshot of the entire screen.
- ⇧ Shift + ⌘ Command + 4 ⇒ Capture selected screen area with mouse.
- ⇧ Shift + ⌘ Command + 5 ⇒ Open the screen capture/video menu (with many options: capture window, capture full screen, record video.)
- ⇧ Shift + ⌘ Command + 6 ⇒ Take a screenshot of the Touch Bar, if your Mac has one.
⇧ Shift + ⌘ Command + 3: Take a screenshot of the entire screen
To capture your entire screen, press and hold Shift + Command + 3 . If you're using multiple monitors, the command will capture and save a screenshot of every screen.
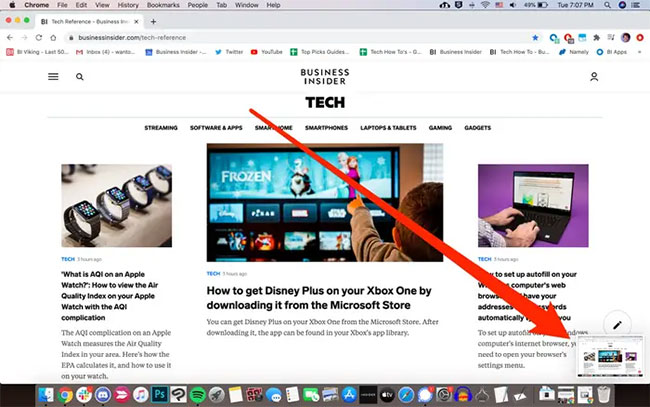
When you take a screenshot, you will see a small thumbnail preview in the bottom right corner of the screen, which you can click to edit the screenshot.
⇧ Shift + ⌘ Command + 4: Capture a specific portion or window
To capture a specific part of your screen, press Shift + Command + 4 . Your mouse pointer will turn into a crosshair. You can then click and drag this crosshair across any area of your screen. Release the mouse or trackpad button to capture the selected area, or press Esc to cancel.

That's not all you can do with this method. After pressing Shift + Command + 4 , you can press other keys to unlock more options:
- Take a screenshot of a specific window : Press Shift + Command + 4 , then press the spacebar. The crosshairs will turn into a camera. Hover the camera cursor over the window you want to capture and click it. When the screenshot is saved, it will have a gray border around it.
- Lock shape and size : After dragging the crosshair to create a highlighted area, press and hold the spacebar. This will lock the frame so it cannot be resized. You can then drag the frame anywhere on the screen. Just release the spacebar to take the screenshot.
- Adjust height and width : After dragging the crosshairs to create the highlighted area, press and hold the Shift key. This allows you to adjust the height and width of the box. You can toggle between height and width by pressing the Shift key. Release the mouse button or trackpad to take a screenshot.
⇧ Shift + ⌘ Command + 5: Use the screenshot menu
Current versions of macOS (Mojave, Catalina, Big Sur, and Monterey) come with the Screenshot app. To open it, press Shift + Command + 5 . A small menu will appear at the bottom of the screen.
The three icons on the left allow you to take a screenshot of the entire screen, a specific window, or a highlighted portion. The next two icons on the right allow you to record a video of the entire screen or just a highlighted portion.
The Capture button on the far right will take a screenshot.
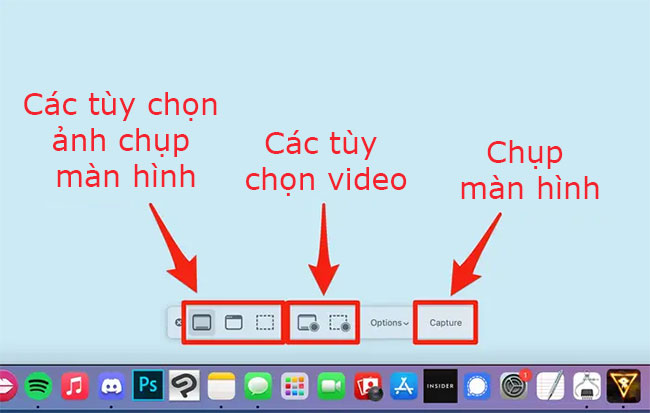
There is also a menu labeled Options. This menu allows you to choose where your screenshots are saved, how long you want between pressing Capture and taking the screenshot, and more.
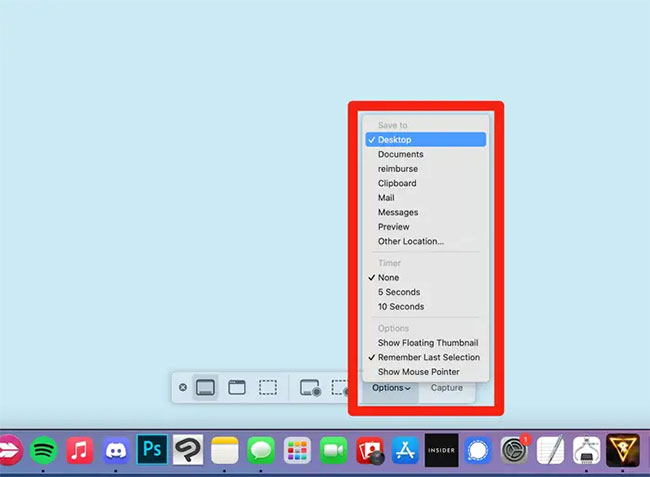
Note in this menu is the Show Floating Thumbnail option , which is enabled by default. When this feature is enabled, after you take a screenshot, a small thumbnail will appear in the lower right corner of the screen. The screenshot will not be saved to your computer until this thumbnail disappears after a few seconds.
However, you can click on this thumbnail before it disappears to open the screenshot in a new window. In this window, you can draw or type on it, crop it, share it via your Apple ID account, or delete it.
⇧ Shift + ⌘ Command + 6: Capture Touch Bar on macOS
Please refer to detailed instructions in the article: How to take a screenshot of the Touch Bar on Macbook .
If the built-in screenshot features on macOS do not satisfy you, try using some macOS screenshot software .
Where to find Mac screenshots?
By default, the screenshot appears on your screen. It will automatically have the title "Screen Shot" , followed by the date and time you took it.
You can also change where your screenshots are saved. Press Shift + Command + 5 to open the screenshot menu, then click Options. Use the menu that appears to select a new save location.
Quick Tip : If you hold down the Control key while taking a screenshot, it will copy the screenshot to the clipboard instead of saving it. You can paste the screenshot anywhere that allows you to insert images.
2. How to take a screenshot of your Mac that contains the mouse cursor
Normally when you take a screenshot on your Mac, the system's built-in screenshot tool automatically hides the mouse cursor from the final image by default. However, in some cases, you may need to take a photo that includes the mouse cursor to illustrate something in the photo.
Luckily, you can easily enable this feature with a simple option. Here's how.
To record the mouse cursor in a screenshot, we'll need to change a setting in macOS's built-in Screenshot app.
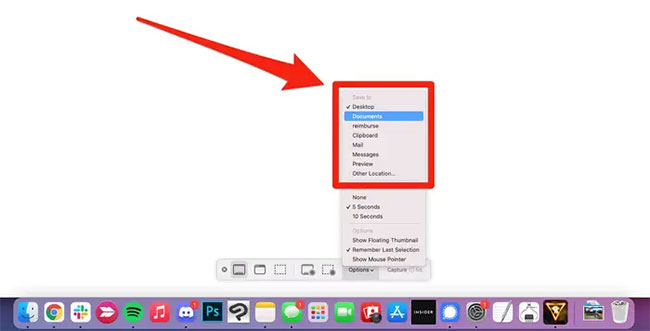
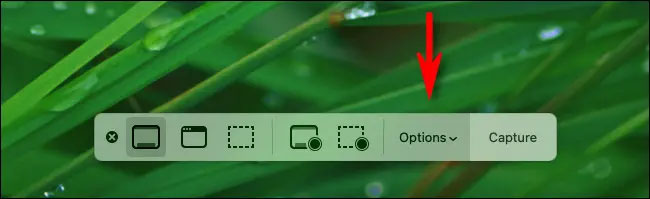
First, press Shift + Command + 5 on your keyboard, you will see a small toolbar appear on the screen. Click on ' Options '.
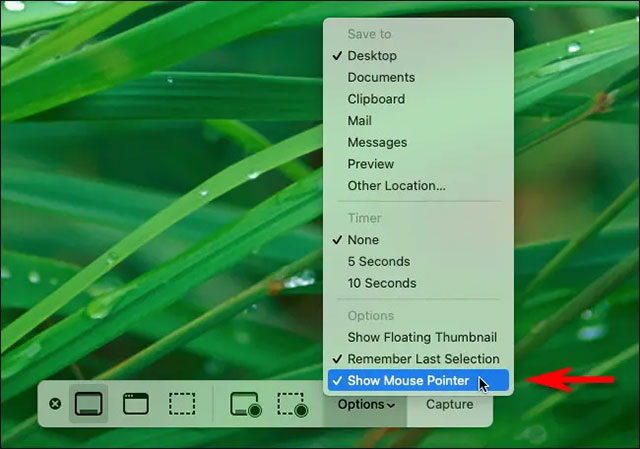
In the Options menu that appears, check the box next to the ' Show Mouse Pointer ' option.
That's it. From now on, every time you take a screenshot with Shift + Command + 3 or Shift + Command + 4 , you'll see your mouse cursor appear in the final image.
In case you again want to hide the mouse pointer from the screenshot as default, just follow the same steps and uncheck the ' Show Mouse Pointer ' option.
3. Take a screenshot of your Mac using a third-party tool
If you want more features that aren't available in the built-in screenshot tools on your Mac, check out these useful screenshot apps for macOS for more cool mac screenshot features.
Above are 3 ways to take screenshots on Mac. If you just need to take a normal screenshot, the first way is the simplest. If you need more photo editing features after taking the photo, you should install additional software like method number 3.
See also:
- How to turn on the camera on your Mac
- How to display the date on the macOS menu bar
Was this article helpful?
Your feedback helps us improve.
Related Articles
 Understand the connection and key presses on the Macbook5 minutes read
 8 ways to take screenshots of MacBook Air M1 20204 minutes read
 3 simple and quick ways to take a screenshot on your MacBook2 minutes read
 Instructions to change the interface of the mouse cursor on Windows3 minutes read
 How to enable Mouse Keys Windows 104 minutes read
 5 Simple Ways to Take a Screenshot of Your Macbook, Guaranteed to Be Clear7 minutes read
Reader Comments 0
Sign in with email or Google to join the discussion.