Table of Contents
Overview
This guide explains how to take a screenshot on macbook without using software in clear, practical terms. It covers the key concepts, recommended steps, common limitations, and useful checks so you can make a better-informed decision.
While using a computer, there are many times when you need to take a screenshot of your computer screen. Windows, you already know, if you don't know, you can see how to take a screenshot of a computer on Windows, and for those of you who use a Macbook, follow the instructions on how to take a screenshot of a MacBook computer below.
The simplest and fastest way to take a screenshot on a MacBook is to use a keyboard shortcut.
How to take a full screenshot on MacBook using keyboard shortcuts
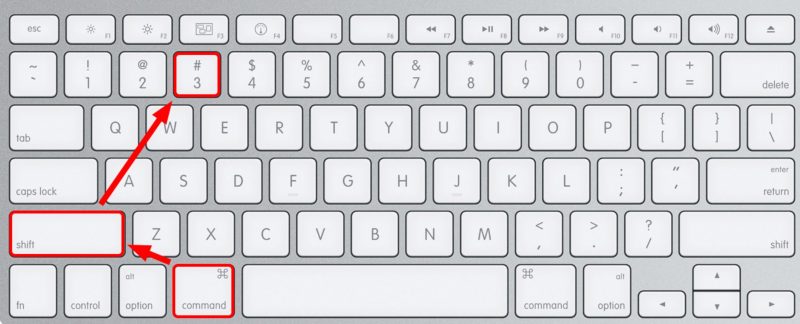
- Press Shift+Command+3.
- If you see a thumbnail in the corner of the screen, click it to edit the screenshot. Or wait for the screenshot to save and open the file you just took to edit it.
- To exit screenshot mode, press the ESC key.
Option to capture part of MacBook screen with shortcut
Instead of taking a full screen shot like above and then wasting time editing, we still have the option to take a shot of the part of the MacBook screen we want, which is
Step 1: Press the key combination Shift+Command+4.

Step 2: Drag the crosshairs to select an area of the screen to capture. To move the selection, press and hold the space bar while dragging. To cancel taking a screenshot, press the Esc (Escape) key.
Step 3: To take a screenshot, release your mouse or trackpad button.
How to capture a window or menu
To take a screenshot of a Macbook window or menu, just press the key combination Shift + Command + 4 + Space bar

The mouse pointer will now change to a camera icon. To cancel the screenshot, simply press the ESC button in the upper left corner of the keyboard.
How to take a screenshot of the Touch bar
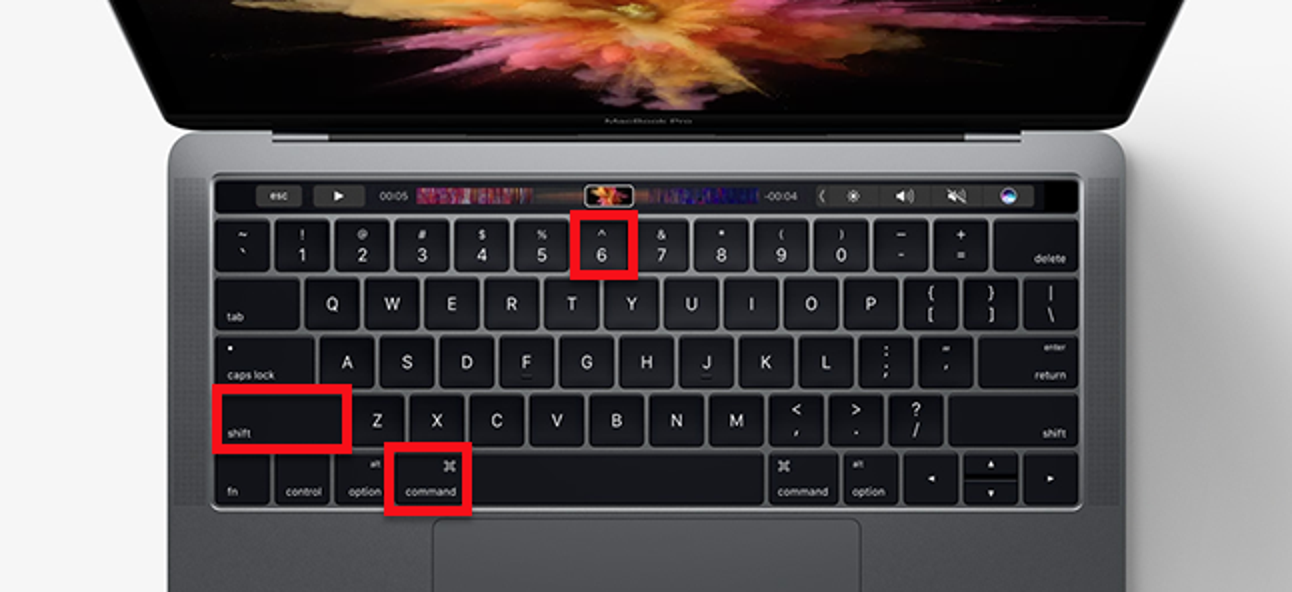
If your Macbook has a touch bar, here's how to take a screenshot of the Touch bar.
Press Shift + Command + 6
Press and hold the Control key while taking a screenshot to copy the image to the clipboard instead of saving it. This will free up space on your device for one-time use photos.
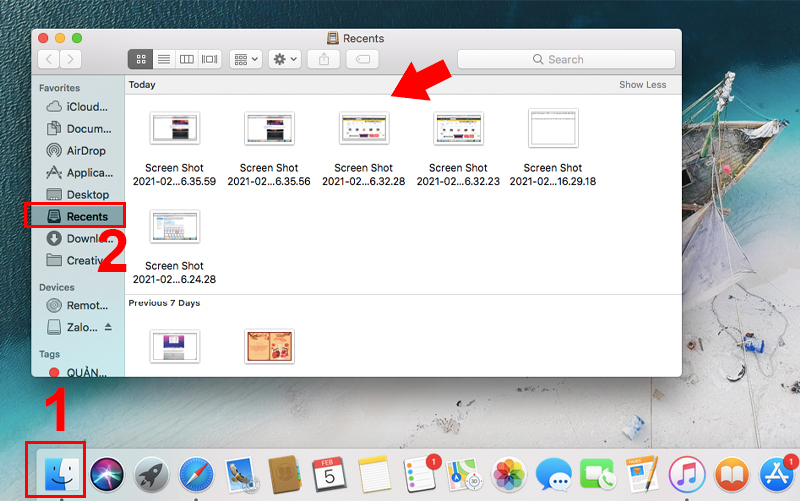
Where to find MacBook screenshots?
Usually after taking a screenshot of your MacBook, it will be saved on the desktop with the name 'Screen Shot [date] at [time]. png'
Some notes when taking screenshots on Macbook
- In macOS Mojave and later, you can also set a timer and choose where to save screenshots using the Screenshots app. To open the app, press Shift+Command+5.
- Some apps, such as the Apple TV app, don't let you take screenshots of windows.
- To copy a screenshot to the Clipboard, hold down the Control key while you take the screenshot. You can then paste the screenshot somewhere else.
- You can customize these shortcuts in the Shortcuts pane of Keyboard preferences. On your Mac, choose Apple menu > System Preferences, click Keyboard, then click Shortcuts.
Above are some ways to take screenshots on MacBook without using software, hope they are useful to you.
Key Takeaways
Use the guidance above as a practical reference for take a screenshot on macbook without using software. Check compatibility, follow the steps carefully, and verify important details with official documentation when software, security, accounts, health, or purchases are involved.
FAQ
How do I take a screenshot on macbook without using software?
Follow the steps in this guide in order, confirm each setting before continuing, and save, restart, or reconnect the device when the instructions require it.
What should I check before I begin?
Confirm the correct device, account access, software version, compatibility, and a current backup whenever the process could affect files, settings, or security.
What should I do if the process does not work?
Repeat the steps carefully, check for model or version differences, install available updates, and consult the manufacturer's official support documentation.
Related Articles
 The Simplest and Fastest Way to Take a Screenshot on a MacBook In 202613 minutes read
 How to Take MacBook Screenshots with Keyboard Shortcuts: Clear Instructions6 minutes read
 5 Ways to Take Screenshots on Macbook10 minutes read
 How to Quickly Take Windows Screenshots on Macbook6 minutes read
 5 Simple Ways to Take a Screenshot of Your Macbook, Guaranteed to Be8 minutes read
 3 Simple and Quick Ways to Take a Screenshot on Your Macbook3 minutes read
Reader Comments 0
Sign in with email or Google to join the discussion.