4 common errors on camera can be fixed in Lightroom
There are no perfect cameras or lenses. Whether you are using a smartphone or a high-end DSLR camera, they all have their own drawbacks and limitations. But it's okay, in this article, we will show you how to fix those disadvantages with Lightroom.
There are no perfect cameras or lenses. Whether you are using a smartphone or a high-end DSLR camera, they all have their own drawbacks and limitations. But it's okay, there will be a way to fix those disadvantages.
In this article, we will show you the most common camera errors, including:
- Dust on the sensor.
- Dead pixel (dead pixel).
- Blurred background.
- The problem of white balance.
You can solve all these problems in Lightroom. This photo editor will help you improve the image quality and you don't need to spend money to upgrade the camera life anymore.
- A set of video tutorials on how to edit photos with Lightroom
- Instructions on how to pair HDR photos on Lightroom
- Make photos as beautiful as hotgirl with Lightroom
1. Dust on the sensor
Dust spots on bad sensors and pixels are two different problems when using the camera but have the same solution.
Dust is a problem on most removable camera lenses, in which the sensor is exposed to the elements when you replace the lens. Some cameras have a built-in sensor cleaning function, otherwise you can clean the dust with a blown bulb (do not blow dust on the sensor by mouth because it will cause worse problems. ).

However, there are some very stubborn stains. If you do not want to manually clean or use other cleaning devices, you can use Lightroom to solve this problem.
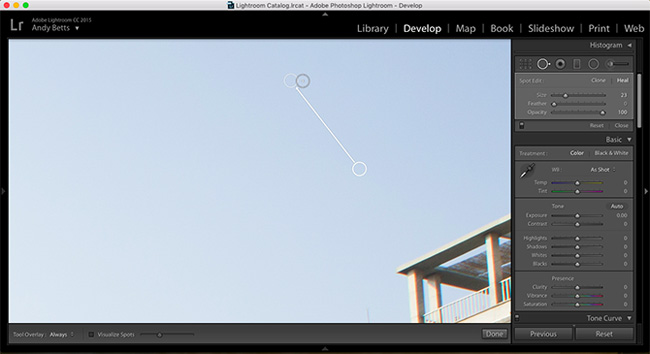
- Open the Develop module and click the Spot Removal Tool (or press Q on the keyboard).
- Choose Heal.
- Check the box next to Visualize Spots under the image. Drag the slider to adjust the threshold level.
- Zoom in and move around the image. Dust spots are easily visible in white.
- Adjust the size of the eraser to suit the dust size.
- Click on the dust on the photo.
- Repeat until the image is cleared of dust.

The Spot Removal Tool replaces an object with details and colors that are blended from surrounding pixels. With elements such as dust or dead spots, just using a simple tool is possible, we don't need to use brush tools, set the opacity or any other way.

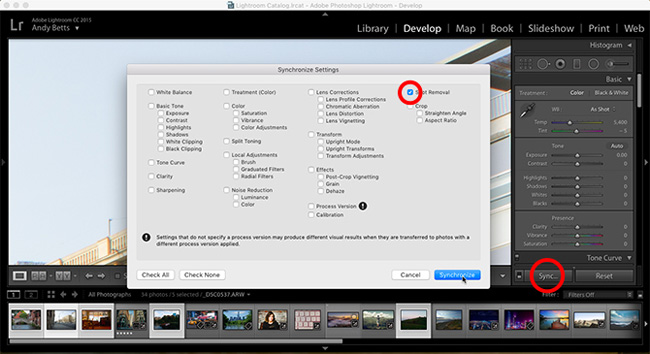
You can copy dust removed images to other images using the Sync function in Lightroom:
- Select the image you have edited in the Develop module .
- In Film Strip viewer at the bottom of the screen, hold down Ctrl (if using Windows) or Cmd (if using Mac) and select the pictures you want to copy.
- Click Sync, select Spot Removal (uncheck the rest) and click Synchronize.
2. Fix dead pixel errors in Lightroom
A dead pixel is a pixel that makes the image worse, it appears in the image as a tiny black dot. A corrupted pixel is even worse, it is displayed on images in the form of 100% red, green, blue or white spots. Hot pixels (also known as hot pixels) are similar, but they are only displayed when the sensor is hot (as long as photos are exposed).
Most cameras can handle hot pixels in their firmware, and some can also handle dead spots or broken points. Lightroom can also automatically identify bad pixels in a photo and edit them.
If no options are available, use the mentioned Spot Removal tool above to remove them from your photos.
3. Background blur effect
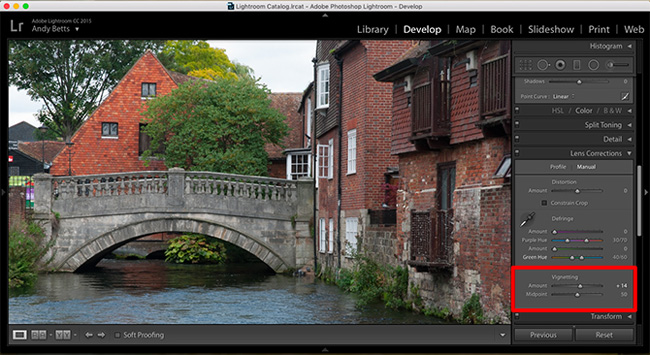
Color line editing can also be applied automatically via a wool profile in Lightroom, if that Lightroom version is built-in. Otherwise we can do it manually.
In the Corrections Lens in the Adjustments panel , click Manual.

In the Vignetting section , slide the Amount slider right until the brightness of the corners matches the rest of the image.
This adjustment can also be assigned to a preset value. Go to Develop> New Preset to do this. You can also save it in the same profile as editing other wools.
4. Problems with white balance
White balance settings are essential for the camera to capture accurate, consistent colors. While our eyes naturally adapt to the change in color temperature from different light sources, the camera cannot do so. Photos taken under fluorescent lights will give a cool green color, while photos taken in sunlight are warm orange. The standard white balance setting will remove the haunted overlay on this image.
Most users take pictures in automatic white balance mode. It eliminates the risk of users forgetting to switch from Cloudy to Sunlight while shooting, but the weather changes.

However, automatic white balance mode is only convenient, not really effective. There will be times when it creates an image that is too hot or too cold. Use Lightroom to fix this.
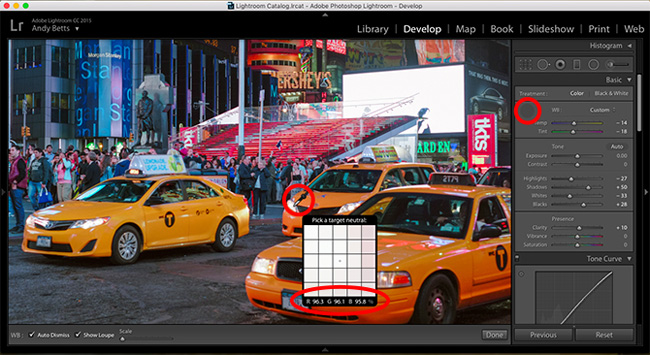
- White Balance ( MB ) is the first option in the Basic box.
- If you are working with RAW files, click on the drop-down list to see all white balance patterns. Choose the type that fits the photo.
- In JPEG, you will need to fix the image manually. First, click the eyedropper icon .
- Zoom in on the image and use eyedropper to select neutral color.
- Click the part you selected in the image to white balance fix the error. You may have to do this a few times to get the results you want.
Fix errors easily with Lightroom
All bug fixes are easy to implement and all help overcome camera limitations. Besides, you will not need to worry much about camera hardware anymore, because there is Lightroom image editing tool.
If you have similar problems, use Lightroom!


 How to cut a circle image on Paint
  How to fix the error of saving JPEG images into JFIF on Chrome
  Instructions on how to crop a circle image online
  How to create a 3x4 photo in Paint
  How to batch format photos in Windows 10
  How to delete text in photos with Paint