Fix problems in shared networks - Part 2
Eric Geier
In this second part, I will show you how to verify sharing and file privileges, how to access shared resources and how to reinstall connection devices.
In Part 1 of this two-part series, I talked about performing troubleshooting and troubleshooting tasks to solve shared network problems.
 Fix problems in shared networks - Part 1
In this section we will continue by evaluating sharing privileges and files. When they are not properly configured, users will not be able to access certain shared resources or may not receive full access (such as the ability to change files) when desired.
You can also discover how to access shared resources manually, this is how you can fix the problem from the underlying problem.
Finally, if you still encounter problems, we will reinstall the adapter and restore the router to the factory default mode.
Verify sharing privileges
If you have problems accessing shared resources or can't share files, then you should check the sharing privileges. These settings will determine who can access the shared folder and what they can do with files (read-only, write, delete, .).
The way you define completely different sharing privileges between two basic (default) and advanced sharing methods that you set yourself.
You can access the sharing settings by right-clicking on the folder and selecting the sharing option. When verifying these settings, you need to make sure you define what you want.
If the user only has read-only access, while you want them to be able to change the files, make sure the sharing terms are set up correctly.
For example, in the default sharing mode of Windows XP, check the option Allow users to change files , as shown in Figure 1 below.
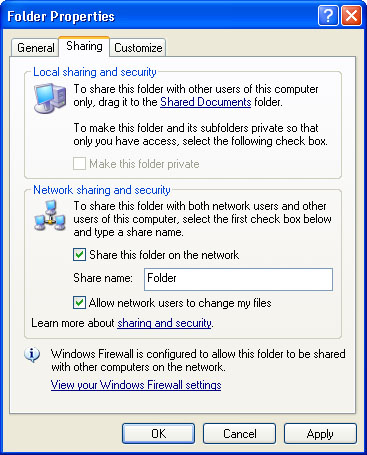
Figure 1
When using the advanced sharing option in XP or Vista, you can edit the access list and the type of permissions of each user (see Figure 2). The simple sharing method by default in Vista is the same as the advanced method.
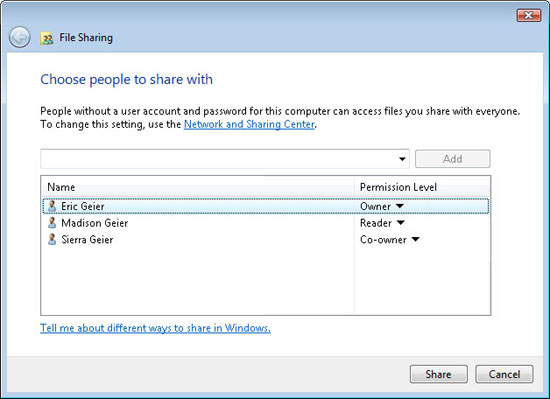
Figure 2
Note : For more details on setting permissions, see Part 1 of this series.
Verify File permissions (NTFS)
Separate permissions for internal file security are provided by the NTFS file system, which also applies to remote access of files on the network.
So if the file permissions for the directory are incorrectly configured, this can cause sharing problems or problems that you don't want. These permissions can be configured as configurations for advanced sharing.
To access the settings, right-click the file or folder, click Properties, and select the Security tab (see Figure 3).
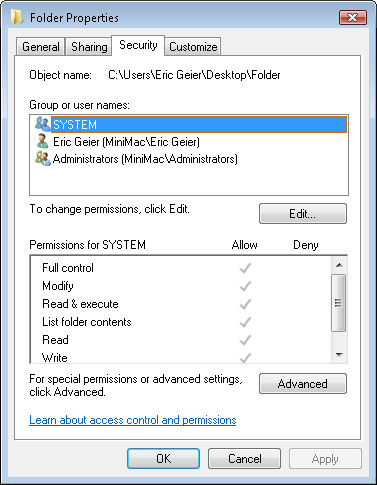
Figure 3
In XP, advanced sharing must be enabled properly for the Security tab
Note : To disable the basic sharing method and learn about the details of file permissions, see Part 1 of this series .
Access to manual sharing
Sometimes network protocols work in background mode and fail to work properly. If you have checked some of the causes (likely) and still cannot access the shared computer, when the cause may be that the protocols did not resolve the computer names correctly.
To fix this problem, you can manually access a computer using the computer's uniform or uniform naming convention (UNC) address.
If the computer still does not display in My Network Places for XP or Network for Vista, you can use the computer name in the UNC address. Alternatively, you can use the computer's IP address in the UNC address.
Sometimes a trick is required when the protocols get messed up (the computer is on the network, but you can't browse it) because My Network Places and Network default use the computer name method.
To manually access a computer (or a shared folder directly), type a UNC address into a web browser or a window.
The examples below clearly show you that, first type in two backslashes' ', then the desired computer's name or IP address; plus the path to the actual file that the directory you need to browse is distinguished by a backslash.
- desktoppc : Displays a list of shared computers via hostname.
- 192.168.0.105 : Displays a list of shared computers, via the computer's IP, such as the IP shown in Figure 4.
- 192.168.0.105sharedfolder : Access a directory directly on the same computer using the IP address.
- desktoppcsharedfoldersubfolder : Access and subdirectories of shared folders by computer name.
- 192.168.0.105sharedfolderexfile.doc : Direct access to a file inside the shared folder by IP address.
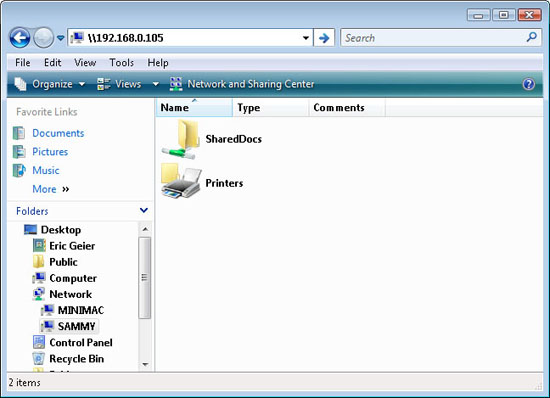
Figure 4
Reinstall the adapter and restore the router
If you still cannot share folders or access shared files, try reinstalling the adapter or restoring the router to the factory default settings.
If a problem occurs with a computer, reinstall the adapter. If the problem occurs in a wide area network, restore the router.
Reinstalling an adaper involves uninstalling its driver, then reinstalling the adapter. You can do it from Control Panel or by right-clicking on the Computer / My Computer icon, and then accessing the Device Manager window.
Navigate to the network adapter, right-click it and select Uninstall , as shown in Figure 5.
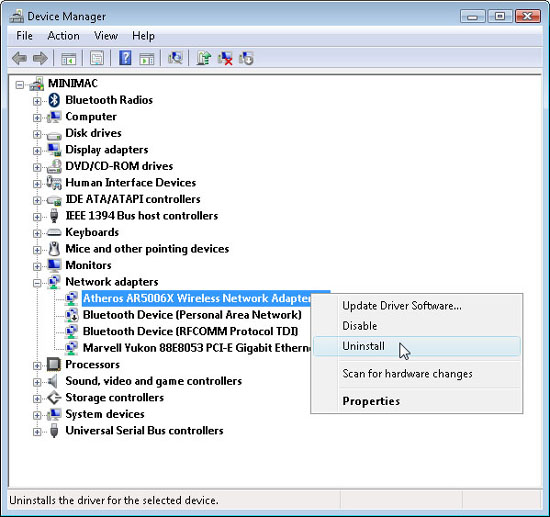
Figure 5
Now restart the computer. When the computer restarts, normally Windows will automatically detect the adapter and reinstall it, possibly with or without the new hardware wizard .
Otherwise, if Windows does not recognize the network adapter, follow the manufacturer's installation instructions.
Restoring your router back to its factory defaults takes only a few seconds, but you need to remember to reconfigure it.
Thus, you must first log into the router's configuration page by typing its IP address into the browser and using the password you created during the installation to log in initially (using a password default if you have not created this password).
Browse through the configuration page and find out where you can create a backup of Router settings, then save the configuration file to your computer.
You should also refer to the adapter documentation before recovering to get the default password for the Router (because you will have to use this password after recovery).
When ready for the Router recovery, find the reset button to perform the restore.
Just press the button, hold for about 30 seconds and release. You should see the network in Windows, using the default network name without encryption or security, this is the case with wireless routers.
As for wired routers, it will automatically reconnect. Now log into the router's configuration page, use the factory default password and use the backup file to restore your configuration.