Steps to fix volume automatically increase/decrease in Windows 10
Have you ever put on headphones, tried to play an audio file on your Windows 10 computer, but the sound disappeared for a few seconds? While it may seem like this is an issue of your own, the reality is that many users are experiencing the same error..
Fortunately, you can fix this problem with the ways that Tipsmake suggests below!.
1. Run Windows Audio Troubleshooter

Windows 10 comes with a dedicated audio troubleshooter that you can access from Settings. Run the troubleshooter and it will automatically find and fix audio-related problems for you.
To run the Windows sound troubleshooter:
Step 1: Press Windows key + I to open Settings. Then go to Update & Security section .
Step 2: In the left pane, open the Troubleshoot tab . Then in the right pane, scroll down and check if there is a troubleshooter available. Otherwise, click Additional troubleshooters.
Step 3: In the Additional troubleshooters window that appears, click the Playing audio option .
Step 4: Click Run the troubleshooter to launch the Windows audio troubleshooter. It will immediately scan the system for potential audio problems.
Step 5: If you have multiple audio devices connected, select the affected device and click Next.
Step 6: Follow the on-screen instructions and apply any of the suggested fixes. Once applied, connect the device and check if the problem of automatic volume up/down in Windows is resolved.
2. Turn off effects and sound enhancement options

Realtek audio driver comes with enhanced features added. It allows you to fine-tune bass enhancement, headphone virtualization, and volume equalization options. However, these enhancements can cause the system volume to change without user intervention.
Turning off all such enhancements can help with volume related problems on your system.
To turn off the sound enhancement features do the following:
Step 1: Right-click the speaker icon on the taskbar (at the bottom right corner) and select Sounds.
Step 2: In the Sound window , open the Playback tab .
Step 3: Locate and right-click the affected device, such as a headset, and select Properties.
Step 4: In the Properties window , open the Enhancement tab . Check the Disable all enhancements box .
Step 5: Click Apply > OK to save the changes.
Step 6: Reconnect the headset to the computer and check if there is any improvement.
3. Disable automatic communication

By default, Windows is configured to adjust the volume of different sounds when you receive or make phone calls. This handy feature can also cause your system to misinterpret incoming audio connections.
You can disable the option to communicate in Sound to prevent Windows from changing the system volume. Here's how to do it.
Step 1: Press Windows key + R to open Run. Enter mmsys.cpl and click OK.
Step 2: In the Sound window , open the Communications tab .
Step 3: Select Do nothing and click Apply > OK to save the changes. That will disable communication activity detection on Windows systems.
While effective, this is only an alternative. However, if you don't use your system to receive or make calls, you won't be affected much.
4. Check for hardware conflicts and third-party apps

Armory Crate by Asus and Discord are some popular apps that can change your sound settings. Close all third-party applications you may be running and check if the sound continues to change.
Open Asus Armory Crate and delete all the apps associated with your profile.
On Discord , go to Settings and open the Voice and Video tab . Next, scroll down to the Attenuation section and drag the slider to 0% to turn off the feature.
Also, check the peripherals for hardware problems. Faulty devices, like a wireless mouse or headset adapter, can also cause this problem.
5. Update the audio device driver in Device Manager

Outdated or damaged audio device drivers can cause the audio control system to malfunction. If you think the problem is caused by a driver error, you can update it from Device Manager.
To update the audio device driver, do the following:
Step 1: Press Windows key + R to open Run , type devmgmt.msc and click OK to open Device Manager.
Step 2: In Device Manager , expand Sound, video, and game controllers section . It will display a list of audio devices installed on the system.
Step 3: Next, right-click on the affected audio device and select Update Driver.
Step 4: Select the option Search automatically for the drivers . Windows will scan for available new drivers and install them automatically.
Also, check the audio driver vendor's website for driver updates that aren't available in the Windows download catalog.
6. Restore audio device driver

Device driver updates often improve performance and fix bugs. However, new updates can also bring problems. If you recently updated your audio device driver, try restoring to an earlier version.
To restore the audio device driver, follow these steps:
Step 1: Type device manager into the Windows search bar and open the app from the search results.
Step 2: In Device Manager , expand Sound, video, and game controllers section .
Step 3: Right-click the device and select Properties.
Step 4: Open the Driver tab and click Roll Back Driver . Follow the on-screen instructions to complete the restore process.
7. Downgrade to Windows shared drivers
If you determine the problem is caused by the Realtek driver installed on your system, you can downgrade to the Windows multi-device audio driver. When you switch to a generic driver, Windows removes the additional audio enhancement features provided by Realtek.
To downgrade to a shared Windows driver, do the following:
Step 1: Open Device Manager and expand Sound, video, and game controllers section .
Step 2: Right-click on the Realtek audio device and select Update Driver .
Step 3: Select Browse my computer for driver .
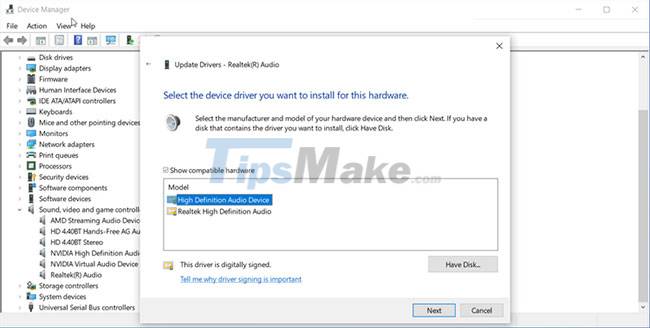
Step 4: Then, select Let me pick from a list of available drivers on my computer .
Step 5: In the driver window, select High Definition Audio Device and click Next.
Step 6: Click Yes to confirm the generic driver installation action. After the installation, restart the PC and check if there is any improvement.
8. Reinstall the audio device driver
You can reinstall your audio driver to fix any temporary problems. Windows will automatically reinstall the necessary drivers during reboot.
To reinstall the audio device driver, do the following:
Step 1: Press Windows key + X , then click Device Manager from the WinX menu .
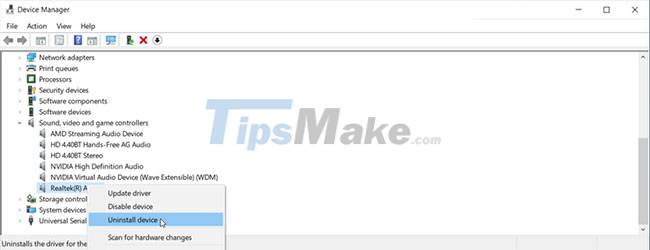
Step 2: In Device Manager , expand Sounds, video, and game controllers .
Step 3: Right-click on Realtek High Definition Audio and select Uninstall Device.
Step 4: Click Uninstall to confirm action. Once done, restart your PC. Windows will scan the system for missing drivers and install them automatically.
Good luck with your troubleshooting!