Table of Contents
This practical guide walks through steps to fix keyboard not working on Windows 10, explains the main requirements, and highlights common issues that may appear along the way.
1. Check if the USB port is faulty
Faulty, damaged USB port is one of the main causes of Windows 10 keyboard not working error. So the first step to do is to try to check if your USB port is faulty or damaged by plugging a mouse or keyboard into another USB port.
If the keyboard works, the USB drive has a problem. If not, read on for a few more ways to fix the next keyboard error below.

2. Disable/Disable Filter Keys
Another way to fix keyboard errors on Windows 10 is to disable Filter Keys. To do this, follow the steps below:
Step 1: Press Windows + R to open the Run window and enter Control Panel here and then press Enter to open the Control Panel window.

Step 2: In the window displayed on the screen, find and click Ease of Access => Change how your keyboard works.

Step 3: Find and uncheck the Turn on Filter Keys option.

Step 4: Finally click Apply => OK to save the changes and check if the Windows 10 keyboard error still occurs or not.
3. Update to the latest keyboard driver version
Outdated keyboard drivers can cause system/software compatibility issues, and cause Windows 10 keyboards to not work properly.
Try updating the keyboard driver to the latest version and check if that fixes the error.
Step 1: Press Windows + R to open the Run window and type devmgmt.msc there and press Enter to open the Device Manager window.

Step 2: Here you find and expand Keyboard => Find and right-click on Standard PS/2 Keyboard => select Update Driver Software.

Step 3: Next, click the Search automatically for updated driver software option so that the system automatically finds and installs the latest driver version, and checks if the same keyboard error still occurs.
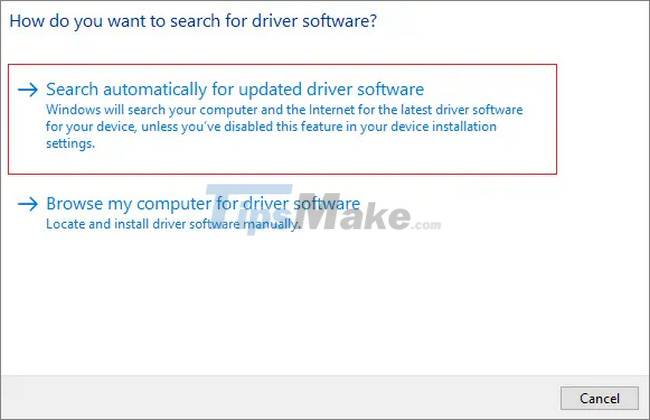
Step 4: In case if the above option is not available, click the second option to Browse my computer for driver software.

Step 5: Click Let me pick from a list of device drivers on my computer.

Step 6: Select the appropriate driver from the list and click Next.
Step 7: Once the process is complete, close the Device Manager window and restart your computer to apply the changes.
4. Disable/Disable Fast Startup
Step 1: The first step is to press Windows + R to open the Run window and then type Control Panel into it and press Enter.
Step 2: On the Control Panel window, find and click Hadware and Sound => Power Options.

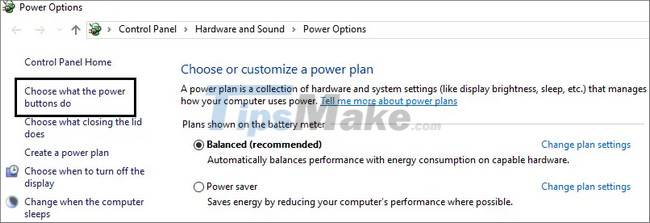
Step 3: In the left pane of the window, find and click Choose what the power buttons do.
Step 4: Click on Change settings that are currently unavailable.
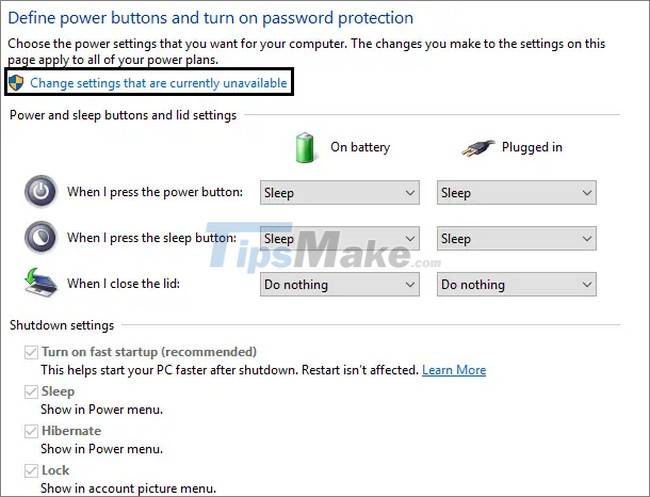
Step 5: Finally find and uncheck the box next to the Turn on fast startup option and then click Save Changes to save the changes.

Now try to check if the Windows 10 keyboard error still appears or not.
5. Uncheck the option Allow the computer to turn off this device to save power
In case if the above methods are not available, the Windows 10 keyboard error still occurs. Follow the steps below to uncheck the option Allow the computer to turn off this device to save power and fix the error.
Step 1: Open the Device Manager window by pressing Windows + R to open the Run window and type devmgmt.msc into it and press Enter.
Step 2: Find and expand Universal Serial Bus controllers, then right-click USB Root Hub and select Properties. If there are multiple USB Root Hubs, do the same for each device.
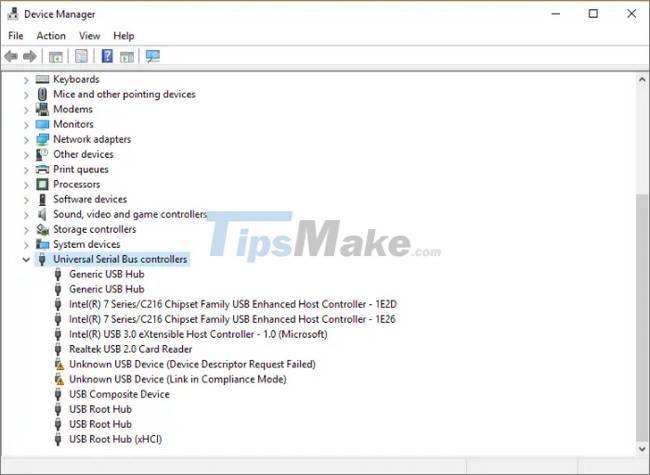
Step 3: On the USB Root Hub Properties window, find and click the Power management tab.
Step 4: Uncheck the option Allow the computer to turn off this device to save power.
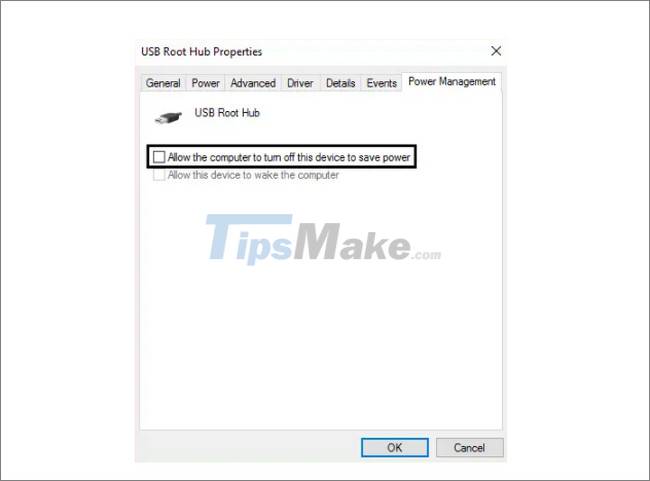
Step 5: Click Apply => OK and restart the computer to apply the changes.
6. Uninstall the keyboard driver and reinstall it
In case if the keyboard driver is damaged, the error can also be the cause of the Windows 10 keyboard not working, not working properly.
To fix the Windows 10 keyboard error in this case, the solution is to uninstall the keyboard driver. All you need to do is follow the steps below:
Step 1: Right-click the Start button on the Taskbar, select Device Manager. Alternatively, press Windows + R to open the Run window and type devmgmt.msc there and press Enter.
Step 2: On the Device Manager window => Find and select Keyboards => Double-click on Standard PS/2 Keyboard => select Uninstall.
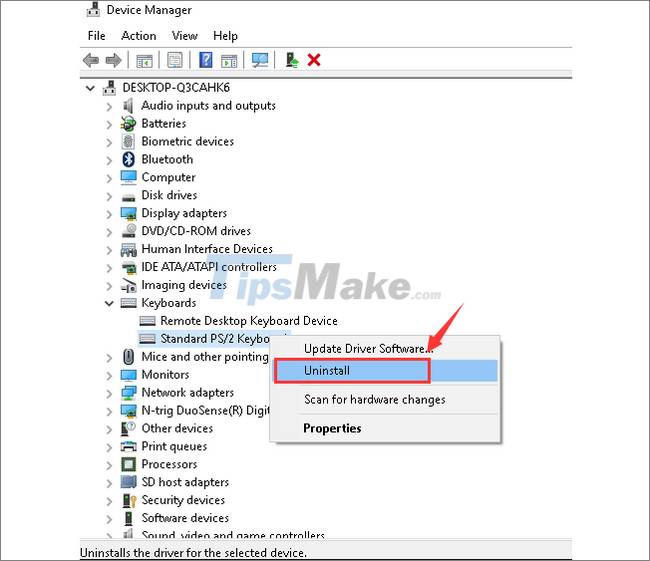
Step 3: If prompted, click OK to confirm and continue.
Step 4: Once the process is complete, proceed to restart your computer to apply the changes.
Next, the Windows 10 keyboard error will no longer appear.
Above are some simple and fastest ways to fix computer keyboard errors, laptops can't type, messed up, and don't work. Good luck.
Key Takeaways
Use the information above as a practical reference for steps to fix keyboard not working on Windows 10. Review each step carefully, confirm any requirements, and choose the option that best fits your situation.
FAQ
What does this guide explain about Steps to Fix Keyboard Not Working on Windows 10?
It explains the main concepts, practical considerations, and useful steps related to steps to fix keyboard not working on Windows 10 without requiring advanced knowledge.
Who can benefit from learning about Steps to Fix Keyboard Not Working on Windows 10?
This information is useful for readers who want a clear overview, practical guidance, and reliable steps related to steps to fix keyboard not working on Windows 10.
What should I check before applying this information?
Review the requirements, confirm that your device, software, or situation matches the instructions, and back up important data before making major changes.
Related Articles
 Fix Virtual Keyboard Not Working in Windows 105 minutes read
 How to Fix Laptop Keyboard Not Working Error on Windows 105 minutes read
 Fix Keyboard Error Not Working on Windows 105 minutes read
 How to Fix the Mac Keyboard Is Not Working5 minutes read
 How to Fix Some Keys on the Keyboard Not Working9 minutes read
 How to Reset the Keyboard: Clear Instructions18 minutes read
Reader Comments 0
Sign in with email or Google to join the discussion.