Share Hosting with Exchange 2007 (Part 1)
Rui Silva
The topic of hosting sharing with Exchange Server is not a new issue. Is it your concern to help many companies with simple, winning Exchange configurations or start small email configurations for themselves, Exchange Server has the capacity to meet those needs? Your set.
The author wants to write this article to introduce the most common requirements he has encountered in the technical community life, which would be very interesting if we explain in detail how to configure settings for each drama. Edition of Exchange infrastructure shared by many companies or customers. Therefore, in order to do that, for those who start a hosting business for a business, we recommend consulting Hosted Messaging and Collaboration (HMC) version 4.0 advanced solution, which we will also talk more or less in this article.
Depending on your needs, there are many ways to implement this shared hosting: with a simple configuration (see Figure 1), and a complex configuration (Figure 2) or using HMC framework (Figure 3). Exchange is really versatile and easy to adjust to your goals.
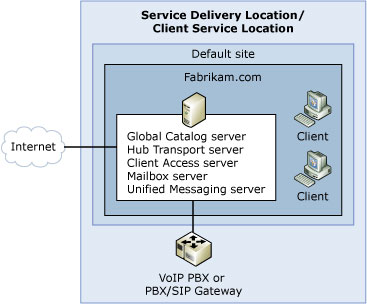
Figure 1: Simple Exchange Server 2007 organization

Figure 2: Complex Exchange Server 2007 organization

Figure 3: HCM architecture
For the purpose of this article, the author will describe in detail the steps needed to get a simple configuration for a server. If you need a more complex configuration, the necessary modifications are not that difficult.
The main object
The main objective mentioned is:
- Acceptance of SMTP Domain
- Isolate from customers or other companies
- List of distinguished addresses
- Exchange 2007 connection protocols: MAPI, Outlook Anywhere and OWA
Solution
The test script consists of a server with Client Access, Hub Transport and Mailbox role. Then use the domain client computer and an external computer simulating access via the Internet.
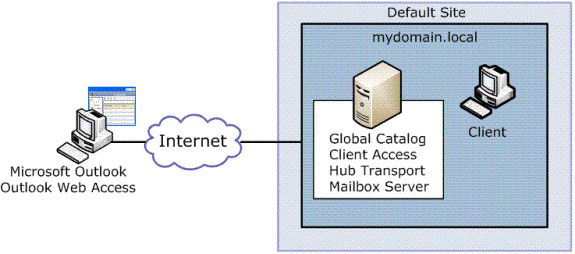
Figure 4
To demonstrate the desired configuration, the author of the article built a scenario in which he himself acted as the hosting company's own system administrator and served several security companies. The most famous secret in the world.
For this article, the author used 2 spy security firms of the TV series Get Smart: CONTROL and KAOS. Both organizations must be unaware of each other's presence on the same server.

Figure 5: CONTROL agents
Factors
CONTROL
- Maxwell Smart [MaxwellS@CONTROL.org]
- Agent 99 [Agent99@CONTROL.org]
KAOS
- Mr. Big [Mr.B@KAOS.org]
- Groovy Guru [GroovyG@KAOS.org]
Setting up the environment
Let's start by organizing Active Directory. Because there will be a lot of permissions and related rights, it is better to create an appropriate OU architecture and a security group for each organization will be very useful.
The author created a top-level OU called Hosting, below it is a new OU for each organization that is supposed to be configured (Figure 6). Under each OU organization, the author wants to separate users and groups, but this is absolutely unnecessary.
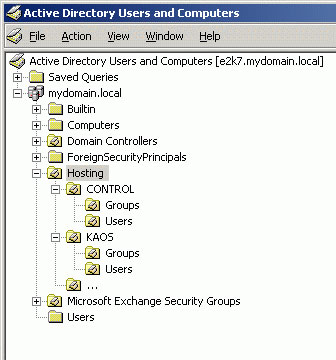
Figure 6
When you need an activated mail group, you use the Exchange Management Console (EMC). Open the Recipient Configuration section, select Distribution Group in the Actions panel and click New Distribution Group . Select Security as Group Type and place the remaining fields according to your organization. Note that you must not forget to select the right OU (Figure 7). Then click Next and New, most of the procedures in this article can be done with PowerShell. Before clicking Finish, EMC will show you the equivalent the PowerShell command (Figure 8).
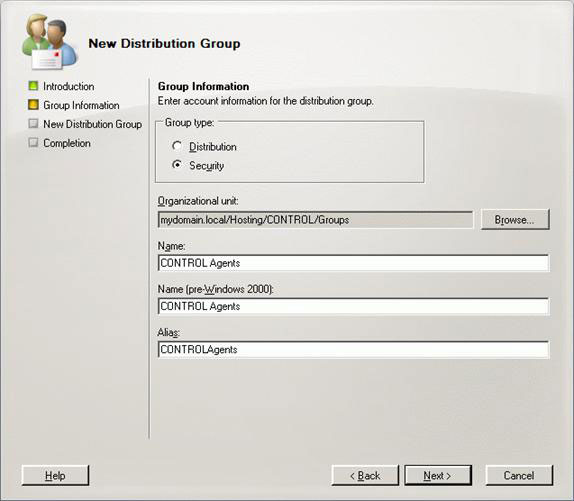
Figure 7
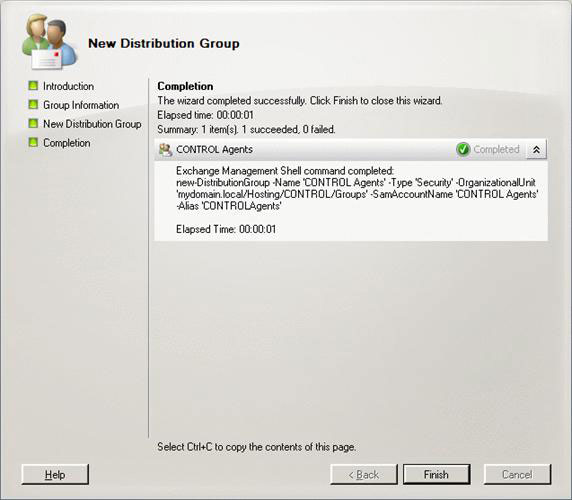
Figure 8
If you don't want the configured companies to use the Active Directory domain name (mydomain.local), it's best to add the appropriate UPN suffixes, so users can use them to log in. Open Active Directory Domains and Trusts management console, right-click Active Directory Domains and Trusts and select Properties . You should see a window, where you can insert all the other UPN suffixes you want (Figure 9).
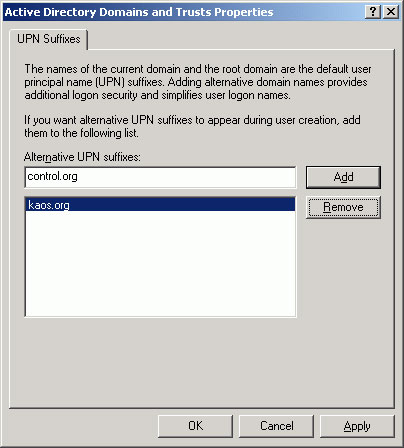
Figure 9
Hub configuration
Consider how to configure Hub Transport for hosting organizations. The first thing to do is to add the configured SMTP addresses to internal domains. This can be done using EMC, open Organization Configuration , Hub Transport and then click on the Accepted Domains tab. On the Actions panel, click New Accepted Domain . The New Accepted Domain Wizard appears, fill in the text boxes appropriately and make sure that Authoritative Domain. E-mail is được phép để một người nhận trong Exchange organization được chọn (Figure 10). Click Next, review the full and equivalent PowerShell commands, close the window by clicking Finish (Figure 11).
Repeat the same steps for KAOS and other companies you like.
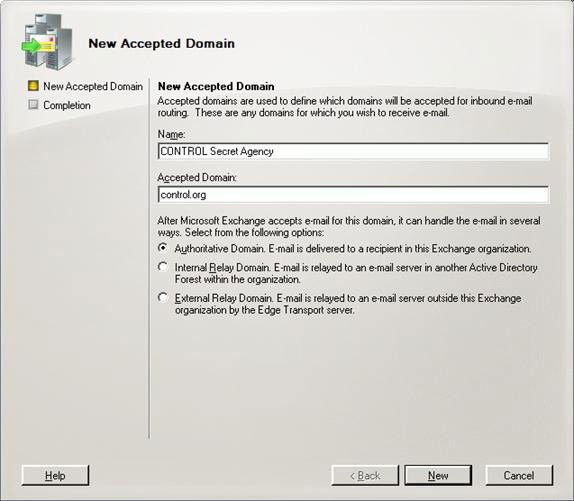
Figure 10
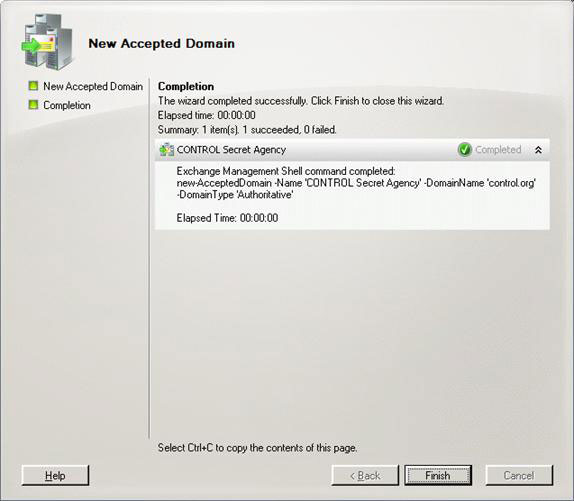
Figure 11
Now that the SMTP domains requested are accepted into the internal, define a new email address policy so that new users will automatically be assigned their appropriate email address.
If we want the email addresses to be generated automatically for the recipient, we must perform some kind of rule to implement this object. The first thought is to use a Distribution or Security Group, create an email address policy applied by the group member. The author in the article even built the necessary PowerShell command (Figure 12).
However, with Exchange 2007 RTM, filtering by group members does not work in all cases. This is an error that will be fixed in SP1.
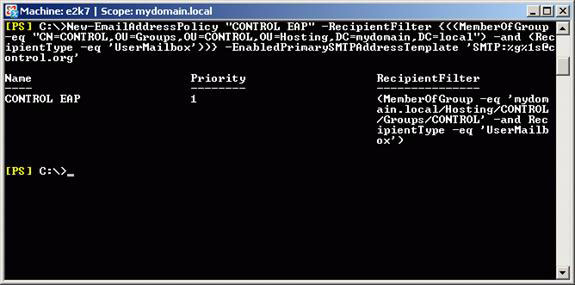
Figure 12
The next option is to use the Company attribute. However, because this attribute is not available to groups and we also want them to be properly assigned an email address, the final solution is to use optional Attribute 1 (Custom Attribute 1).
If you do not close EMC in the last step, select the E-mail Address Policies tab and click New E-mail Address Policy from the Actions panel. Give it a name for later reference and click Next (Figure 13).
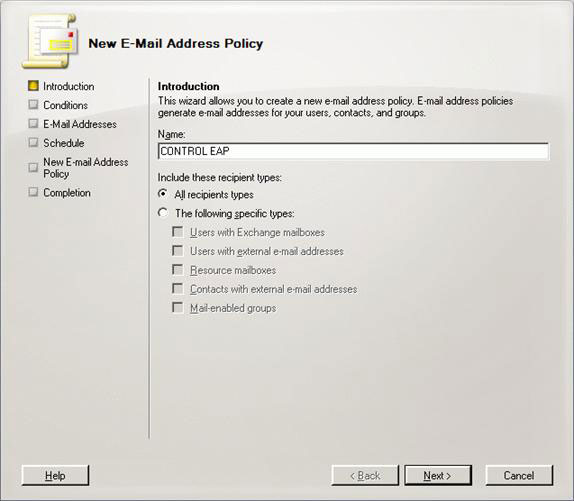
Figure 13
Select Custom Attribute 1 equals Value , click certain hyperlinks and type text values to distinguish the configuration organizations from each other. With the current example we will use "CONTROL" (Figure 14).
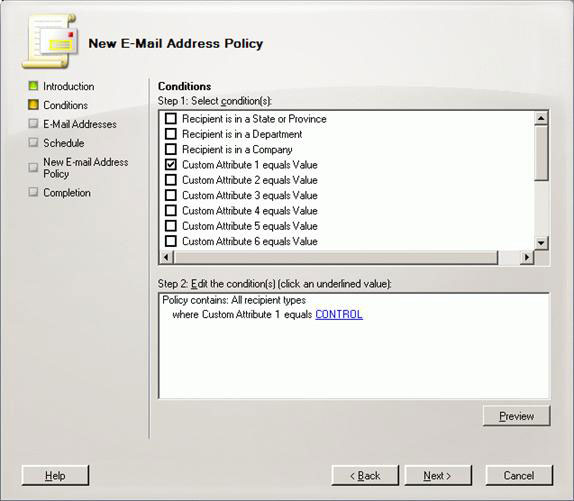
Figure 14
On the next screen, click Next, select the E-mail address local part (the author used the first and last name) and the E-mail address domain (control.org), as described in Figure 15 and the picture. 16. Click Next and Finish on the summary page (Figure 17). Create another email address policy for KAOS organization, you will end up with the necessary policies created as illustrated in Figure 18.
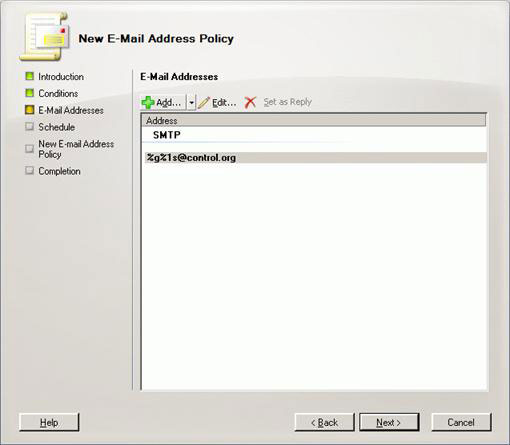
Figure 15
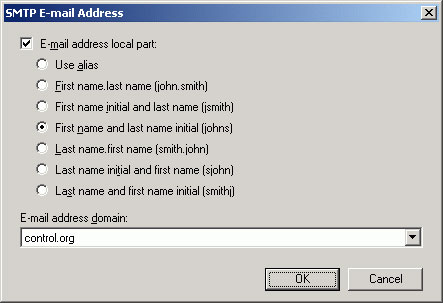
Figure 16
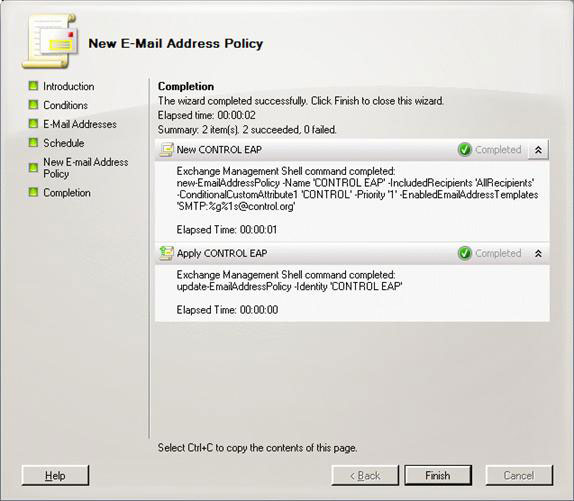
Figure 17
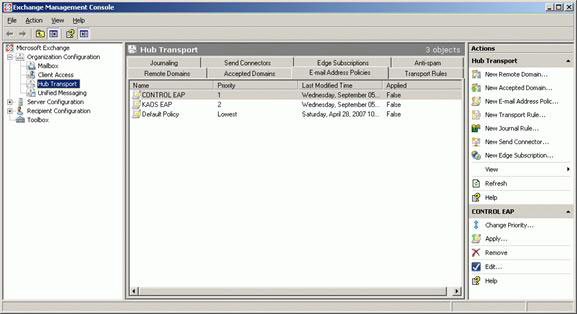
Figure 18
Figure 19 shows two CONTROL agents with the correct email addresses, after we apply the email address policy of CONTROL
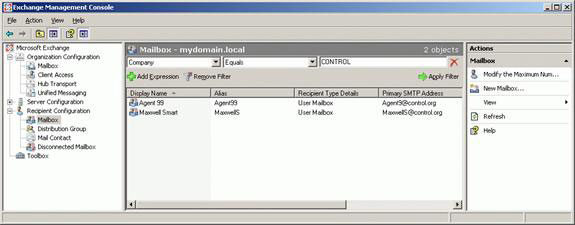
Figure 19
Configure Mailbox
Now we will give each organization their own address list. The procedure is the same as creating an email address policy. We will use Custom Attribute 1 again to filter the appropriate recipient.
Open EMC, select the Organization Configuration tab of the Address Lists tab and then click New Address List in the Actions panel. Set the name you want (CONTROL AL) and select the recipient type (Figure 20). Click Next.
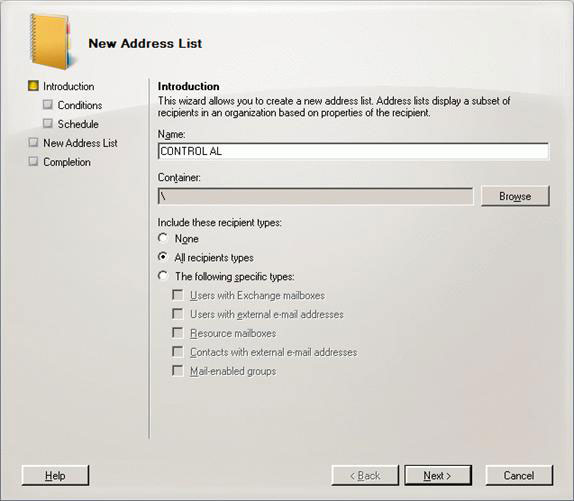
Figure 20
As mentioned, we'll use Custom Attribute 1, so again you choose Custom Attribute 1 equals Value , click on the specific hyperlink and type in the text value to distinguish the organization from (CONTROL or KAOS ) , as shown in Figure 21. Click Next , then Finish to finish the process of creating the address list (Figure 22).
After you repeat the same steps for the KAOS organization, the Address Lists tab will look like Figure 23.
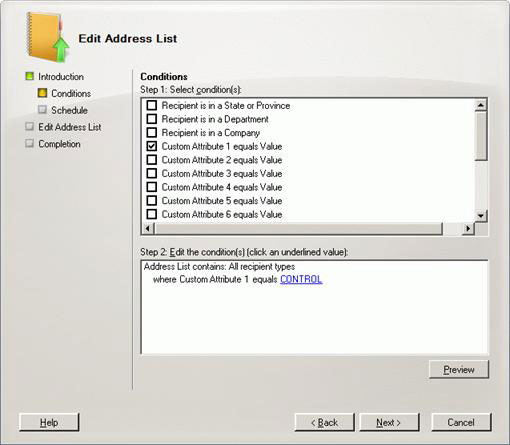
Figure 21
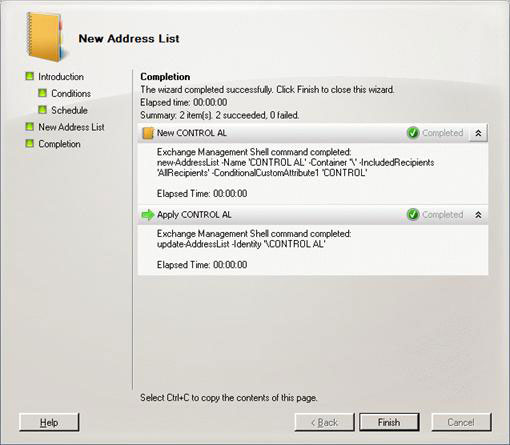
Figure 22
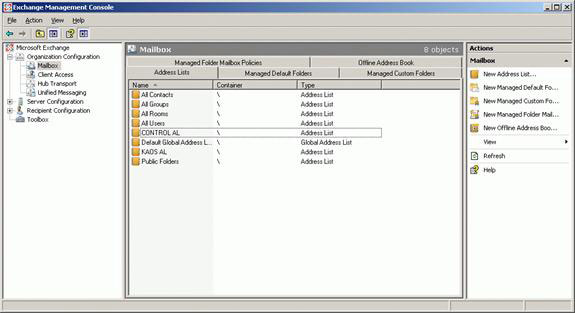
Figure 23
Let's move on to creating an offline address book. With the Mailbox selected on the left pane, click the Offline Address Book tab. From this panel, click New Offline Address Book . A pop-up window will appear, this is the New Offline Address Book wizard (Figure 24), where you will have to choose the generation server, name it the list of addresses you created. previous (CONTROL AL in case of evidence). Click Next and add the OAB virtual directory and select Enable Web-based distribution and Enable public folder distribution (Figure 25). Click Finish to close the wizard (Figure 26).
Figure 27 shows how the Offline Address Book tab looks after creating OAB for CONTROL and KAOS.
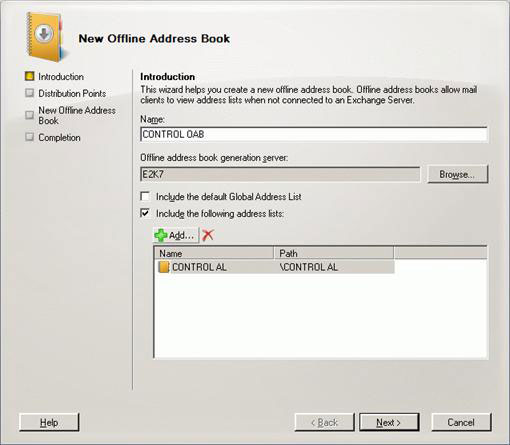
Figure 24
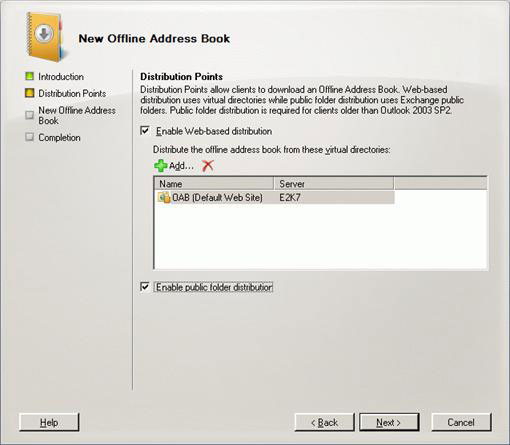
Figure 25
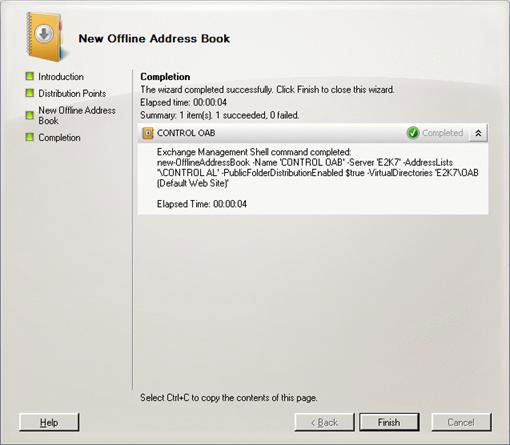
Figure 26
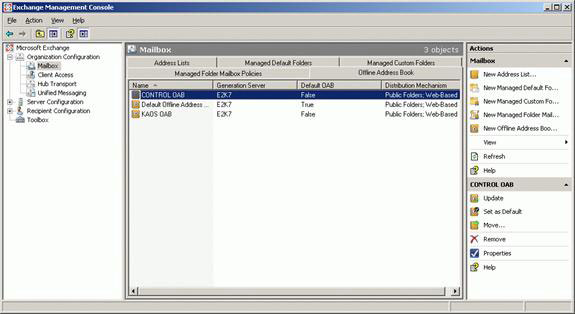
Figure 27
And last but not least, to end the Mailbox configuration, we have to create different Global Address Lists (GAL) for each spy company.
To complete this step, we will use PowerShell. You cannot use the Exchange Management Console to create a GAL but must use New-GlobalAddressList cmdlet in Exchange Management Shell (Figure 28):
New-GlobalAddressList -Name "CONTROL GAL" -ConditionalCustomAttribute1 "CONTROL" -IncludedRecipients AllRecipients
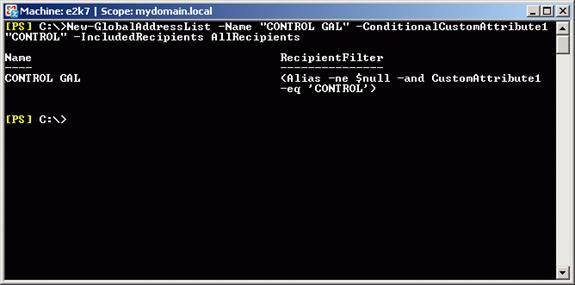
Figure 28
If you have multiple GALs in your organization, only one GAL is displayed in Outlook Address Book on each client. This address list is displayed as Global Address List, even if you have specified a different name when creating it in Exchange Server 2007. We will look more closely at how to incorporate each GAL for different organizations.
Conclude
Here we conclude Part 1 of a three-part series that introduces step by step the design of a simple hosting solution with Exchange 2007. In the next section we will focus on configuring security and adjusting Active objects. Directory.