Table of Contents
FILEminimizer Pictures can reduce the file size of one image or a batch. Add the source files, choose an output location and compression setting, then run Optimize Files. Always keep the originals until you have checked the compressed copies for readable text, clean edges and acceptable detail.

Before you compress the images
- Copy important originals to a backup folder.
- Decide whether you need smaller file dimensions, stronger compression or both.
- Use JPEG for most photographs; use PNG when transparency or crisp interface graphics matter.
- Test one or two representative images before processing an entire folder.
Compression and resizing are related but not identical. Resizing changes the pixel width and height, while compression changes how the image data is stored. For background on common photo formats, see the difference between JPG and JPEG.
Compress images in FILEminimizer Pictures
The screenshots show a legacy version of FILEminimizer Pictures. Button names may differ in another release. If you need to install the program, obtain it only from its current official publisher and scan the installer before running it.
1. Open the source files
Launch FILEminimizer Pictures and select Open Files in the main window or Tasks panel.
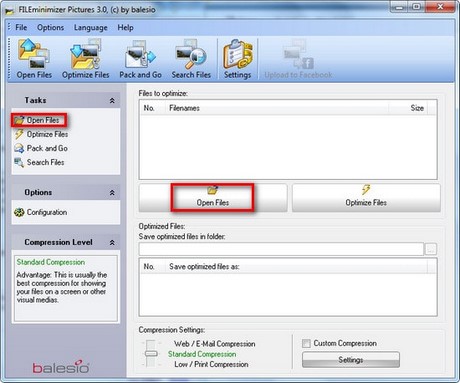
2. Select the images
Browse to the folder containing the source images, select one or more files and click Open. Work with copies if you are unsure how the installed version handles source files.
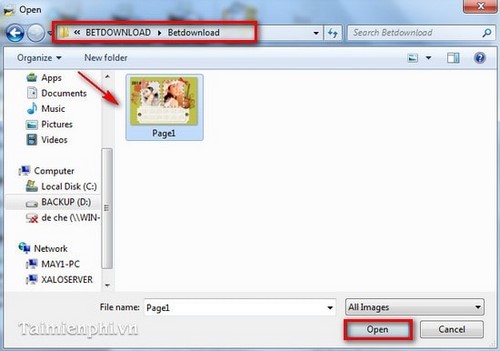
3. Review the processing list
The selected files appear in the main list. Use Add to List to include more images or Remove from List to exclude a selected item. Confirm that every file should receive the same compression settings.
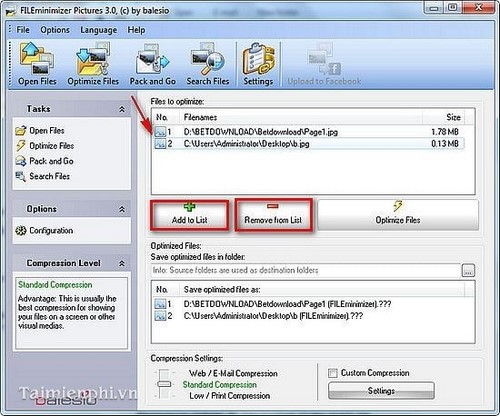
4. Choose output and compression settings
Select a separate output folder so the optimized files do not replace the originals. If the application offers presets, choose one that matches the destination, such as web, email or print. Stronger compression produces smaller files but can introduce blockiness, blurred text or color banding.
5. Optimize the files
Click Optimize Files to start processing. Do not close the program or move the source files until the operation finishes.
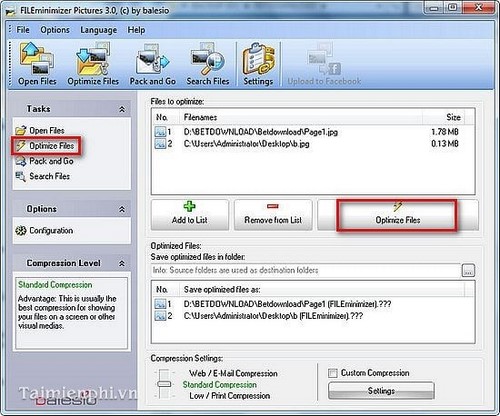
6. Check the results
After processing, compare the reported values:
- Old size: the source file size.
- New size: the optimized file size.
- Reduction: the percentage by which the stored file became smaller.
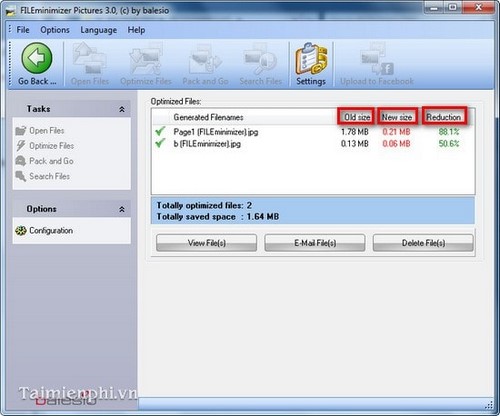
A large reduction percentage does not automatically mean a good result. Open several output images at 100% zoom and inspect faces, text, gradients and sharp edges. Keep the originals if the compressed version will be edited again.
When to use another method
- You only need a few quick files: TipsMake's online image tools include image resizing and compression options, but avoid uploading confidential images to any online service without reviewing its privacy terms.
- You need repeatable batch controls: compare other desktop photo-compression tools.
- You need exact pixel dimensions: use an image resizer and lock the aspect ratio rather than relying only on a compression preset.
Why a compressed image may still be large
Very large pixel dimensions, complex detail and a high export-quality setting can keep the file size high. Reduce the dimensions to the maximum actually needed, remove unnecessary metadata if appropriate and export a new copy. Avoid repeatedly opening and saving a JPEG because each lossy save can reduce quality.
Related Articles
 Instructions for Reducing Image Size with Fileminimizer Pictures6 minutes read
 Install and Use Fileminimizer Pictures to Reduce Image File Size4 minutes read
 Reduce the Size of Word Files with FileMinimizer3 minutes read
 Instructions to Reduce the Volume of Photos in Photoshop3 minutes read
 3 Best Software to Reduce Image Size Best 20205 minutes read
 Reduce Image Size Online Without Breaking the Image, Keeping7 minutes read
Reader Comments 0
Sign in with email or Google to join the discussion.