Attribute is one of the most important concepts of .NET, it affects many different aspects of a .NET application such as the ability to communicate with COM components, the ability to create a service, calculate security features, feature to save the object's data to file .
What is the attribute?
The power of .NET (compared to previous generations) is largely due to the idea of metadata. It is these information that help assemblies fully describe themselves, so that it is easier and more efficient to communicate and reuse programs written in different languages. Programming of course is also simpler! How to provide this information? The answer is: use attributes.
Properties are specialized objects that provide descriptive information for elements in an .NET assembly. The element here consists of assembly, class, members of the class (including constructor, attribute function, field, function function, parameter, return value), event.
How to use properties in C #
There are some rules that must be followed when using properties to write program code:
• Attributes must be enclosed in square brackets.
For example : When you create a Console type application in the VS.NET IDE, you will see the Main function is applying the STAThread attribute as follows:
[STAThread]
static void Main (string [] args) {
.
}
• The name of the attribute classes that usually have the tail is "Attribute" but you may not write this tail.
For example : Try changing [STAThread] to [STAThreadAttribute] and compiling the program. You will see that no errors have occurred.
• Properties can have many variations for different sets of parameters. When you need to pass parameters to attributes, write them in parentheses. For non-parametric variants, it is possible to write or not write empty parentheses "()". In addition, parameters must be constant expressions, typeof expressions, or array creation expressions (like new Type [] {typeof (TargetException)} ).
Example 1 : It is possible to replace [STAThread] with [STAThread ()] .
Example 2 : When you need to mark a class, the function is "old, you need to use an alternative version", you can use the ObsoleteAttribute attribute. 1 of 3 variations of this attribute is:
[Obsolete (string message, bool error)]
In it : message is used to provide information about the replacement class and function. error used to instruct the compiler to know what to do when compiling the class, the function using the applied element Obsolete . If the error is true, the compiler reports an error and does not compile. In contrast, the compiler only warns and still compiles normally.
Thus, we can use the following:
[Obsolete ("NewClass" should be used, false)]
public class OldClass {
.
}
// This class does not apply Obsolete attribute
public class ClientClass {
private OldClass a = new OldClass ();
.
}
When compiling the ClientClass class, VS.NET IDE will notify in the Task List window as shown in Figure 1 :

Figure 1
If you correct false to true, you will see an error message as shown in Figure 2 :
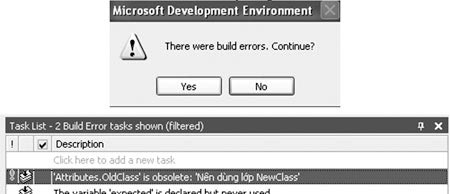
Figure 2
Example 3 : cannot be used
private string s = "Should use the NewClass class";
[Obsolete (s, false)]
But if adding const to the declaration of s is valid.
• The attribute has the target applied (specified by the author of the attribute), so the placement is also restricted. In general, the attribute must be set in front of the applicable target and cannot stand inside the body of the function. If the attribute has many applicable goals, it is possible to specify a specific target by one of the keywords: assembly, module, type, event, field, property, method, param, return.
For example :
[assembly: AssemblyTitle ("Demo")] // Right place
namespace Demo;
[assembly: AssemblyTitle ("Demo")] // Wrong place
[type: Obsolete] // Right place
// [method: Obsolete] // Wrong place
public class OldClass {
[type: Obsolete] // Wrong place
.
}
}
• Properties can be placed in consecutive square brackets or put in the same pair of square brackets separated by commas.
For example:
[type: Obsolete ("NewClass", false), Serializable]
equivalent to
[type: Obsolete ("NewClass" should be used, false)]
[Serializable]
• There are attributes that can be applied multiple times to the same goal . This is also attributed to the person who wrote the attribute.
Example 1 :
// The compiler will report "Duplicate Obsolete attribute" error
[type: Obsolete]
[type: Obsolete]
public class OldClass {
.
}
Example 2 :
// The compiler did not report an error
// ExpectedException property here is a custom property that we will create in part 5
[type: ExpectedException (typeof (xxxException))]
[type: ExpectedException (typeof (xxxException))]
public class OldClass {
.
}
• Some attributes are inherited. When you apply these attributes to a class, remember that the subclasses of that class also implicitly apply those properties. You will see this clearly in the "Creating a custom property" section.
• Finally, when using any attribute, remember to make a reference to the type space that contains it. For example, to use properties like AssemblyTitle, AssemblyVersion, need to add:
using System.Reflection;
Characteristics of properties
1. When adding properties to the program code , we have created an object whose information will be stored in the assembly containing the applicable goal of the attribute. Depending on the properties of custom or p-custom (p- is pseudo), this information will be saved as another .custom directive (.ver, .hash, serializable, .) in the IL code set.
For example , the following OldClass class will have an IL code (see ILDasm.exe) as shown in Figure 3:
[Obsolete ("If you want to use NewClass", false)]
[Serializable]
public class OldClass {
.
}
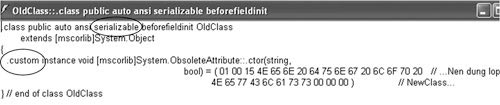
Figure 3
• Although stored in the assembly, the properties do not affect other code. Properties only make sense when there is a program needed and access it through the Reflection feature of .NET. Of course, the meaning of the attribute will be determined by that program. It also means that the same properties but "under the eyes" of different reading programs can have different uses. This is the most notable feature of the attribute.
For example, the Obsolete attribute used by the compiler to detect elements will not be used anymore, [TestFixture] is used by NUnit to select classes containing test functions that need to be activated automatically, .
• The data specified in the attribute is closely tied to the application's objective , not loose and therefore not as flexible as the data in the configuration file. Thus, the descriptive data is saved with a safer, more difficult-to-fix attribute.
• Attributes also have other characteristics such as : having a definite application goal, being able to apply multiple times to the same goal, can be inherited.
Some examples of application examples of properties
a - CLSCompliant Attribute:
The goal of .NET is to create a unified communication platform between many different programming languages. To achieve that, .NET defines two standards, CTS and CLS, in which CTS includes the basic types that a .NET language can choose to support and CLS is a set of rules that enforce all languages. .NET must apply to elements used to communicate with each other. Thus, a language can support the types that other languages do not support. As a result, when languages want to work together, these "non-common" types will "break", causing misunderstandings. To avoid this situation, .NET creates the CLSCompliant attribute used by the compiler to monitor and warn if any element violates the CLS rule. This property has the goal of applying every element.
For example:
// Check that all assembly elements are CLS-compatible
[assembly: CLSCompliant (true)]
namespace Demo {
// Own: ignore elements of this class
[type: CLSCompliant (false)]
public class A {
private uint a;
public uint b;
}
public class B {
private uint a; // is not considered a violation because it has a private domain
public uint b; // violation
}
}
b - Description information about assembly:
When using the VS.NET IDE to create a project, you will see that there is always a file named AssemblyInfo.xx (depending on the language, xx can be a file with C #, vb with VB.NET, .) . The following is the content of the file AssemblyInfo.cs has omitted the caption:
using System.Reflection;
using System.Runtime.CompilerServices;
[assembly: AssemblyTitle ("")]
[assembly: AssemblyDescription ("")]
[assembly: AssemblyConfiguration ("")]
[assembly: AssemblyCompany ("")]
[assembly: AssemblyProduct ("")]
[assembly: AssemblyCopyright ("")]
[assembly: AssemblyTrademark ("")]
[assembly: AssemblyCulture ("")]
[assembly: AssemblyVersion ("1.0. *")]
[assembly: AssemblyDelaySign (false)]
[assembly: AssemblyKeyFile ("")]
[assembly: AssemblyKeyName ("")]
( Note : You may be misguided that the file is mandatory. But no, it is nothing more than a tool that VS.NET provides, helping you focus the general assembly information in one place. It is possible to delete the above file and recreate the same items but to scattered in the project files.)
As you can see, the above file only contains all the properties with the assembly application goal. Those properties are in two spaces, System.Reflection and System.Runtime.CompilerServices . The first 8 properties are used to provide general assembly information (you can view this information using ILDasm.exe or Windows Explorer). AssemblyVersion is used to record the version number for the assembly, which will be needed by CLR. In particular, if assembly A refers to assembly B, then in assembly A it will recognize the version of B that A references. Thus, when CLR needs to load B to support A, the CLR can know and download the proper version of B.
AssemblyKeyFile is used to specify the file containing the public / private key pair that the compiler will rely on to create a unique assembly. If you do not use AssemblyKeyFile, you can use AssemblyKeyName instead, only need to specify the name of the key that has been installed into Crypto Service Provider on the machine. It is also possible to use both properties at the same time to specify the key; At that time, AssemblyKeyName will be used first.
Finally, AssemblyDelaySign is used to ask the compiler to create a unique pseudo assembly (since only a common key is needed), making testing easier. When it comes to deploying a real application, it must use a private key to create a unique assembly. Thanks to AssemblyDelaySign, the private key can be kept secret by someone without affecting the overall software development process of the group.
Create a custom attribute
In the previous sections, we used the available properties of .NET. In this section, we will learn how to create your own "use" properties through the process of building the ExpectedException property.
As with all custom attributes available, our self-created properties must be a subclass of the System.Attribute class:
// By convention, the attribute name should have the attribute Attribute
public class ExpectedExceptionAttribute: System.Attribute {
.
}
Self-created properties can have constructors and attribute functions as a regular class:
.
private Type expected = null;
private string msg = "";
public ExpectedExceptionAttribute (Type expectedType): this (expectedType, "") {}
public ExpectedExceptionAttribute (Type expectedType, string message) {
if (expectedType as Exception == null)
throw .
mong đợi = mong đợiType;
msg = message;
}
public Type ExpectedType {
get {
return expected;
}
}
public string Message {
get {
return msg;
}
set {
msg = value;
}
}
.
When used, the parameters of the constructor become positional parameters (ie mandatory and transmitted in the correct order), and the attribute functions become parameter named (ie optional). Yes and can be transmitted in arbitrary order, as long as it follows the positional parameters). Here are some valid uses:
[ExpectedException (typeof (Exception))]
[ExpectedException (typeof (Exception), "Expected type: System.Exception")]]
[ExpectedException (typeof (Exception), Message = "Expected type: System.Exception")]]
[ExpectedException (typeof (Exception), "Expected type: System.Exception"), Message = "Expected type: System.Exception")]]
Our properties only need to apply to create function, function, attribute function. Therefore, we need to specify the target applied to it via AttributeUsage attribute as follows:
[ AttributeUsage (AttributeTargets.Constructor | AttributeTargets.Method | AttributeTargets.Property)]
public class ExpectedExceptionAttribute: System.Attribute {.}
On the other hand, a function can generate many different errors, ie the ExpectedException attribute can be applied multiple times for the same target. We specify more:
[AttributeUsage (., AllowMultiple = true)]
Finally, we want that if the virtual functions of class A apply the ExpectedException property, the corresponding override functions of the subclass of A also inherit this attribute. Therefore we add:
[AttributeUsage (., ., Inherited = true)]
Please note that only if both AllowMultiple and Inherited are true, the new subclass inherits all attributes with the same value applied to the parent class.
Come here as we have completed the definition of properties. We set the properties we just created in assembly named DemoAttrLib.dll. Next, we build a program that uses ExpectedExceptionAttribute. We put this program in assembly DemoAttrClient.exe.
/ * This program includes 2 classes: DemoParentClient and DemoChildClient * /
dùng System;
using System.Reflection;
using DemoAttrLib;
namespace DemoAttrClient
{
public class DemoParentClient
{
[method: ExpectedException (typeof (TargetException))]
public DemoParentClient () {.}
[method: ExpectedException (typeof (ArgumentException))]]
[method: ExpectedException (typeof (TargetException))]
public void TestMethod1 () {.}
[method: ExpectedException (typeof (TargetException))]
public virtual void TestMethod2 () {.}
}
DemoChildClient class: DemoParentClient
{
[method: ExpectedException (typeof (ArgumentException))]]
public override void TestMethod2 () {.}
[method: ExpectedException (typeof (ArgumentException))]]
public new void TestMethod1 () {.}
}
}
As mentioned, an attribute is only valid when a program uses it. This program will use classes in the space type System.Reflection to check the properties associated with each element before making the appropriate decision to handle that element. Here is a simple example of such a program (in DemoAttrReader.exe assembly):
/ * This is a Console type program used to list the functions that are applied to the ExpectedException attribute in the specified assembly. * /
dùng System;
using System.Reflection;
using DemoAttrLib;
DemoAttrReader namespace
{
DemoReader class
{
// This function returns a string containing information that reports all functions that are applied to the ExpectedException property in the specified assembly.
public static string Read (string assemblyName)
{.}
// This function returns a string containing information that reports all functions that are using the ExpectedException property in the specified type.
private static string AttrRead (Type t)
{.}
[STAThread]
static void Main (string [] args)
{
if (args.Length! = 1)
{
Console.WriteLine ("Or is it an assembly?");
return;
}
Console.WriteLine ("PACKAGING:");
Console.WriteLine (DemoReader.Read (args [0]));
}
}
}
Run the program as shown in Figure 4- (note that there are two TestMethod1 functions for DemoChildClient class):
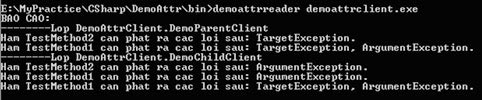
Figure 4
If you want a more complex example, please refer to NUnit's source code (www.nunit.org), an automated testing program that is quite popular with .NET programmers. The way NUnit works is simple: the probe in the assembly specifies which classes have the TestFixture attribute and activates the functions marked with Test properties, SetUp, TearDown, . in those classes.
So we've basically learned about the properties of .NET. Hopefully, what you have presented will help you with your programming.
Nguyen Phuong
Email: hungphung@hcm.fpt.vn
---------------------------------------
References
- "Applied .NET Attributes", author: Tom Barnaby and Jason Bock, Publisher: Appress.
- "C # Attributes", "Extending Metadata Using Attributes" and related articles in the MSDN library.


 What is CSS3? What's new and different from traditional CSS?
 Attribute in C #
 Attribute Selector - Attribute Selector in CSS
 Input element attributes in HTML
 Elements of the Form in HTML
 Attributes in HTML