Prepare Active Directory for Exchange 2007 (Part 2)
In part one, we went over the first four steps to take to prepare the Active Directory schema to receive Exchange 2007.
>> Prepare Active Directory for Exchange 2007 (Part 1)
First we need to prepare the legacy permissions for Exchange in case the legacy versions of Exchange exist, such as Exchange 2000 or Exchange 2003. Also in part one we just run the setup / PrepareLegacyExchangePermissions command to display a The number of errors should be fixed before the preparation process is completed. These problems are displayed in the command window but there are a number of other methods to check what happened when running these prepared commands.
In this section we will focus on checking whether the process of preparing an Exchange heritage license is successful.
Install Log files
For every preparatory process that we will perform in this article, the Log files (logs) will be created and we can check after this process completes to see if an error occurs. The file to check is ExchangeSetup.log, created in the C: ExchangeSetupLogs folder as shown in Figure 1.

If you open the ExchangeSetup.log file in Notepad, you will see the same errors and warnings in the text file that we have seen in the command window (in part one). These errors are highlighted in Figure 2.

You should note that some errors have hidden other errors that may appear in the legacy Exchange system. For example, when adding a current account to the Enterprise Admins group and moving the legacy Exchange system to a natural node, then run the setup command again.
/ PrepareLegacyExchangePermissions will cause a new error as shown in Figure 3. It means that one or more Exchange 2003 servers in the legacy system have not installed Exchange 2003 SP2 version. Therefore you need to make sure that you have fully archived the legacy Exchange system and fixed any errors that may hinder the process of preparing legacy Exchange licenses before running this command. If you do not do so, you need to run this command repeatedly to detect any missing errors.

Finally, you will be able to run the setup / PrepareLegacyExchangePermissions command successfully as shown in Figure 4. However, you should be aware of the warning that the .NET Framework 2.0 SP1 still exists and this warning is not true. obstructing the process.

Check out groups Permissions


So far we have completed testing legacy Exchange licensing settings.
Conclude
>> Prepare Active Directory for Exchange 2007 (Part 1)
First we need to prepare the legacy permissions for Exchange in case the legacy versions of Exchange exist, such as Exchange 2000 or Exchange 2003. Also in part one we just run the setup / PrepareLegacyExchangePermissions command to display a The number of errors should be fixed before the preparation process is completed. These problems are displayed in the command window but there are a number of other methods to check what happened when running these prepared commands.
In this section we will focus on checking whether the process of preparing an Exchange heritage license is successful.
Install Log files
For every preparatory process that we will perform in this article, the Log files (logs) will be created and we can check after this process completes to see if an error occurs. The file to check is ExchangeSetup.log, created in the C: ExchangeSetupLogs folder as shown in Figure 1.
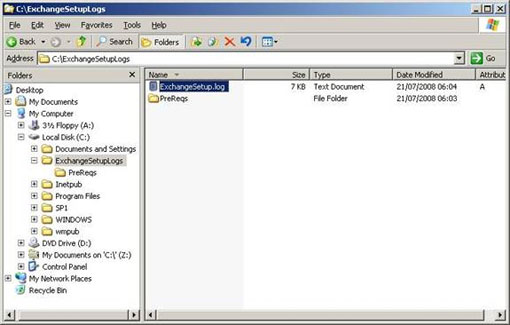
Figure 1: ExchangeSetupLog Folder.
If you open the ExchangeSetup.log file in Notepad, you will see the same errors and warnings in the text file that we have seen in the command window (in part one). These errors are highlighted in Figure 2.
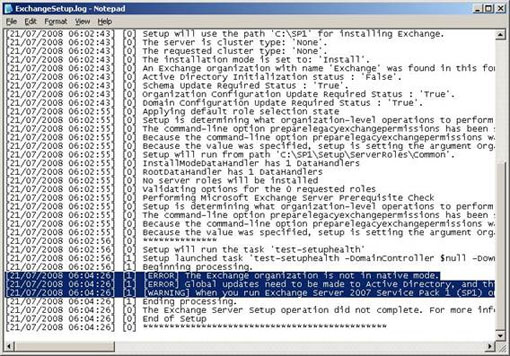
Figure 2: Errors displayed in the ExhcangeSetup.log file.
You should note that some errors have hidden other errors that may appear in the legacy Exchange system. For example, when adding a current account to the Enterprise Admins group and moving the legacy Exchange system to a natural node, then run the setup command again.
/ PrepareLegacyExchangePermissions will cause a new error as shown in Figure 3. It means that one or more Exchange 2003 servers in the legacy system have not installed Exchange 2003 SP2 version. Therefore you need to make sure that you have fully archived the legacy Exchange system and fixed any errors that may hinder the process of preparing legacy Exchange licenses before running this command. If you do not do so, you need to run this command repeatedly to detect any missing errors.
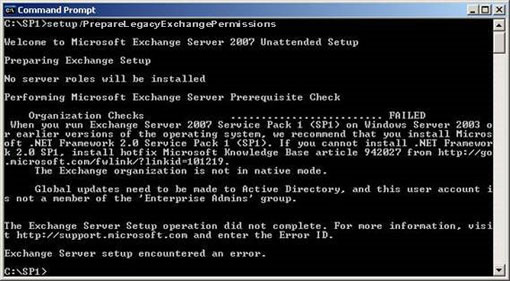
Figure 3: Error still exists in Exchange 2003 SP2.
Finally, you will be able to run the setup / PrepareLegacyExchangePermissions command successfully as shown in Figure 4. However, you should be aware of the warning that the .NET Framework 2.0 SP1 still exists and this warning is not true. obstructing the process.
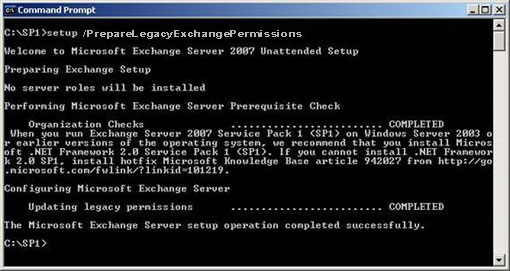
Figure 4: Heritage licensing process successfully completed.
Check out groups Permissions
Although we received a notice of successful implementation at the order window, how can we confirm that the process for preparing a legacy license has been successful? Remember that Log files are very useful in these cases as we mentioned in part one. First, go to the ExchangeSetup.log file and check for completed processes without errors.
Next, note that Microsoft provided detailed information on the Access Control Entries (ACE) that was added when doing this process. The other problem is how we can determine that these ACEs have been added. Please check the ExchangeSetup.log file created during the installation of legacy Exchange permissions. An excerpt of this file is shown in Figure 5. You need to install Notepad with the Word Wrap option to check all items in this Log file.

Figure 5: ACE items in ExchangeSetup.log.
What you see in Figure 5 is the different types of ACE applied. Checking the first item listed will show that the WriteProperty ACE has been added to the domain (DC = neilhobson, DC = com). Also examine the Globally Unique Identifier (GUID) you can see at the end of this section as you will see later in this article. This GUID is 1f298a89-de98-47b8-b5cd-572ad53d267e. If you check the end of this Log file, you can see that the ReadProperty and WriteProperty ACE has been applied to the AdminSDHolder object.
You can use LDP in the Windows Support Tools to check the ACEs complemented by the legacy license preparation process. In this article we will not go into the details of all additional ACEs, but focus on two of these ACEs including WriteProperty on the object domain and the ReadProperty / WriteProperty group on the AdminSDHolder object. First we will look at the ACE added to the object domain.
- Run LDP.EXE .
- At the LDP window, click on the Connection button and then click Connect .
- In the Connect window, enter the name of the original Domain Controller and click OK as shown in Figure 6.
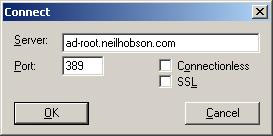
Figure 6: Connect window of LDP.
- When returning to the main LDP window, click Connection and then click on Bind .
- In the Bind window, enter the user name, password, and domain of a licensed user account, such as the administrator account of the root domain as shown in Figure 7.
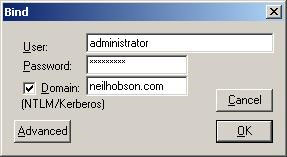
Figure 7: Bind window of LDP.
- The table on the right will inform you that you have been authenticated. Click View then Tree, and in the Tree View window, leave the BaseDN field and click OK .
- Back to the LDP main window you will see the root domain listed at the top of the left panel as shown in Figure 8.
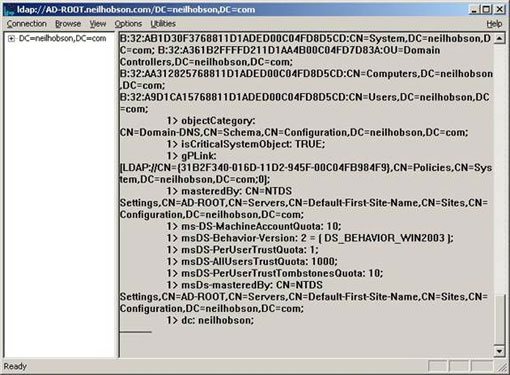
Figure 8: Tree View of LDP.
Before taking the next steps, you need to delete the information in the right panel by clicking Connection select New . Doing this makes it easier to read information in the next step.
- Right-click on the top domain of the right panel and select Advanced , then Security Descriptor from the context menu will appear as shown in Figure 9.
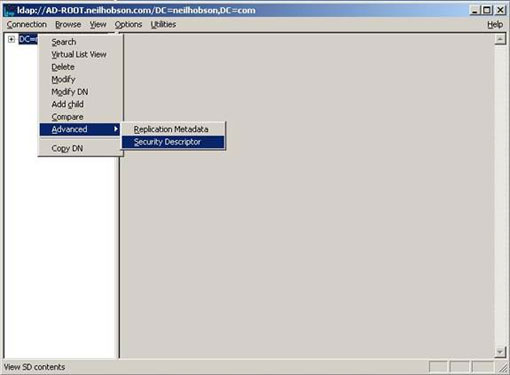
Figure 9: Options Security Descriptor.
- In the results window of Security Descriptor , leave the Dn field blank and click OK .
- The right panel will then contain more detailed information describing the ACE. In our example, there are a total of 40 ACE defined.
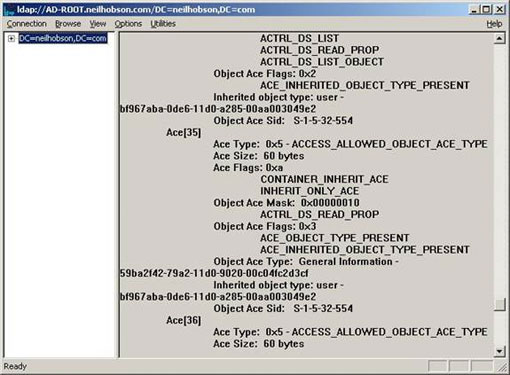
Figure 10: The ACE is displayed.
If you check the entire ACE list, you will see an item displaying the Write WritePreperty group on the object domain as shown in Figure 11. This is actually an WriteProperty ACE (via the ACTRL_DS_WRITE_PROP line) and that is the Security Identifier that accepts this item as the Exchange group . Enterprise Servers . Note that the GUID listed earlier is also displayed.
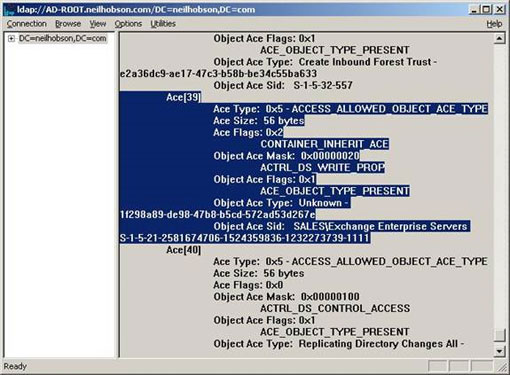
Figure 11: Domain ACE for the Exchange Enterprise Servers group.
Next, confirm whether you can see the ACE group on the AdminSDHolder object. Open LDP and then do the following:
- Click Connection to select New to delete the right panel.
- In the left panel, expand the object domain and then double-click the System object. Just inside the System object you will see the AdminSDHolder object.
- Click Connection to select New to delete the right panel.
- Right-click on the AdminSDHolder object, select Advanced and then select the Security Identifier .
- At the Security Identifier window, leave the Dn field blank and click OK .
- You will then see a lot of ACE information displayed in the right panel. You can check the entire list to find out which items to install ReadProperty and WriteProperty for the Exchange Enterprise Servers group as shown in Figure 12.
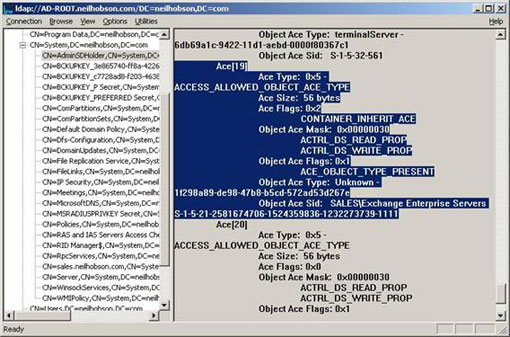
Figure 12: ACE AdminSDHolder for the Exchange Enterprise Server group.
So far we have completed testing legacy Exchange licensing settings.
Conclude
In this second part we have completed the preparation of legacy Excahnge licenses, finding out how to determine the process of success. In the next section, we will take a few steps to prepare the Active Directory schema and check if this and the Active Directory replication process are successfully performed.
Share by
Marvin Fry
Update 26 May 2019