Configure the Lightweight Directory Service service - Part 6
In this next article, I will continue the discussion by showing you how to create a site structure used for larger AD LDS deployments .
In the previous part of this series, we gave you an overview of how the replication working process works in the AD LDS environment. In this section, I want to show you how to create an AD LDS site structure.
Defining an AD LDS site
The tool we can use to create AD LDS site is Active Directory Sites and Services console. This is the main utility used for managing Active Directory environments, but it can also be used to manage AD LDS sites with ease.
Let's start the process by opening Active Directory Sites and Services console. When the console appears, right-click on Active Directory Sites and Services and select Change Domain Controller from the menu. If you perform this action from a domain controller, you will see a screen that appears similar to the one shown in Figure A, listing all known domain controllers. If you look carefully, you will see the Change To section of the dialog box with an option called This Domain Controller or AD LDS Instance .

Figure A: You must use Active Directory Sites and Services console to create AD LDS sites
Here, select this Domain Controller or AD LDS Instance option . You will see nothing happen when doing this action. The dialog box still displays the list of domain controllers. However, if you look at the image above, you will see the first domain controller has the words ' Type a Directory Server Name [: port] Here ' (Enter the Directory Server name [: port] here). Click this line and type in the FQDN of the AD LDS server, followed by a colon and the port number assigned to the instance you want to connect to.
As I have explained in the previous sections, when you create an instance, you will be asked to provide the name for that instance as well as the LDAP port and SSL port, as shown in Figure B.

Figure B: AD LDS Setup Wizard requires you to assign the port number to the instance
If using the default settings, the first instance will be named Instance1 and assigned port number 50000, as shown in the image name. If you want to create additional instances (using the default settings), you can see the port number added 2 after the port number of each created instance. For example, Instance2 will use the default port number of 50002 , Instance3 will use 50004 .
At this point, we must enter the name of the FQDN and the port number assigned to the instance to connect to. For example, we installed AD LDS on a domain controller called Lab-DC2 in the lab.com domain. So here if you want to connect to the default instance (using the default port number), we just need to type:
Lab-dc2.lab.com hai0000
When you click OK , you will see a message like the one shown in Figure C below that will ask if you want to use another forest with the same domain. Here we click Yes to connect to the AD LDS instance.
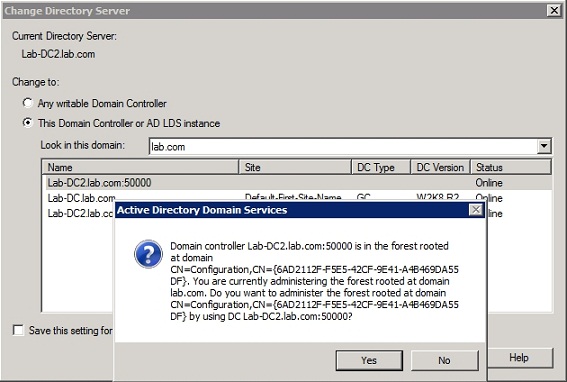
Figure C: Click Yes to connect to the AD LDS instance.
Create AD LDS Site
After connecting to the AD LDS instance, let's define the topology of the site. In general, the site structure you create is similar to a network topology, with each site link corresponding to a WAN link. If there is a high-speed LAN connection between two AD LDS instances, these LDS instance ADs should be placed inside a site.
To create a site, right-click the Sites section in Active Directory Sites and Services console and select the New Site command from the menu that appears. When done, you will be prompted to specify a name for the site. You are also prompted to select the site link to connect to other sites, as shown in Figure D below. Microsoft provides you with a default site link (named DEFAULTSITELINK ), but you can create other links if you want.
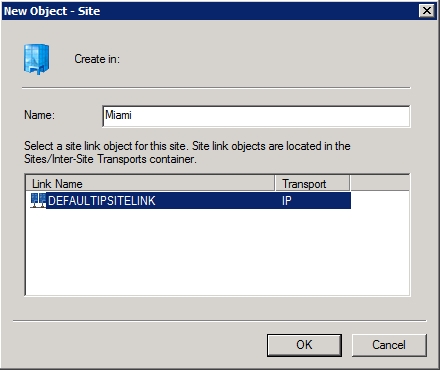
Figure D: Give Windows the site name and select the auxiliary link for the site
When you click OK , the site will be created. However, you will see a message telling you that you need to do some other work. As you can see in Figure E, you must link the site to several other sites, combine one or several subnets with the site. The dialog box also tells you that one or more domain controllers must be installed or moved to the site. However this notice is not true. It is displayed because AD LDS acknowledges that you are working in an Active Directory environment. However, because we are working with AD LDS, domain controllers are not required. We only have to move AD LDS instances to the site.
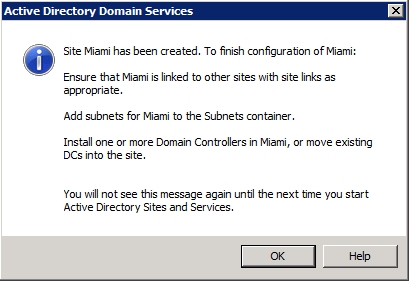
Figure E: Some other work to be done
Assign Subnet
As explained above, each Active Directory site needs to correspond to a subnet. To give AD LDS subnet information for your network, open the Sites section, then right-click the Subnets section to select New Subnet .
You must enter the subnet prefix, as shown in Figure F. The prefix you entered will be listed under Active Directory Domain Services Prefix Name , but in practice it will be limited by the configuration file. Finally, you must select a site to associate with the IP address prefix, as shown in the figure below.
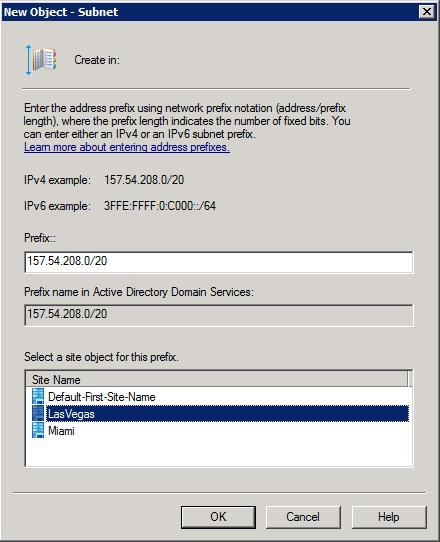
Figure F: Assign the IP address prefix for each site
Move the server to another site
By default, each of the AD LDS servers is placed on a site named the first default site name. If you want to use a multiple site configuration, you need to move the servers from the default site to the appropriate site.
To move a site, we just need to open the Site section and select Servers below it. Right-click the list of servers and select the Move command from the menu that appears. Then there will be a dialog box asking to specify the site you want to move the instance into, as shown in Figure G. After making your choice, click OK to move the instance.
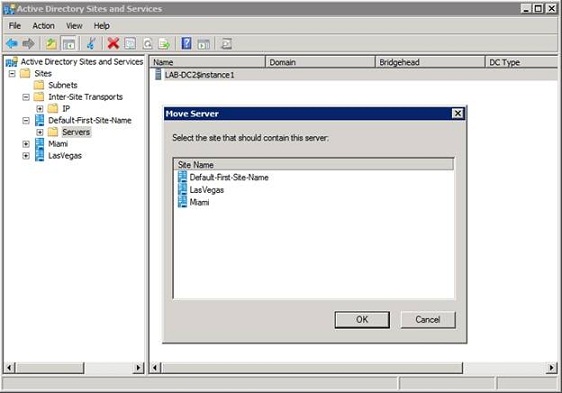
Figure G: Select the site you want to move the instance into and click OK.
Conclude
In this section, I have shown you how to create AD LDS sites and how to move AD LDS instances to a site. In the final part of this series, we will show you how to configure the process of creating an AD LDS replica between sites that you have created.