Table of Contents
To create a new partition in Windows 11 or 10, open Disk Management, shrink an existing NTFS volume, and create a New Simple Volume in the resulting unallocated space. This reorganizes capacity that already exists on the same physical disk; it does not add storage or make a nearly full disk larger.
Decide whether a new partition will solve the problem
A separate partition can keep projects, media, or backup images organized and can simplify some reinstall workflows. It does not protect files from physical-disk failure, and splitting a nearly full drive can leave both volumes short of working space. If C: is full while D: has plenty of room, moving personal files or supported applications may be safer than deleting and recreating partitions.
Before resizing:
- Back up important files to another physical device.
- Save the BitLocker recovery key and suspend protection if the Windows volume is encrypted.
- Check the drive's health and resolve file-system errors.
- Connect a laptop to AC power.
- Do not alter EFI System, Recovery, OEM, or Microsoft Reserved partitions.
1. Open Disk Management
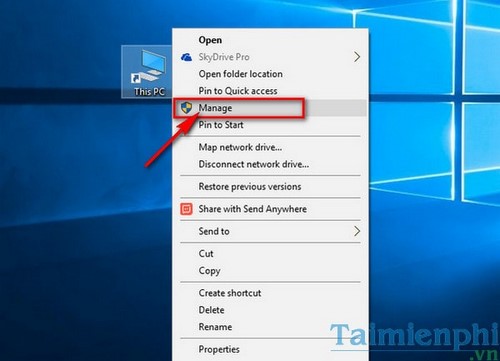
Right-click This PC and choose Manage.
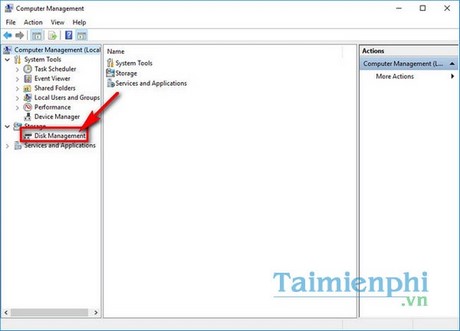
In Computer Management, select Storage > Disk Management. You can also press Windows + R, type diskmgmt.msc, and press Enter.
2. Choose a volume to shrink
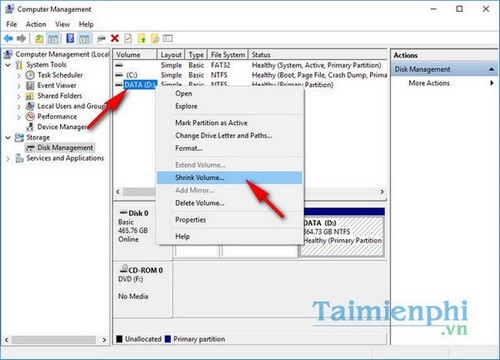
Use the lower pane to locate the intended physical disk and a healthy NTFS volume with enough free space. Match the disk number, total capacity, volume label, and drive letter. Right-click the volume and select Shrink Volume.
Do not choose a volume merely because it looks “empty.” Hidden recovery and boot partitions may have no drive letter and must remain intact.
3. Enter the amount to release
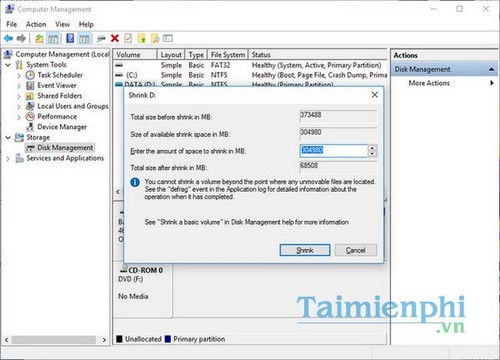
The Shrink dialog shows:
- Total size before shrink: the volume's current size.
- Size of available shrink space: the maximum Windows can currently release from the end.
- Enter the amount of space to shrink: the size you want for the new unallocated area.
- Total size after shrink: the capacity left in the original volume.
The dialog labels the units MB; 102,400 MB is approximately 100 GiB. Leave enough free space in the original volume for Windows updates, applications, temporary files, and growth. Choose Shrink.
4. Start the New Simple Volume Wizard
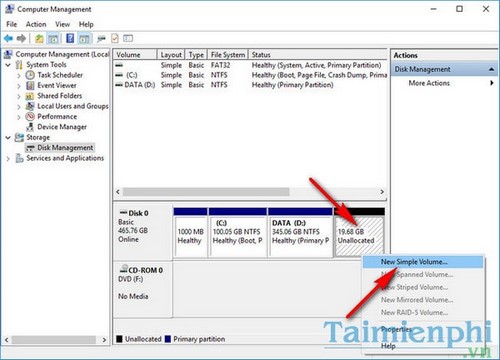
When the operation completes, a black Unallocated block appears immediately after the shrunk volume. Right-click that block and select New Simple Volume.
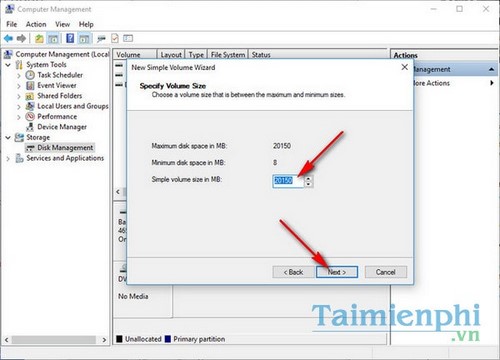
Choose Next. Use the maximum size to make one new partition, or a smaller number if you intentionally plan to create more than one.
5. Assign a letter and file system
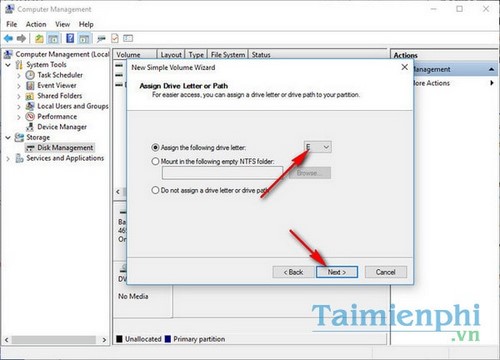
Select an unused drive letter. Avoid changing letters used by installed programs, libraries, backup jobs, or mapped workflows.
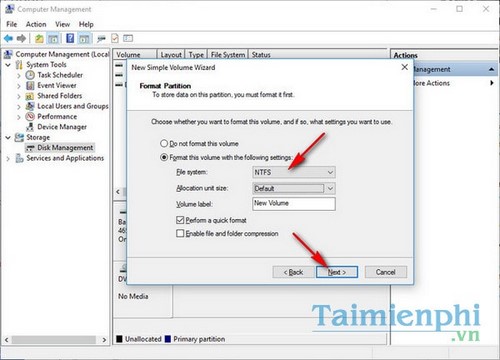
For a Windows-only internal data volume, select NTFS, leave allocation unit size at Default, and enter a descriptive volume label. Choose Quick Format for a known-good drive.
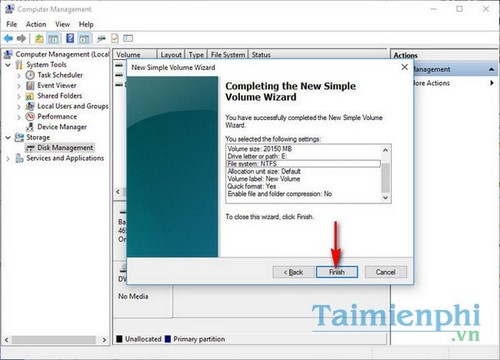
Review the summary and choose Finish.
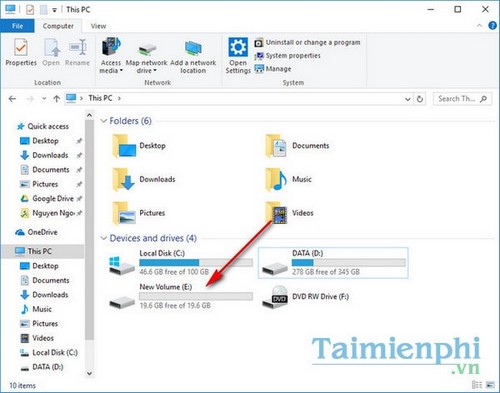
Check the new partition
- Confirm the expected sizes and NTFS file system in Disk Management.
- Open the new letter in File Explorer and create a test folder.
- Verify that the original volume's files are still accessible.
- Restart once if you resized C:.
- Resume BitLocker protection and keep the backup until the layout is tested.
If Windows cannot shrink as much as expected
Windows can release only suitable free space from the end of the volume. Page files, hibernation data, restore points, or file-system metadata may limit the result. Restart, confirm the volume is healthy, and retry. Do not delete recovery data or system files at random to force a larger shrink.
A reputable partition manager may move data that Disk Management will not, but it adds risk and may require a reboot. Read the precautions in the guide to repartitioning with EaseUS Partition Master before using one.
If you need to give space back to C:
Disk Management can extend a volume only into suitable adjacent unallocated space to its right. Deleting a neighboring data volume erases everything on it, and a Recovery partition between C: and the free space blocks a simple extension. Back up first and inspect the complete disk map.
For a broader explanation of shrinking, formatting, verification, and MBR limitations, see the complete Windows partitioning guide. If the hardware itself is nearly full, adding or replacing storage is often cleaner than repeatedly reshaping the partition table.
Related Articles
 Instructions for Dividing Hard Drives Right in Windows 104 minutes read
 How to Partition a Hard Drive in Windows 11, 10, 8, and 7 Without Losing Data6 minutes read
 Instructions to Mount the Hard Drive Into a Folder on Windows 106 minutes read
 How to Split the Hard Drive, Merge the Partition on Windows XP8 minutes read
 How to Merge a Hard Drive in Windows 10 Does Not Lose Data5 minutes read
 Minitool Partition Wizard - Redistribute Hard Drive with Minitool Partition8 minutes read
Reader Comments 0
Sign in with email or Google to join the discussion.