Mobile messaging in Exchange 2003 (Part 2): Discover security policies
 Part 1: Introduction to Microsoft's DirectPush technology
In part 1 of the mobile mail discovery series with Exchange 2003 and Windows Mobile 5.0 devices with security and mail packages installed, we took a closer look at this new DirectPush technology available in Exchange. 2003 SP2.
We all know that mobile devices are very likely to be lost or stolen. When synchronizing devices with mailboxes, it is necessary to protect our devices in some way, so that sensitive information and data can be protected safely. With Exchange 2003 SP2, you have the ability to configure the required PIN or password for the Windows 5.0 Mobile Devices in sync with the Exchange server in the organization. For example, you can configure a device that requires a 4-digit PIN code for users to enter before accessing the device. If the user enters the PIN 4 times incorrectly, the security settings can be configured so that all data on that device is erased.
Note :
If you've never seen it before, check out the following video before continuing to read the section below, which will demonstrate how the device security policies work and how to work with them. reality:
Configure device security policy
The device security policies are configured in the same sections on the mobile device, the following is the property page of the Mobile Services object in Exchange System Manager (see Figure 1).
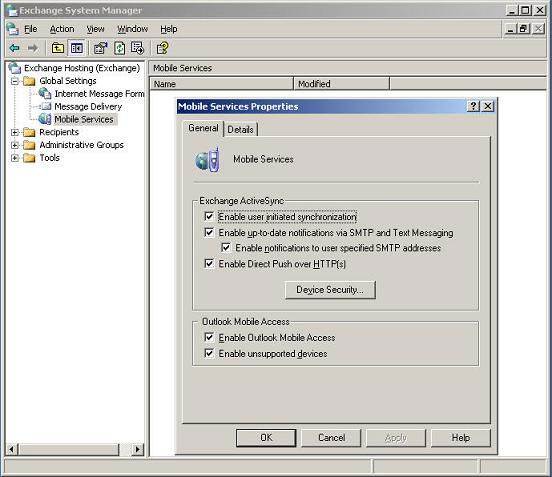
Figure 1: Properties of Mobile Services in Exchange System Manager
When you click your mouse on the Device Security button, you will be taken to the page used to configure the security settings (Figure 2).
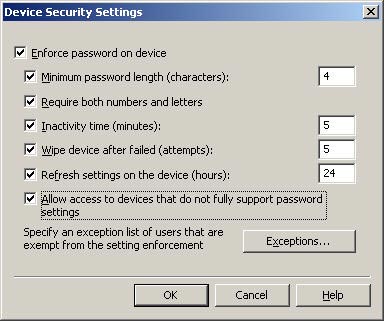
Figure 2: Device Security Settings
Device security settings are quite common (they must be applied separately for each individual user connection to your organization's Exchange servers), so you must understand exactly the purpose of each device. up. Below we list all the settings along with detailed descriptions of it:
Security settings DescriptionRequired passwordActivate device password policy.No security settings work before this feature is enabledMinimum length of password (character)Activate this option to specify the required length of the user's device password.The default setting is 4 characters.You can specify a length of 4 to 18 characters.Request both numbers and lettersActivate this option if you want to ask users to choose a password with both numbers and letters.This option will not be selected by default.Login waiting time (minutes)Enable this option to specify whether you want users to log on to the device after a while waiting to log in.This option will not default.If checked, its default setting is 5 minutes.Wipe the device after a failed login.Enable this option to specify whether you want to erase the device memory after multiple logins. failure.This option is not selected by default.If checked, its default setting is 8 times.Refresh settings on the device (hours)Enable this option to specify the period of time you want to send requests to devices.This option is not selected by default.If checked, the default setting is 24 hours.Allow access to devices that do not fully support password settingsSelect this option if you want to allow devices that do not fully support the security features to be able to synchronize with the Exchange server.This option is not selected by default.If not selected, devices that do not have full security settings (for example, devices that do not support redundancy) will receive a 403 error message when trying to synchronize with Exchange Server.
Table 1: Describe security settings
In addition to the settings in the table, you also have another button that is Exceptions (see Figure 3). After clicking this button, you can specify the user you want to be exempt from the settings you have configured in the Device Security Settings dialog box. This list of exceptions can be very useful if you have some trusted users (or managers) who really don't need device security settings.
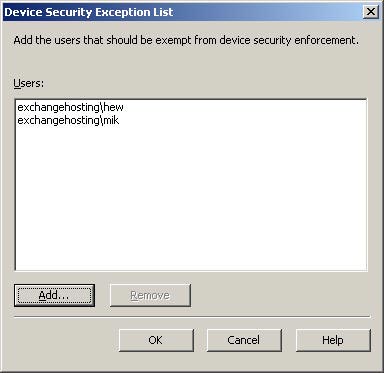
Figure 3: Device security exception list
Make sure you don't configure the device security policy too tightly and remember that users in certain situations will have problems that need to contact the IT office if their device is deleted. The user used a 4-digit number (between the numbers included in their credit card) so it is a good idea to ask for a 4-digit number in situations. Indeed the best solution is to use 4 numbers associated with the device cleanup setting after a number of failed attempts.
Location to store security settings
So where is all the device security settings saved? Almost all values have configured security settings stored in Active Directory, more specifically in properties called msExchOmaExtendedProperties , properties can be found under CN = Outlook Mobile Access, CN = Global Settings, CN = Organization, CN = Microsoft Exchange, CN = Services, CN = Configuration, DC = domain, DC = com using tools like ADSI Edit (see Figure 4).
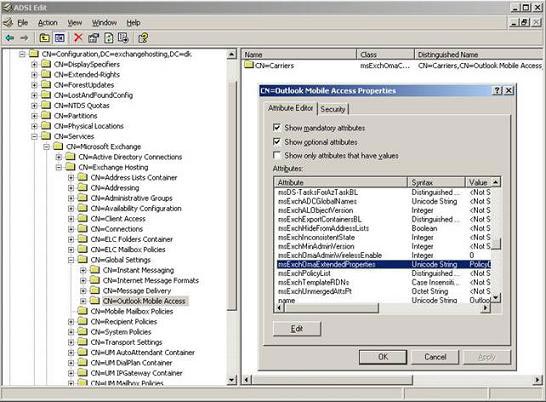
Figure 4: Location of device security settings in Active Directory
If you select the msExchOmaExtendedProperties property and click the Edit button, you will be taken to the screen shown in Figure 5 below.
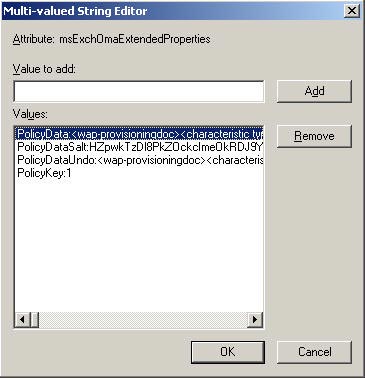
Figure 5: msExchOmaExtendedProperties attribute
As you can see, all device security related values are also stored in the string prefixed PolicyData . Values are encrypted between tags. Because there is nothing but XML blob, you can reserve your own custom policy by specifying the required values in the same XML format as in the image. You can also set these policies on users through the GUI, but now there is only one way to configure those settings on a basic user: configure the msExchOmaExtendedProperties attribute for each user, but is that right? Is the method convenient? Microsoft offers a way for you to configure these settings for each user, using a GPO or similar method; The problem here is that this setting is not available before the Exchange 12 RTM version.
Mobile devices
Once you have configured and enabled the security settings on the server, the dialog box shown in Figure 6 will appear on the device during the next move to the server.
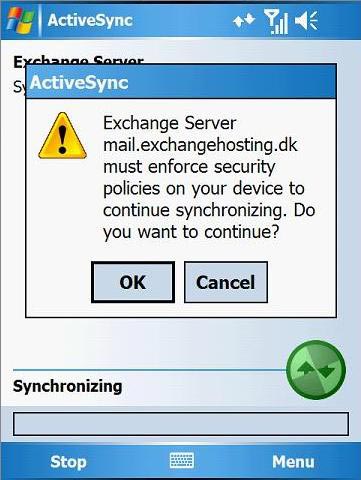
Figure 6: Security policy set on the device
After clicking OK , you need to specify, confirm the PIN and password you want to use. PIN and password need to be entered daily, device is unlocked or after giving a restart process. If an incorrect password is entered, maybe because one of your children has played with the device or forgot to lock the keyboard when the device is in the pocket, you will get a message like this:
Mật khẩu bạn typed là không đúng. Please try again. 1/5 attempts have been made.
( The password you just entered is wrong. Please re-enter. 1/5 of your attempt has been made .)
Depending on the number of times you can enter the password you specify in the Wipe device after failed option in Device Security Settings (see Figure 2 again).
After the second attempt fails, you will be notified that some wrong passwords have been entered. To confirm the login attempt is not due to the accidental button you are required to enter A1B2C3 or something like that (depending on the mobile provider configured when designing them). Once you have entered the characters, you will have the option to specify the device password again. If for some reason you enter the wrong password again, the wrong password dialog will appear again. Before the last attempt you will receive a notification that all information on the device will be erased after this unsuccessful attempt. All internal device memory will be erased, the device will be reset to the factory default state. Here happens the fact that the data in the device's memory card will be kept intact. You may be wondering if this solution is good or not, but personally, this will make the security risk factor great, especially because you can reconfigure the device to save the Email attachment on memory card!
Note :
If you know that the device has been lost or stolen, it is possible to perform remote data erase for the device, this deletion will be done immediately. We will talk more about this in section 3.
Change PIN and password
If you want to change your PIN or password, click Start > Settings > Lock .
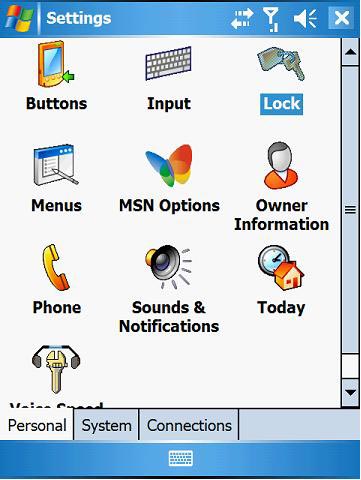
Figure 7: Lock button under Settings page
You will have to enter your current PIN or password to access and change the password, when you are done, you will see a new window appear as shown in Figure 8 below.
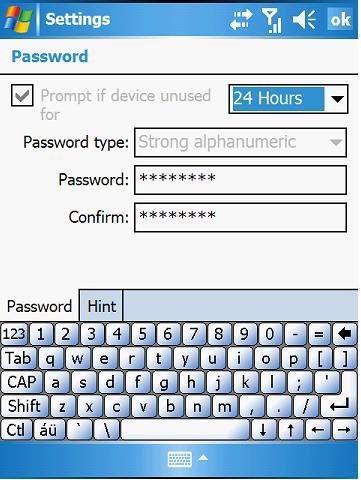
Figure 8: Change device password
It is interesting to note that when a locked device that is connected to a computer with a USB cable is not accessible, if you access it, you will encounter a dialog box like Figure 9 below.
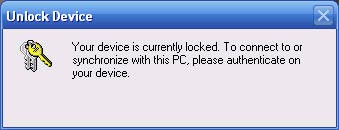
Figure 9: Connecting a locked device to the computer via USB.
Conclude
In this article, you learned how to make mobile devices more secure by using the new security feature included in Exchange 2003 SP2. You also see how that security setting works on the client side. This security setting is obviously a great improvement when it comes to security, but it still does not provide optimal security because the data kept on the memory card is not erased immediately.
In the next article, we will show you how to install the Exchange Server ActiveSync Web Administration administration tool, as well as how you proceed to delete remote data when the mobile device is lost or stolen.
 Part 3: Installation, administration, and use of Microsoft Exchange Server ActiveSync Web Administration tool
 Part 4: Access group GALs from mobile devices with GAL Lookup