Table of Contents
This guide provides a clear, practical overview of learn the Windows 10 installation process, with useful context, important details, and straightforward takeaways for everyday readers.
The purpose of this article is to help you better understand the Windows operating system installation process. If you understand the installation process of Windows operating system, you will catch disease (if an error occurs during the installation process) simply.

+ Process 1: Create a simple Windows installation USB
On the blog, I have a lot of detailed instructions for you how to create a win-win usb , for example using Rufus software for example. However, if you are trying to create a USB to install Windows 8, Windows 8.1 or Windows 10 . then you just need to Format USB with FAT32 format and then unzip the installer to USB that can be booted on both UEFI standards and LEGACY already.
Implementation: Right-click the USB => select Format => at the part File system you choose the format is FAT32 => click Start to start implementing USB Format .
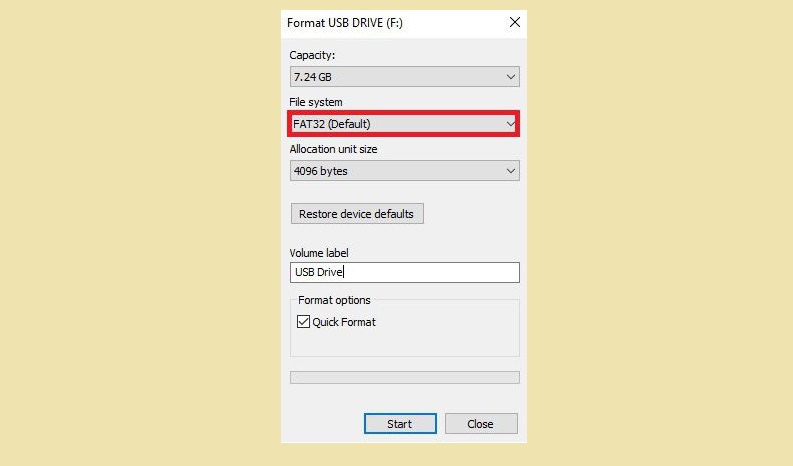
Now you need to extract the windows installer to USB
- On Windows XP or Windows 7: You can use Winrar software to extract compression directly to USB.
- On Windows 8 and above: If you are working on a computer using Windows 8 or higher, you can Mount the file to the virtual drive by right-clicking the installer (format * .iso) = > select Open With => select Windows Explorer => then copy all files / folders in the virtual drive to the USB and you're done.
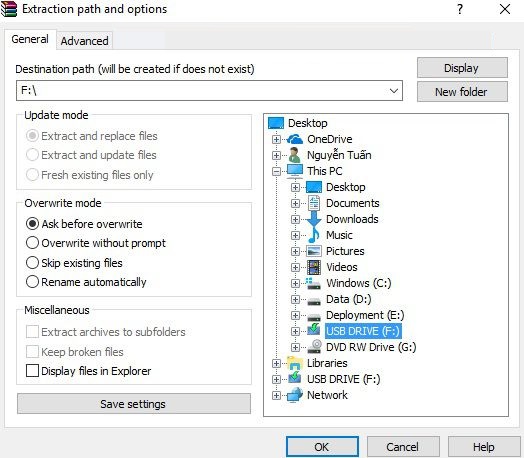
These are the files in the virtual drive that you just mounted.

This guide will analyze through the installer for UEFI BOOT system. But first, To boot this standard, you should first set up BIOS in UEFI standard .

Process 2: Analyze the Boot process
- If you choose USB UEFI, Windows will by default load boot from the file bootx64.efi in the boot folder of the efi folder found on USB BOOT.
- Conversely, if you choose to boot from USB LEGACY, Windows will load from the file bootmgr on the USB BOOT.
Note: For new installers such as Windows 8, 8.1 or Windows 10, MS has integrated the folder efi into the 32-bit Windows installer, so for USB containing this installer, you can still boot. UEFI standard through bootia32.efi file.
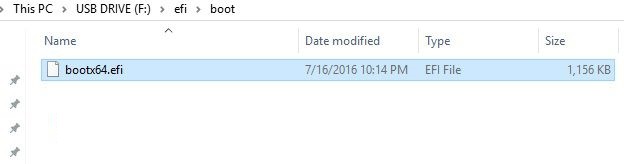
After loading the boot file, Windows will boot into Win Pi through the file boot.wim (located in the sources directory ) of the usb.
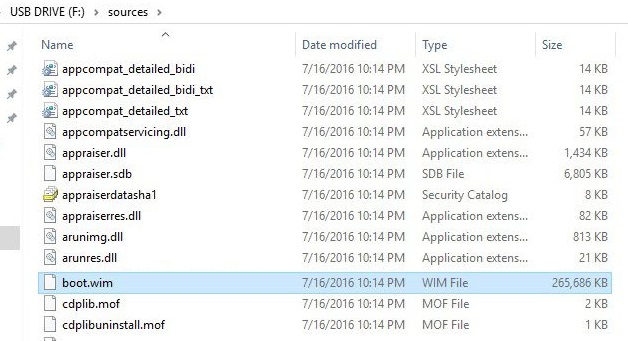
This file is configured based on the file bcd in two boot directories:
- USB boot folder.
- And the boot directory in the directory efi (efimicrosoftboot)

USB boot folder
And .
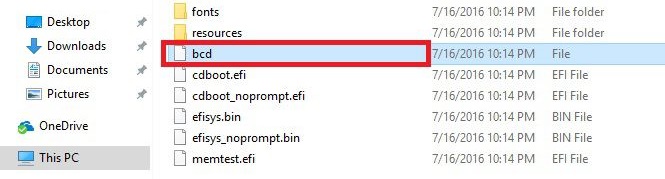
Boot directory in the EFI directory
To learn more about how the BCD file is configured, we will use the BootICE tool to open this file, you will know how it is set up as shown below, I will open at the same time. 2 BCD files in 2 different places.


Observing the 2 pictures above, we can see that both files bcd have in common that is configured to take physical memory RAM as storage place boot.wim after mounting. And the file boot.sdi is its boot interface, this file is located in the directory boot of the usb.
Process 3: Analysis of the Windows installation interface
When the load is complete, boot.wim the screen with the first boot logo appears with a circle of dots. This is called boot flags.

About Logo:
Because we are installing on a standard UEFI Boot system, there will be 2 cases that happen now:
- The appearance of the company's Logo (for example, the logo of DELL or the Logo of HP company) means that the BIOS of the computer is integrated boot flags.
- Conversely, if it is still the Windows Logo, it means that the computer's BIOS does not or has not integrated boot flags
If you install on a standard Legacy Boot system, the default will be the Windows Logo.
=> After loading the boot interface, the next screen appears and select the language to install as shown below.
* The first interface of the Windows Setup screen (screen 1)

Looking at the image above, you can see that the current installation language is English. This language is obtained from file lang.ini in the directory sources of the mounted partition boot.wim and in the directory sources of the USB.

The background color, dark green, is called from the image file background.bmp in the sources directory of the mounted partition boot.wim and in the sources USB directory .
The image file is background_cli.bmp

The language picker will get the interface from the file spwizimg.dll in the directory sources of the mounted partition boot.wim and in the directory sources of the USB
Note: You can download the R esource Hacker tool to open the file spwizimg.dll => you will see the interface located in the section Bitmap.

The text in the frame is taken from the files arunres.dll.mui, setuperror.exe.mui, spwizres.dll.mui, W32UIRes.dll.mui in the en-us directory of the sources directory on the mounted partition boot.wim and in sources USB folder .

* Next screen interface (monitor 2).
Okey, After setting up the first interface, press Next to go to the next screen. The next screen will have the interface as shown below.
Why is Microsoft leaving this screen? At this step, many of you will think it is useless, why after the first setup screen MS did not design so that after clicking Next we go to the installation section? Yes ! The reason is:
At this screen in addition to the Windows installation function, Microsoft also integrates the repair function, Repair your computer …. This is a very nice feature, if you have installed the operating system instead of ghost, you can use the Repair feature to fix Windows errors instead of having to reinstall Windows which takes a lot of time.

In addition, when you click on Repair your computer it , you can also use a number of additional features as shown below.
At this screen, you will have 2 options to either continue repairing Windows errors ( Troubleshoot ) or shutdown ( Turn off your PC ).
Note: Here, you only have 2 options, but there is no option to go back to the main installation screen when you click and choose Repair your computer .
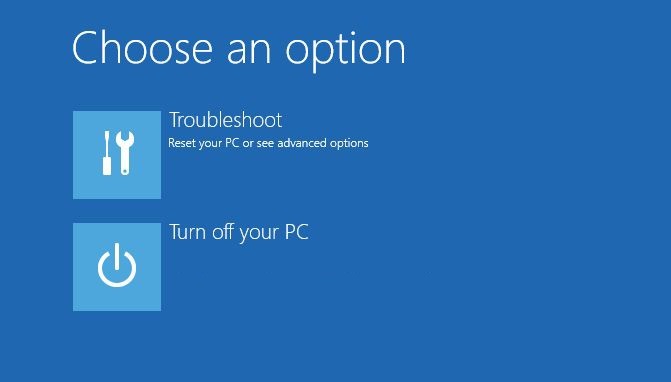
If you click on the option Troubleshoot , then the window Advanced options will appear with 5 extremely useful features for troubleshooting assistance.

If you cannot find the tool you want to use here, you can click the arrow (top, left) to go back to => then choose Turn off your PC to shut down the computer and now restart boot from USB BOOT and reinstall from scratch.
Another interesting thing that many of you may not know is that starting from the Install Now selection screen to the next selection screens, you can open the cmd window to use at any time through the nest. key combination Shift + F10.
As I said at the beginning, in the file boot.wim it is Windows PE, so To view or check the file boot.wim with the command in cmd, you do the following:
Implementation: Click Shift + F10 to open the window cmd => next type notepad and press Enter => Notepad tool appears, now press the key combination Ctrl+O => open File Explorer you will see the X main drive is the drive containing the boot.wim file .
Note:X This drive is taken from Ram memory and does not use the HDD or SSD, this drive has the default letter X.
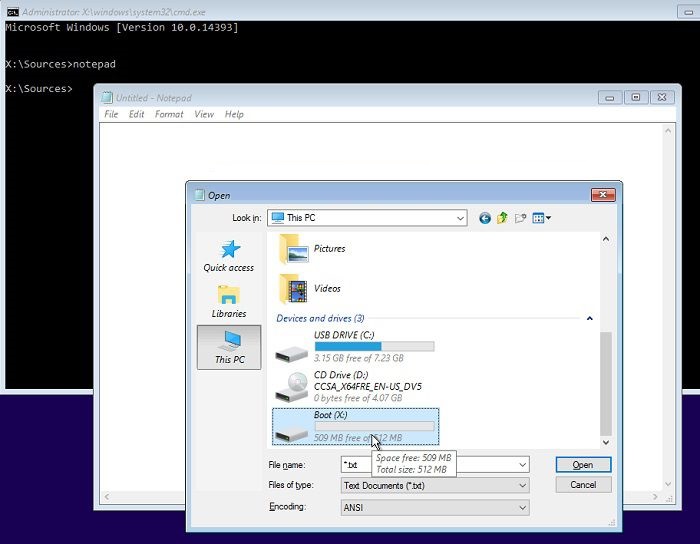
You can check or view additional files and folders on X this drive .

* Screen 3
After you click Install now ( Screen number 2) =>, the Windows installation process will continue with the words Setup is starting - setup notification is beginning.

The dark blue (backgroud) background image above is taken from the image in the file spwizimg.dll in the sources directory of the mounted boot.wim partition and in the USB sources directory as well .
There is also an image file setup.bmp in the directory system32 of the mounted partition boot.wim.

* Screen number 4
Now Windows will check the image mount file install.wim (or install.esd) in the sources directory of the USB BOOT to see if it is available?
If yes, Windows will check which version of Windows it is? using 32 or 64 bit Windows platform ? What is the operating system version (Edition)? After determining Windows will search in the sources directory of the USB to see if there are files EI.CFG or PID.txt not. If there is not one of the two files above, you must enter the installation key in the screen below.
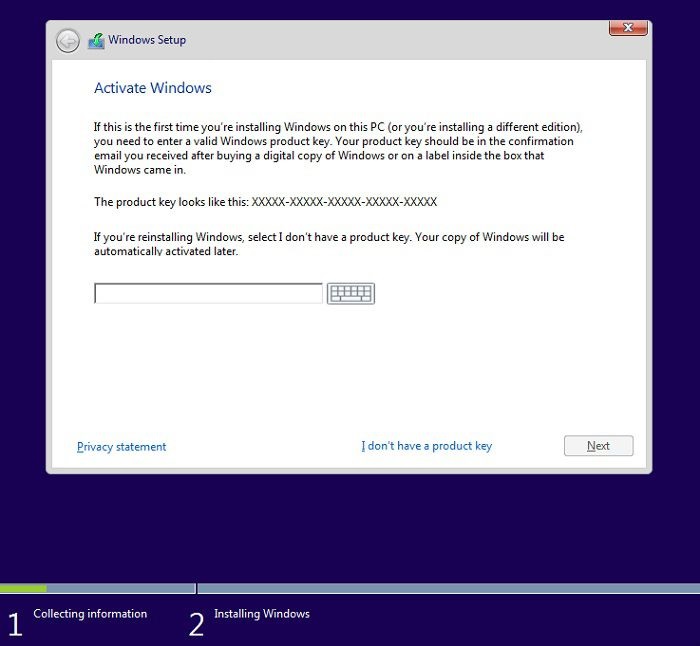
This screen only appears on the Home, Pro or Single Language versions, these are 3 retail versions, usually without the built-in file, EI.CFG but must enter the version key before going to the next screen.
However, unlike the Windows 8 or 8.1 installer, with the Windows 10 installer, users will have the option to I dont't have a product key quickly switch to the next screen without having to enter a key, but there are still a few sets. The installation cannot skip the step entering this setup key.
This bypass method applies to 3 versions Home, Pro, Single Language
This is a pretty cool trick for those interested in rebuilding the Winodws installer. To skip the step of entering the installation key, in the USB sources directory there must be one of the two files EI.CFG or PID.txt. The content in these two files is as follows:
EI.CFG
- [EditionID] {Edition ID} [Channel] {Channel Type} [VL] {Volume License}
PID.txt
- [PID] Value = XXXXX-XXXXX-XXXXX-XXXXX-XXXXX
=> So looking at the above content, what we need to do is:
- Identify Edition ID.
- Channel VL, Retail and OEM.
- In the Volume License you set the value to 0 (if the Retail version, OEM version) or 1 (if the VL version).
- The setting key consists of 25 alphanumeric characters and letters.
Home, Pro, and Single Language versions have Edition ID respectively:
Edition ID: Core: Home Professional: Pro CoreSingleLanguage: Windows 10 Home Single Language
+ If the integrated installer includes two versions of Pro and Home, we can leave the part blank {Edition ID}, the part {Channel Type} you write as Retail and in the {Volume License} set it is the value 0 . As follows:
- [EditionID] [Channel] Retail [VL] 0
=> When you leave the section blank {Edition ID} , the installation version selection screen will appear as shown below.

Likewise, the Home Single Language version is the same if you leave it blank, the {Edition ID} screen will appear as above.
Assuming you want to ignore this screen and choose the installed version, then the EI.CFG content {Edition ID} you add the Edition ID of the version to the Pro version, for example, its content is:
- [EditionID] Professional [Channel] Retail [VL] 0
Or use the PID.txt file if you do not like to use the EI.CFG file.
- [PID] Value = VK7JG-NPHTM-C97JM-9MPGT-3V66T
* Screen number 5
Once you have selected the version you want to install, you will now be taken to a screen containing the Microsoft terms of use.
After you have finished reading and agree with the terms they require, please tick the line I eccept the license terms => at this time the Next new word will light up to give you the option to continue.

* Screen number 6
- Here you will have 2 choices that are to upgrade to overwrite the old version of Windows available on the computer. With this option you can keep personal files, previous settings and applications and software installed on the computer before.
- The second option is a custom install ( Custom) and we usually still use this option if we decide to reinstall Win. Because choosing Upgade will often crash during the installation process.

* Screen number 7
If you choose Custom in the above section, Windows will now switch to the hard drive partition selection interface to install Windows and this is the most common part of the Windows installation process. Some of the most common errors that users encounter that I have instructed how to fix them:

At this screen, the system will check information of the hard drive in the computer, including information such as:
- The hard drive that you are installing Win is the HDD or SSD.
- What is the ID of the hard drive, Sata or IDE. If SATA, which SATA? SATA1 (referred to as SATA), SATA2 or SATA3.
- Whether the hard drive on the computer has a Bad sector or not (for the HDD), or is there something wrong (for an SSD ).
In addition, it checks whether the current hard drive structure is MBR or GPT .
In case, if the computer does not see the hard drive, the screen will not appear the hard drive as well as the installation partition. And according to the rule of the drive selected to install is always 0 (disk 0) and it ranks on the top according to the list of partitions in case the computer is mounted with two or more hard drives.
When you choose to boot from usb uefi , Windows has checked your computer's BIOS, which includes manufacturer information, what version is the current BIOS version? update day ? and bootable firmware… .and when installing Windows will check the structure of the hard drive for GPT or not.
The principle that you need to know is:
- When installing a LEGACY-compliant computer, the hard drive structure must be MBR.
- Conversely, To install a UEFI computer, you must convert the hard drive to GPT format.
- If the free hard drive is not formatted with a partition, it is MBR by default.
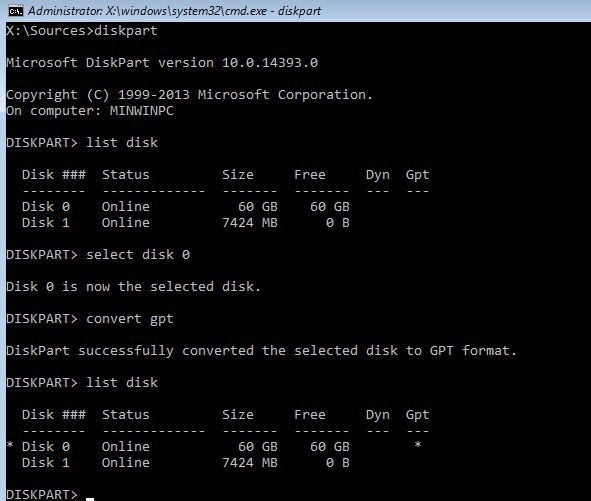
To check exactly what the hard drive is having at the above screen, press the key combination Shift + F10 to open the window cmd => use diskpart => continue to enter the command list disk check, if there is no sign * in the GPT line then that means your hard drive is structured MBR .
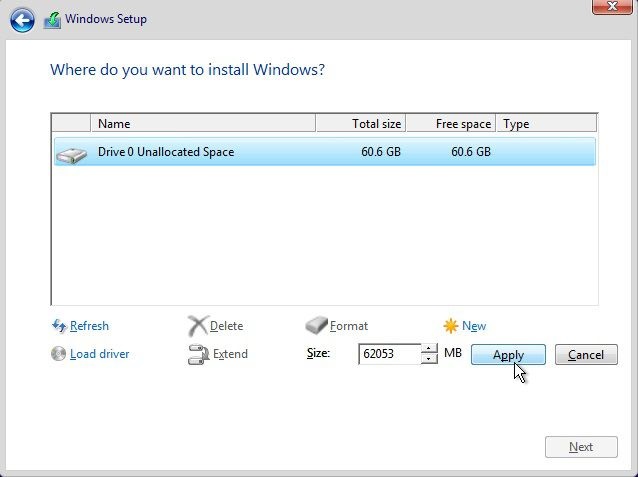
You can look at the interface of the figure below (Figure 1) whose functions include:
- Refresh: Refresh the screen.
- Delete: Perform 1 partition deletion.
- Format: Format a partition, but you cannot choose to format either NTFS or FAT32. This means that before the hard drive partition was formatted, after formatting it, it will have the same format.
- New: Creates a new hard drive partition from the hard drive or from an empty Unallocated Space partition.
- Load drive: Open the driver manager of the drive in case the drive does not appear on the screen.
- Extend: Extend the hard drive partition.
During the Windows installation process you can use these function buttons before clicking Next to begin the installation.
The rules for installing Windows on a drive are composed of primary partitions, and they are arranged from top to bottom. Windows partitions are always first, meaning it will be above the partitions that store data.
LEGACY boot standard system - hard drive with MBR structure
- System Reserved: This partition has NTFS format, 500 MB of space containing the BCD boot files and files winre.wim
- Windows: NTFS format and the partition that stores the system files.
UEFI boot standard system - hard drive with GPT structure
- Recovery: The partition is NTFS format, 450 MB in size and this partition will save the winre.wim file
- System: Available in EFI format, 100 MB in size, but with a 4Kn format drive, its size will be 260 MB and this partition will save the BCD file.
- MSR (Reserved): This partition has no format and its size is 16 MB.
- Windows: Format NTFS and this is the partition that will save the Windows system files.
When installing Windows, we will have 2 cases that are: Install Windows for a brand new hard drive and install Windows on a pre-partitioned computer, that is, your computer is already in use.
+ Case 1: For a brand new hard drive, there is no data yet.
If your hard drive is empty unformatted ( Unallocated) but you leave it and click Next , Windows will base on Firmware boot => it will divide the system partition for you (partitions <500MB).
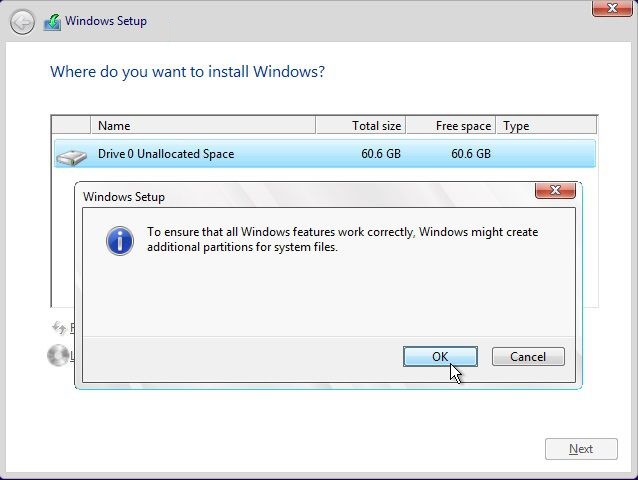
If you click New to create a new partition, you must click add line Apply and click OK confirm in the dialog box
+ Case 2: If the hard drive already has data, and is already pre-partitioned.
In this case, you have already installed Windows before, now you want to reinstall, just use the feature Delete or Format for the partition that you want to install Win on.
The best thing is that you should base on the rule that I mentioned above, that is, click delete to delete the old Windows partition (delete partitions <500MB, and the partition you want to install Win), only except the partitions are saving data only.
=> The purpose of this operation is to let them merge into an empty unformatted partition ( Unallocated), then click New to format that partition or click Next to install it. Encourage you to just leave the partition to install Win in the format Unallocated and click Next , because it will be less error prone.

Okey, so if during the installation process you get an error and there is an error message, you know what it is, but there is a solution right. Follow Microsoft's pre-programmed rules when you install Windows on the drive.
* Screen number 8
If there is no problem, please press Next to continue.

Yes ! This is the screen we have to wait the longest during the Windows installation process. At this screen, the system will have to go through 5 main processes as follows:
+ Copy Windows file : This step will copy all necessary data in the folder sources of Windows PE partition, or from your Windows installation USB => to clipboard.
+ Getting files ready for installation : This step will perform the decompression of the mount image file install.wim in the sources folder of the USB install win => into the Windows partition. This process is the longest and it depends on the number of rounds of the drive. If you install it on the 7200 Prm, SATA3 600Mb / s drive you will see a marked difference because the installation is very fast, the slowest is the drive. The IDE then goes to SATA, SATA2 and SATA3.
You should know one thing is that up to this step can still get the error as usual and of course you can not continue the installation process, it is due to an error from the file install.wim or when Windows install detects the drive or There is a problem with the usb port when Windows cannot get the data from the install.wim file.
Installing features : Install the following features after applying the image to the Windows partition
+ Installing updates : This step will install the updates already integrated into the file install.wim. If your Windows installer is integrated with more updates, the installation process takes longer because when you integrate offline, it stays in the standby state without being installed and integrates completely into the WinSxS folder in the folder. Windows system partition
+ Finishing up : Complete, in this process will include 2 steps to integrate Boot into a partition System Reserved (Legacy) or System (EFI). In addition, it also creates a folder named WindowsRE in the System Reserved partition. It then copies the files winre.wim in Recovery the System32 directory in the Windows directory of the system partition to the WindowsRE directory.
In case with UEFI system, Windows will create a new folder named Recovery in the Reovery partition and in the folder Recovery Windows create a folder named WindowsRE and copy winre.wim into it. After copying Windows will activate winre.wim before completing it will restart the computer for the installation to continue.
One interesting thing that you should know is why during the installation of Windows, the computer screen is bright and not dark? The explanation for the above phenomenon is that when you start the installation, Windows will conduct a direct check on the power source and the status of the battery's power consumption (for the Laptop) and Windows will always set the screen. The computer with the highest brightness, power mode is always selected as High Perfomance. Therefore you must always keep a stable power source if Windows checks if you are not using direct power Windows will warn and may not continue installation if you see the state of battery drain is not enough to complete the process. Setting. So when installing you should keep the power source directly and maintain stability during the installation process.
* Screen number 9
Before restarting the computer, the screen will appear a message before the computer will restart within 10 seconds and when restarted, the next screen will appear and this screen is no longer in use. to your installation USB again because it has copied all the necessary files to the Windows partition. Therefore, at this step you can remove the USB from the computer and still install as normal.

At this step, we also have to wait quite a long time, for the following reasons:
- This step will take the device information on the computer such as VGA card information, network card, usb connection port, . in Device Manager
- Once it has obtained the information of the above device, it will install driver for that device. The driver will be taken from the DriveStore folder present in the system folder System32 on the system partition. That is why when you have finished installing Windows 8 / 8.1 or on Windows 10, your computer already has quite a few drivers. Your computer always has the network driver installed, the driver of usb 3.0 is completely automatic because it is built into the folder DriveStore and when installing Windows will check the compatibility of the driver with the device in the computer that install properly. unify.
- Search for pre-programmed files, for example autoresponder files Unattend.xml in Panther the Windows folder, files SetupComplete.bat in folders Scripts located in folders Setup in Windows folders
- Update Registry Editor.
- Look for the folder oobe in the system folder system32 and based on that reboot the machine starts on to the next screen.
FAQ
What is the main purpose of this guide?
It explains the topic in practical terms and highlights the information readers need to understand or apply it correctly.
What should readers check before following the advice?
Confirm the relevant requirements, use current software or reliable sources, and protect important data before making major changes.
Can the steps vary by device or version?
Yes. Menus, features, and available options may differ by device, software version, region, or service provider.
Related Articles
 Summary of Windows Installation Errors on Computers - on Windows 7/8/109 minutes read
 Cac: Steps to Prepare for Installing Windows Server 200818 minutes read
 Learn About the Searchindexer.exe Process and Why It Works4 minutes read
 7 Common Errors During Windows Installation and How to Fix10 minutes read
 Parallel Installation of Windows 10 with Windows 7 or 87 minutes read
 Instructions for Fixing 1406 Errors During Application Installation4 minutes read
Reader Comments 0
Sign in with email or Google to join the discussion.