Table of Contents
Follow the instructions below to root Android easily and quickly efficiently and safely. Each section focuses on the actions, settings, and troubleshooting details that matter most.
If you hang out on smartphone websites or forums, then you've probably seen root-related themes, especially Android devices. If you are wondering why you must root or how to root your Android device. Please refer to the following article of Network Administrator.
How Root Android Easily and Quickly Works
After rooting your Android device, you have full access to the system and can run many types of applications that require root access. These applications can disable bloatware, allow application control, enable connections and many other great things.
Root has many ways to understand depending on each device and case. When using root Android, here root is the unlocking of an Android device to allow more access to the core software that may have been blocked by the device manufacturer.
Android is developed on the Linux platform. For Linux and other UNIX operating systems, the root user is equivalent to Administrator user on Windows. Root user has access to the entire file system in the operating system and does whatever it wants. By default, users will not have administrative rights on Android devices and certain applications will not work without administrator rights. Some settings, deep intervention into the system will also need to be rooted to be able to perform. In other words, Android Root is a way for you to get administrative rights on Android devices, which can perform advanced tweaks or deep intervention into the file system.
With administrative rights, you can disable bloatware (software preinstalled on the phone) in the phone, not allowing the app manually, running a firewall, accessing the entire file system system or device connection, even when connectivity is disabled. Many applications in the Google Play store (formerly Android Market) require administrative rights and will not be available until you root the device.

Root device is not required. We only need to root the device if we want to do things that require administrative rights for users.
Here are some reasons why you should root your Android device:
- Custom ROM installation:
After your Android device is rooted, you can Flash a Custom ROM or Kernel, which means you will experience and use your Android phone just like you just bought it.
- Uninstall Preinstalled Crapware:
The manufacturer does not allow users to uninstall Preinstalled applications on their device. However, when rooting these devices, users can uninstall the installation easily.
- Block ads (Ads) on any application:
Every time you play a game,. on the screen displays an advertising popup and this makes you feel extremely uncomfortable. However, if a device has been rooted, all these ads will be "removed" and no longer cause discomfort to you.
- Install incompatible applications:
Some applications that require root access can be installed on your device. So if your device is rooted, you can freely install these applications.
- Speed up the Android device boot process and extend battery life:
Some apps like Greenify can automatically close unused apps on your Android device to improve your device performance. And of course, Greenify needs root access.
- Update to the latest Android version:
Operating system updates are always a headache for Android users. By rooting the device, you can download and install the latest operating system (optimized for each model) before it is officially provided.
Before rooting your phone or Android tablet, there are some things that users should know:
- Warranty : Many manufacturers claim that root invalidates the device warranty. However, root Android doesn't really harm the hardware. Users can 'unroot' the device and the manufacturer will not be able to know if the device has ever been rooted.
- Security : In particular, Google Wallet has a vulnerability on rooted devices that can allow other applications to access users's PIN and other personal information. Google Wallet will display a warning message if users is using the program on a rooted device. If you are one of those who use Google Wallet to pay on NFC, you may want to reconsider rooting your device.
- 'Brick' phenomenon : Root device is a safe process. However, there is always some risk of damage to the device if users changes common parameters and performs hacking on the device. In particular, if users is trying to root a device or an operating system version is not supported by a tool. 'Bricking' is damaging the device, making it no different from the function of a brick. When root, jailbreak or install a homemade ROM, or other hack around, there will always be certain risks. It is better to do a little research first and find out if someone else has reported successfully rooted the device like you.
The root device process only takes a few clicks. However, users will need to do the following first:
- Download and install the Java JDK and Android SDK before continuing. Scroll down to the bottom of the page to download the Android SDK, above is Android Studio. Java must be installed before installing the Android SDK.
- Activate USB debugging mode on Android. On the device, go to the Settings screen, click Applications, click Development and check the USB debugging box.
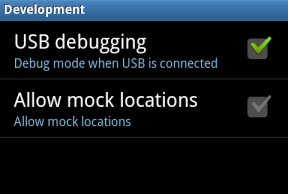
- Connect Android to the computer using a USB cable.
Also you need to have a USB driver for your phone or tablet installed. SuperOneClick can automatically install the appropriate drivers. However, if it fails, users will need to download and install the appropriate drivers from the device manufacturer's website.
Here we are rooting with SuperOneClick. This is a simple method to root and support many different devices.
Download SuperOneClick to your device and install it here.
After downloading the program, run the SuperOneClick. exe application.
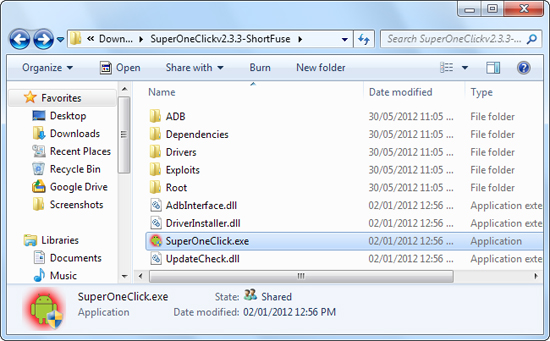
Click the Root Button in the SuperOneClick and SuperOneClick Windows that will work.
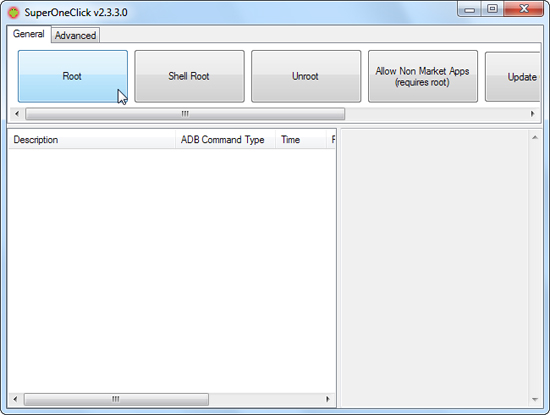
The process will take several minutes.
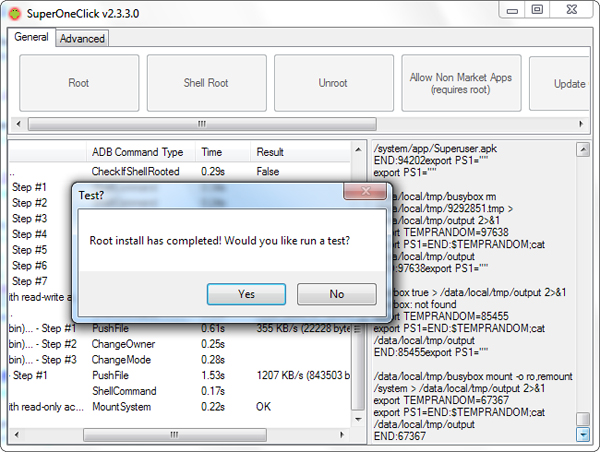
Restart the device after the root has finished.
Superuser automatically installs SuperUser binary. Whenever an application on the device tries to gain Admin rights by calling the SU command, users will be asked to allow or deny the request.
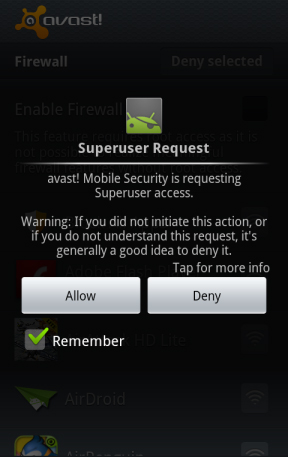
Open the Superuser application to control saved and configured permissions for Superuser.
Now, you can freely install and use applications that require access.
Requirements: Your Android device must have at least 20% battery or more to be uninterrupted during root.
Steps to take:
Step 1:
On your Android device, open Settings => Security => Device Administration => check the Unknown Source To activate.
Step 2:
Download and install the APK KingRooot application on your Android device.
Download KingRooot APK to your device and install it here.
Step 3:
After completing the installation process, you will see the app icon on the Launcher Menu.

Step 4:
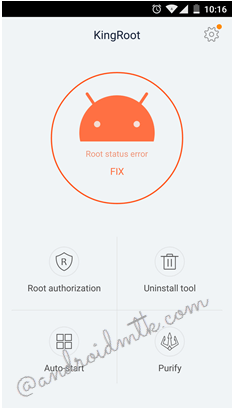
Click the KingRoot icon to open the app.
Step 5:
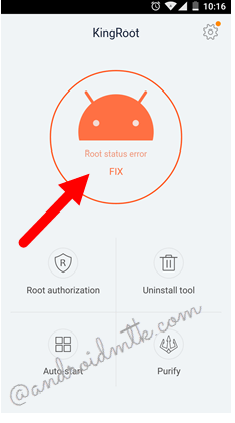
Next, click the Start Root Button to start the root process.
Step 6:
Now KingRoot will start the process of rooting your Android device.
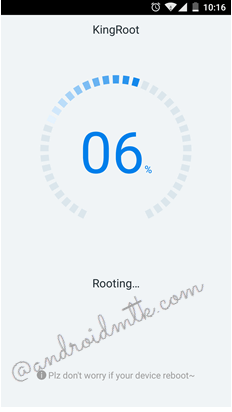
Step 7:
Wait until the screen of your Android device appears large blue traces as shown below, which means that your device has been successfully rooted.
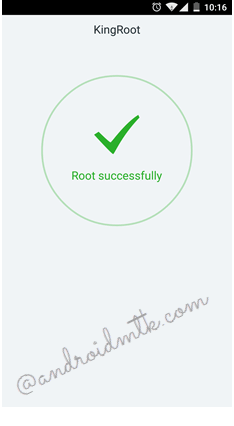
Step 8:
Restart your Android device is done.
In addition, you can refer to the video tutorial root of Android 4.3, 4.4, 5.0 and 5.1 devices below:
Refer to some of the following articles:
- Prevent advertising notifications on Android
- 3 ways to uninstall apps for Android devices
- Decode the errors encountered on Google Play and how to fix them
Good luck!
FAQ
What should I prepare before I root Android easily and quickly?
Review the requirements in the guide, confirm that your device or software is compatible, and save important work before changing settings related to root Android easily and quickly.
Why might root Android easily and quickly not work as expected?
The most common causes are incompatible versions, missing permissions, incorrect settings, or an interrupted internet connection. Recheck each step and restart the app or device when appropriate.
Can beginners follow these root Android easily and quickly steps?
Yes. Follow the steps in order, avoid skipping confirmation screens, and compare your interface with the screenshots because labels may differ slightly between versions.
Related Articles
 Instructions to Root Android Easily and Quickly - Experience New14 minutes read
 Root Way of Android Phones 7.0 / 7.1 Nougat with Kingoroot5 minutes read
 Instructions to Root Android Using TWRP Recovery5 minutes read
 Is Root Android Phone Still a Must-do?7 minutes read
 How to Check If Android Device Is Rooted or Not?5 minutes read
 Root Various Android Devices with Kingo Android Root5 minutes read
Reader Comments 0
Sign in with email or Google to join the discussion.