Instructions to enable battery saving mode on Windows 11
By default, battery saver mode automatically turns on when your computer has 20% or less battery life and automatically turns off when your computer is connected to a power source. However, you can turn it on whenever you want, especially in situations where you can't plug in for a long period of time.
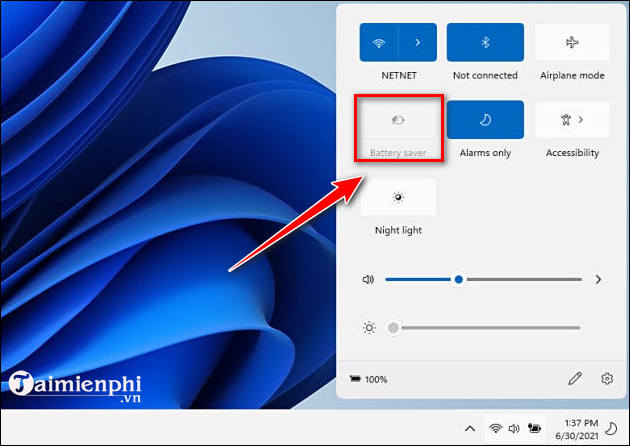
1. Use Quick Settings
Click the area containing the Wi-Fi, battery, and speaker icons or press Windows + A to open the Quick Settings menu.

Then, just click on Battery Saver.
To turn off battery saver, open the quick settings menu and select Battery Saver .
You can also turn off the Windows 11 startup sound to reduce noise and save battery.
2. Turn on power saving mode in Settings
Step 1: Click on the Windows icon => select Settings or press Windows + I to open the Settings application.

Step 2: In the Settings window , select System => click Power & battery.

Step 3: In the Power & battery window , select Turn on now under Battery.

If you want to turn off battery saving mode, just follow the same steps => click Turn off now to turn it off.
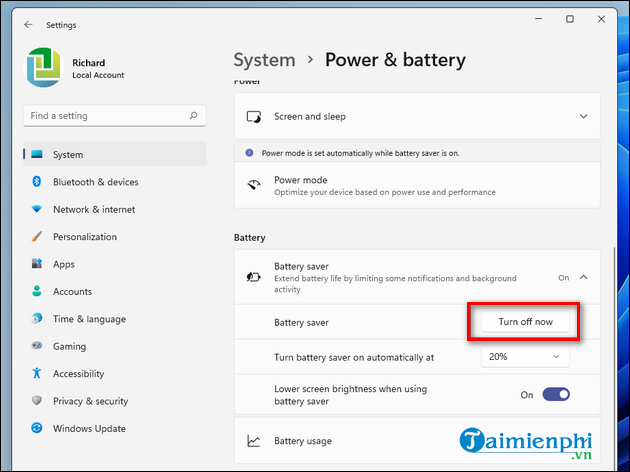
If the Battery Saver option is grayed out and you can't click it, it means your laptop is plugged in. Unplug the charger to enable battery saver on Windows 11. Note that you won't see this option if you're using a desktop computer.
- Instructions to enable / disable Windows 10 Battery Saver (Battery Saver) feature
- Instructions on how to enable the Battery Saver function on your laptop.
- How to turn off battery saving mode on Android, Samsung, Xiaomi phones
- How to adjust Google Maps settings to save battery power.
- Steps to enable battery saving mode (Battery Saver) on Windows 11
- How to customize battery saving mode on Android Oreo
- How to enable/disable battery saving mode on Windows 11 laptop
- Tips to increase battery life for iPhone 5
- Steps to change Taskbar position on Windows 11
- Download Ghost Windows 11 Pro Full Soft v1.0 Best New Standard 2021
- How to report Windows 11 errors, suggest Windows 11 features for Insider Preview users
- List of MSI motherboards that support Windows 11
- Steps to open Local Security Policy on Windows 10, Windows 11
- How to use Explorer Patcher, a tool to bring Windows 10 Taskbar to Windows 11
- How to bypass TPM 2.0 requirement when installing Windows 11?
- Download Ghost Windows 11 Pro No Soft v1.0 2021
- How to disable Sleep mode on Windows 11
- How to open multiple images side by side for comparison on Windows 11


-
 Why does my phone's battery drain even when I'm not using it?
-
How to accurately check the battery health of Windows and MacBook laptops.
-
How many mAh is one battery cell? Calculation method and detailed example.
-
Check Samsung battery health, check the battery degradation of your Samsung phone.
-
2 ways to display battery percentage on Android 10 phones
-
How to fix an iPhone that keeps shutting down.
 Why does my phone's battery drain even when I'm not using it?
 How to accurately check the battery health of Windows and MacBook laptops.
 How many mAh is one battery cell? Calculation method and detailed example.
 Check Samsung battery health, check the battery degradation of your Samsung phone.
 2 ways to display battery percentage on Android 10 phones
 How to fix an iPhone that keeps shutting down.