Instructions for installing and setting up the microphone on the computer
Microphone is a peripheral device on the computer that makes it possible to make VoIP calls or even sing karaoke right on your computer. TipsMake.com will guide you how to set up and install microphones on your computer effectively.
Table of Contents
1. Basic Microphone setup on computer
On Windows 7
Step 1: Go to Start => Control Panel .
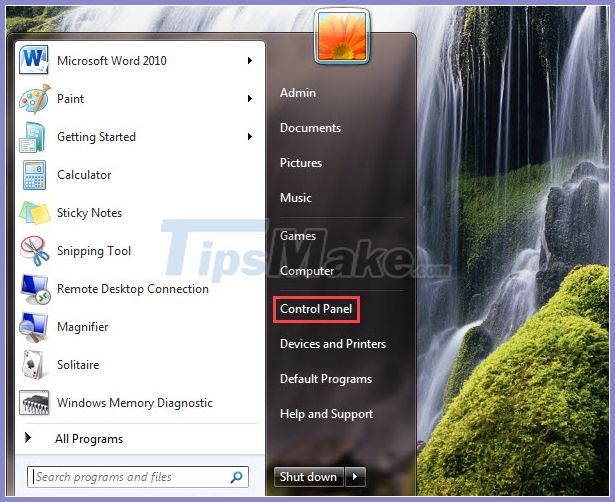
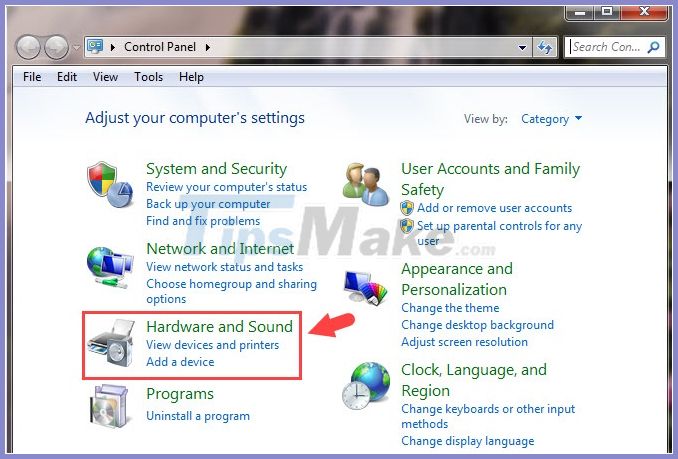
Step 2: Select the item Hardware and Sound .
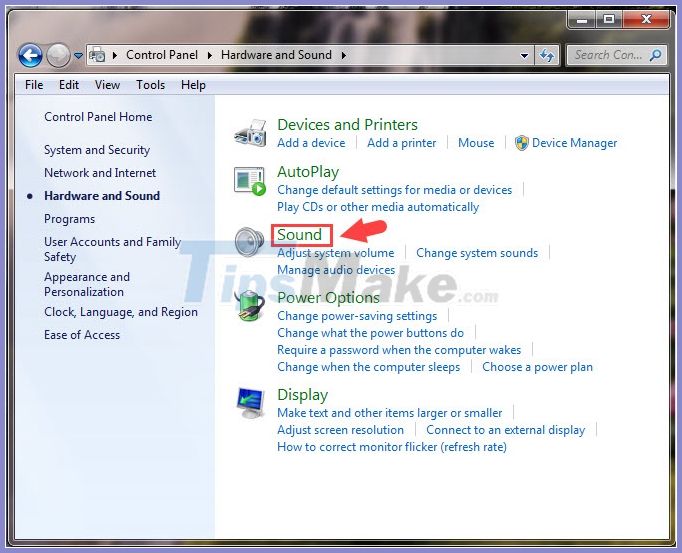
Then select the item Sound .
Step 3: Choose Recording (1) => left-click Microphone (2) .

Step 4: In the General (1) , click on Device usage (2) => Use this device (enable) (3) to turn on the microphone on the computer.

Step 5: Switch to Levels (1) and adjust the Microphone volume (2) . To increase the volume of the microphone, you adjust the Microphone Boost (3), but this section can make the microphone recording sound or be echoes if you adjust this item too loud.

Step 6: Go to Advanced (1) , tick 2 items in Exclusive Mode (2) so that the application on your computer will automatically control the volume and reproduce the sound from the microphone . Next, click Apply (3) and OK (4) to save.

On Windows 10
Step 1: Open the Start menu (1) => Settings (2) .

Step 2: Select the System item .

Step 3: Next, select the item Sound (1) and find the section Sound Control Panel (2) in Related Settings .

Step 4: Switch to Recording card (1) => click on Microphone (2) .

Step 5: In the General (1) section , click Use this device (enable) (2) in the Device usage section .

Step 6: Go to Levels (1) and adjust the volume level for the microphone in Microphone (2) . To increase the volume even further, adjust the Microphone Boost (3) accordingly.

Step 7: Switch to the Advanced tab (1) and check the two items in Exclusive Mode (2) to automatically allow recording applications to have full access to the microphone. Then click on Apply (3) and OK (4) to save the changes.

2. Set up recording on Micro on computer
On Windows 7
Step 1: Open Start => Control Panel .

Step 2: Select the item Ease of Access .

Step 3: Next, select the Setup a microphone item in the Speech Recognition section .

Step 4: Choose the name of the microphone device that you connected to the computer (1) => Next (2) .

You continue to click Next to move to the next step.

Step 5: Read the paragraph (1) into the microphone to try the mic and click Next (2) to move to the next step.

Step 6: Once done, we click on Finish to complete.

On Windows 10
Step 1: You click on Search (1) or use the keyboard shortcut Windows + S . Next, you enter the keyword Control Panel (2) => select Control Panel (3) .

Step 2: Click on View by (1) => Large icons (2) to easily find items in the form of icons. Next, select Speech Recognition (3) .

Step 3: Choose Set up microphone .

Step 4: Choose the type of microphone you are using in the list (1) and click Next (2) .

You continue to click Next to move to the next step.

Step 5: Read the text on the screen (1) into the microphone for the application to identify and click on Next (2) to proceed to set up the microphone.

Step 6: Click Finish to complete the setup.

With instructions for setting up and setting up microphones on your computer, readers will no longer get errors that do not recognize the device. If you encounter difficulties or problems during the implementation process, please send support requests to TipsMake.com in the comment section at the end of the article!
Was this article helpful?
Your feedback helps us improve.
Related Articles
 Instructions for setting up and installing Microphone on computer9 minutes read
 How to set up a microphone for karaoke, recording, and speaking on a computer or laptop.5 minutes read
 How to Connect Microphone to Computer9 minutes read
 How to choose a good computer recording microphone to use7 minutes read
 5 simple ways to connect microphone to PC5 minutes read
 How to fix computer not recognizing microphone effectively6 minutes read
Reader Comments 0
Sign in with email or Google to join the discussion.