Table of Contents
Learn how to enable passkey access for Windows 11 apps with clear steps, practical tips, and troubleshooting guidance for a reliable result.
How to enable Passkey access for Windows 11 apps
Step 1
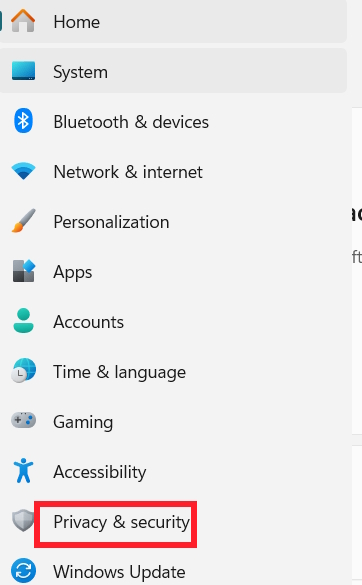
Open Settings on Windows then select Privacy & security in the left menu of the interface.
Step 2
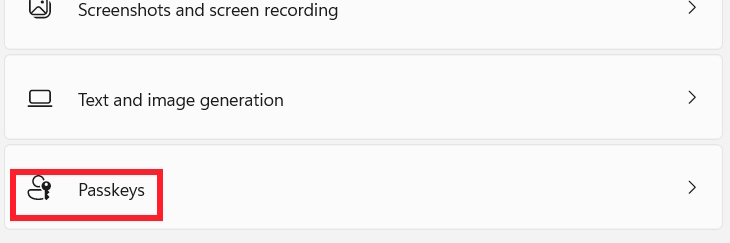
Looking at the next interface, we scroll down and click on the Passkey feature to proceed with the setup.
Step 3
In the next new interface, users need to enable Passkey access settings .
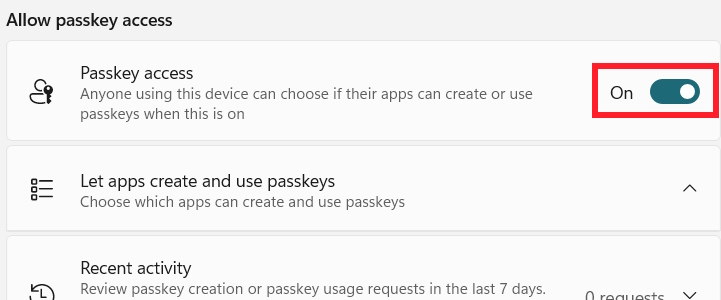
Applications will then request to use and access the passkey on your computer. Enabling or disabling passkey access is a simple process. And regularly reviewing the application permissions associated with the passkey can improve the overall security of your computer.
Final Thoughts
Use this guide as a practical checklist for how to enable passkey access for windows 11 apps. Work through the steps in order, verify each result, and adjust the options to match your needs.
FAQ
What do you need before following this How to Enable Passkey Access for Windows 11 Apps guide?
Review the required tools, accounts, settings, or materials mentioned in the article. Learn how to enable passkey access for Windows 11 apps with clear steps, practical tips, and troubleshooting guidance for a reliable result.
What are the main steps for how to enable passkey access for windows 11 apps?
Follow the sections in order, especially How to enable Passkey access for Windows 11 apps, Step 1, Step 2. Complete each step before continuing and verify the result as you go.
What should you do if the process does not work as expected?
Recheck the prerequisites, update the relevant app or service, review the settings, and repeat the step that caused the issue. Use any troubleshooting notes included in the guide.
Related Articles
 Passkey Support Is Finally Here on Lastpass, but There Are a Few3 minutes read
 How to Start Using Passkey: Step-by-Step Guide7 minutes read
 How to Block Apps from Accessing Messages on Windows 113 minutes read
 How to Enable DNS Over HTTPS for All Apps in Windows 116 minutes read
 How to Enable DNS over HTTPS for All Apps in Windows 105 minutes read
 How to Enable / Disable the Archive Apps Feature in Windows 103 minutes read
Reader Comments 0
Sign in with email or Google to join the discussion.