Table of Contents
Error 0x0000011B usually appears when a Windows 11 PC connects to a printer shared by another Windows computer. Start with updates, network checks, and the Print Spooler before changing security-related settings.

Before changing Windows settings
- Confirm the printer and both PCs are powered on and connected to the same trusted network.
- Install current Windows updates on the host and client PCs, then restart both computers.
- Verify that Network Discovery and File and Printer Sharing are enabled for the active private network.
- Restart the Print Spooler service on both PCs: press Win + R, enter services.msc, open Print Spooler, and select Restart.
For broader connection troubleshooting, see how to fix “Windows cannot connect to the printer”.
Method 1: Add the shared printer through a local port
This approach keeps Windows security protections in place and is a sensible workaround when the normal shared-printer connection fails.
- Open Control Panel > Hardware and Sound > Devices and Printers.
- Select Add a printer, then choose The printer that I want isn't listed.
- Select Add a local printer or network printer with manual settings.
- Choose Create a new port and set the port type to Local Port.
- Enter the UNC path in the form
HostComputerSharedPrinterName. - Select or install the correct driver, finish the wizard, and print a test page.
If the path is rejected, confirm the host computer name and the printer's exact share name in Printer Properties.
Method 2: Change RpcAuthnLevelPrivacyEnabled on the print host
Security warning: this registry change reduces RPC authentication protection. Use it only as a temporary workaround on a trusted network, and prefer a supported printer or network configuration when possible. You need administrator access and should back up the registry first.
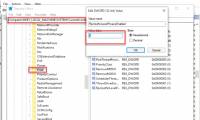
- On the computer that shares the printer, press Win + R, type regedit, and press Enter.
- Go to
HKEY_LOCAL_MACHINESystemCurrentControlSetControlPrint. - Create a DWORD (32-bit) Value named
RpcAuthnLevelPrivacyEnabledif it does not exist. - Set its value data to 0, close Registry Editor, and restart the host PC.
An administrator can make the same change in an elevated PowerShell window:
Set-ItemProperty -Path 'HKLM:SystemCurrentControlSetControlPrint' -Name 'RpcAuthnLevelPrivacyEnabled' -Value 0 -Type DWordTo reverse the workaround, remove the value or set it according to your organization's current Windows security policy, then restart the host.
Avoid uninstalling security updates as a routine fix
Removing the update associated with the error can also remove security fixes and may only provide temporary relief. For managed or business environments, use a dedicated print server, direct IP printing where supported, or guidance from the printer vendor or IT administrator.
If error 0x0000011B remains
- Check that the share path opens from the client PC and that the user has permission to use the printer.
- Install the printer manufacturer's current Windows 11 driver.
- Check Windows Firewall rules for File and Printer Sharing instead of disabling the firewall entirely.
- Remove the failed printer connection, restart the spooler, and add the printer again.
Related Articles
 How to Fixed Error 0x0000011b Could Not Be Printed When6 minutes read
 How to Fix Error 0x0000011b When Printing over the Network4 minutes read
 How to Fix Error 0x0000007c When Printing over the Network4 minutes read
 Fix Printer Sharing Errors 0x00000709, 0x00000040, and 0x0000011b4 minutes read
 Microsoft Rolls Out Update KB5007253 That Fixes Network4 minutes read
 Microsoft Admits Recent Windows 10 Update Breaks USB Printing4 minutes read
Reader Comments 0
Sign in with email or Google to join the discussion.