Install Mac OS X Snow Leopard on a PC using VMware
Many users choose Mac not only to use OS X, but also to meet the demand for Windows operating systems. This is a strong point for Mac in the battle between Mac and PC. Apple computers can be used with Windows, or with Bootcamp and virtual machines.
Many users choose Mac not only to use OS X, but also to meet the demand for Windows operating systems. This is a strong point for Mac in the battle between Mac and PC. Apple computers can be used with Windows, or with Bootcamp and virtual machines.
So can't Windows computers run OS X? The answer is yes. But this is in contrast to the Apple-licensed and licensed user agreements. So what is presented in the following article is for educational and simulation purposes only. If you want to use OS X in the best way, buy yourself a Mac.

Minimum hardware requirements must support virtualization technology and features. It is best to use processors from the Core 2 Duo, Quad Core, or Core i7 series (if available). But the most important thing is that you must use Intel series processors, not AMD.
In this test, we will install OS X after Windows through the virtual machine system, and the most suitable application is VMware Workstation 7. If you cannot afford the Workstation 7 license, you can use it. Use the free version here with the installation file size of about 512MB:

Workstation 7 installation process is quite simple, after completing this step, we must adjust and set up VMware to install Snow Leopard. Download this file and save it somewhere on your computer. Then unzip the downloaded file (this is actually just a disk image framework, not a virus or any malicious program). VMware Workstation will use and save this format to accommodate the core of the virtual machine.
To start installing Snow Leopard, start VMware Workstation from the Start > All Programs > VMware > VMware Workstation path . Then, open File > Open and point to the archive you downloaded above named Mac OS X 10.6 Server (experimental) . Then click the Open button to start loading the required files for the virtual machine:

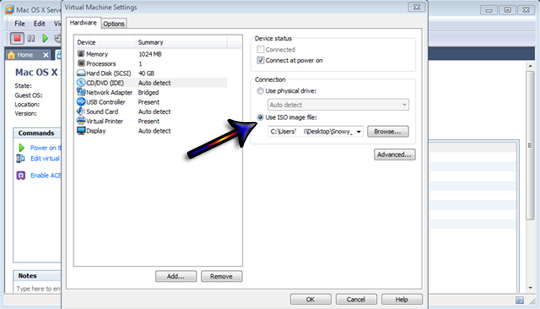
At the Mac OS X Server tab of the VMware Workstation window, click the virtual machine adjustment icon. Here you can change the hard drive usage, memory allocation . depending on the actual system configuration. In the CD / DVD (IDE) section under Connection, select ISO Image File and point to the Darwin_Snow.iso file in the Snowy_VM folder:
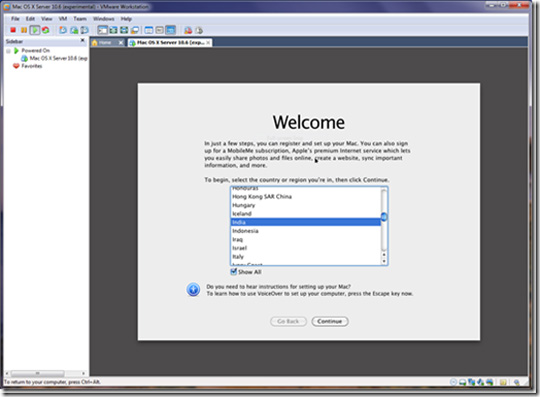
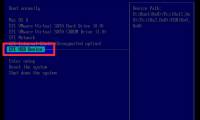
Click the Power button on this virtual machine to start using the virtual machine you have just set up. When the system has booted up, press F8 key:

At this step, you directly use the OS X Snow Leopard installation disc and insert it into the CD / DVD drive. And the following is the step of installing Snow Leopard on that virtual machine file. If you look carefully, you will see a number of icons at the bottom right, right-click the CD icon and select Settings :

In the Connection box, select the use physical drive with the Auto Detect option. Then click Save> Exit:

Go back to the boot screen and select C: Boot from DVD . Press F8 to use extension options, type -v and Enter. VMware Workstation will start installing Snow Leopard from the disk, the loading of boot files will take a few minutes:

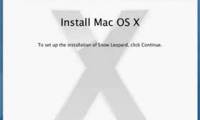
And from this step on, you can install Snow Leopard in the usual way. Click Continue to move to step 2, here select utility applications and disk management to install (if desired). Use the hard disk partitioning utility to convert the current format to OS X Extended (Journaled). After restarting, you need to set up a few more steps to use Snow Leopard. At the CD / DVD section, we do not use the real CD / DVD drive, but return to using the Darwin_Snow.iso file in the Snowy_VM folder above:
This change will cause the virtual machine to boot Snow Leopard directly, without the installation disc. And to use Snow Leopard, you need to set up and reconfigure some functions for the system to boot completely. The above are a few steps to install and use Mac OS X Snow Leopard on a computer using a VMware program, based on the provided sample file. Your success!
Was this article helpful?
Your feedback helps us improve.
Related Articles
 Install Snow Leopard: Things you need to know16 minutes read
 Scientists have discovered 3 new species of snow leopard3 minutes read
 How to Install Snow Leopard on an Intel PC5 minutes read
 Create USB install Snow Leopard5 minutes read
 10 support for Snow Leopard for Admin8 minutes read
 Snow Leopard 3 points are hard to beat Windows 75 minutes read
Reader Comments 0
Sign in with email or Google to join the discussion.