How to create a Service in Snow Leopard
In this article we will show you how to create a simple service (Automator)..
Network Administration - In a previous article we discussed the Services in Snow Leopard, this newly refurbished feature is one of the unexploited gems in Mac OS X 10.6. You can control what appears in the Services menu, this is a great change, but the real winner here is the ability to create a Service for anyone, or even download it. services created by others.
In this article we will show you how to create a simple service (Automator). Even if you are not a programmer, this guide can still help you achieve this intention. The ultimate goal of the guide is that you will have a service, along with enough confident knowledge to be able to create your own service.
In the tutorial, we will create a service to extract text from one or more selected PDF pages in the Finder. The extracted text will be included in a new text file, saved, renamed and then moved elsewhere. All of these functions will only take you a few minutes, then can be used from the Finder's context menu or via shortcut.
It should be noted that this tutorial is only suitable for components running OS X 10.6. You need to have some PDF files to test the service and have enough disk space to store the text files you will create.
Build a Service
To build a service, launch Automator (in Applications). A new window will appear with a drop-down sheet displaying some workflow templates; select Service , then click Choose .
This will open a blank template, which looks similar to what you see when using Automator in OS X 10.5. However, at the top you will see a section with two menus appearing and a checkbox; This is the area used to define the type of information your service works, the applications it works for and whether the selected text is replaced.

Automator's service definition range appears above each Service workflow
Click on the menu that appears, set it to PDF Files , which is the type of file we will work with. Click the second menu, set it to Finder , this is where the service will be activated. The checkbox will not be clickable because we do not work with the selected text.
Now is the time to create a real service. Since the service is only launched after selecting one or more files, we do not need to do any work to find the files that will work with it; they will be transferred when you launch the service.
Extract text from PDF
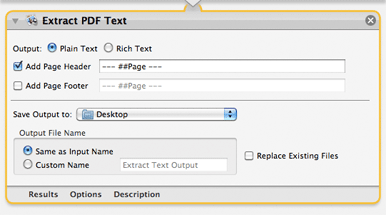
Given that the files are recognized for your service, the first step is to select a PDF entry in the Library column, then drag the Extract PDF Text action into the right workspace. This is the action of extracting the text from the selected PDF file.
Set options on this action as you like - in the lesson we use Plain Text output and add the header of the page. The destination is set to Desktop (where the file is transferred later) and the output file has the name along with the name of the input file (however the extension will be different, so there will be no conflicts here. ).
Rename the file
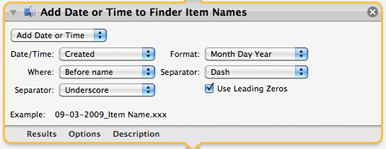
After extracting the text, the next step is to rename the file. In the Library column, select Files & Folders ; then drag Rename Finder Items into the work area on the right, below the existing Extract PDF action section.
When you drop the workflow, a dialog box will appear asking if you want to copy the items before changing their names. Since just renaming a newly created file (it's easy to recreate this file if necessary), we don't need to create a copy here but just click Don't Add .
Change actions at your disposal; In the example we added the creation date in place before the file name. The end result is a series of files that are automatically saved by creation date, even when viewed in alphabetical order.

Transfer files
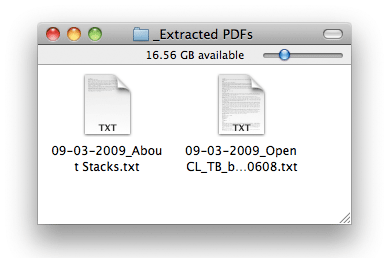
After changing the name, the last step is to transfer the file to the final destination. In this case, that's the folder named _Extracted PDFs on the Desktop .
In the Files & Folders column in Library , drag the Move Finder Items action to the bottom of your workflow. Click the To menu that appears and navigate to the folder where you want to save the files; select Other if there is no predefined destination directory. Click the destination folder, then click the Choose button to set the destination directory.
And that's all the work done for the service - three simple steps to extract text from PDF files, rename the resulting file and transfer them to the destination directory. Choose File -> Save , give the new service a memorable name ( Extract text from PDF , for example), and click Save .
Use the service
When you create a service, its use is very simple. In Finder , select one or more PDF files, then Control-click on the selection to display the context menu. Scroll down to the bottom of the context menu and select Services -> Extract text from PDF (or whatever name you have set for the service).
Text files created from PDF
Wait a second or two (maybe longer if you choose a large PDF file), then navigate to your selected folder. Here, you will find text files for each PDF file you have selected, each of which will contain the text taken from the PDF file.
This is a very simple example, but we hope to provide you with an initial sense of what can be done with services in Snow Leopard.
The ability to create your own service - or for other users for the purpose of creating distribution services - will enrich the tools available, making it easy to perform repetitive tasks. . This is indeed a breakthrough in Snow Leopard.
See more article Introduction Services in Snow Leopard