How to view upgrade history in Windows 10
Viewing the detailed Windows upgrade history can be very helpful when learning about Windows builds and versions previously installed on a Windows 10 PC.
Table of Contents
Every time you upgrade Windows 10 (for example from Home edition to Pro edition) or upgrade Windows 10 build (for example, new build via Windows Update), this upgrade history is stored in the registry.
View Windows upgrade history in Registry Editor
Step 1. Press Win + R to open Run , type regedit into Run and click OK to open Registry Editor.
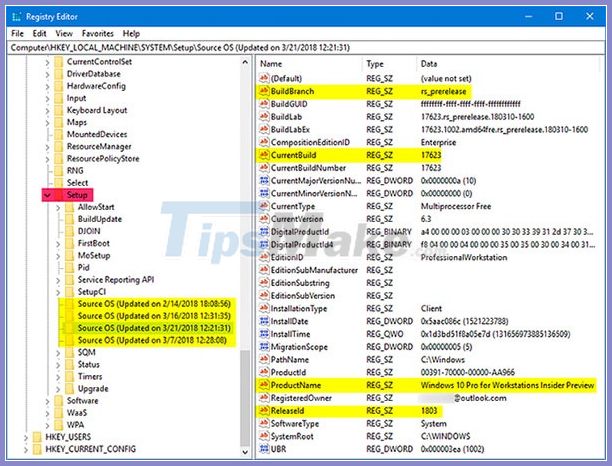
Step 2. Navigate to the key below in the left panel of Registry Editor.
HKEY_LOCAL_MACHINESYSTEMSetup
Step 3. Look to the right side of each Source OS (Updated on) subkeyin the Setup key . Each Source OS subkey will give you BuildBranch, CurrentBuild (build number), ProductName (version), ReleaseID (version number), etc., detailing the upgrade history of Windows installed before.
View Windows upgrade history in PowerShell
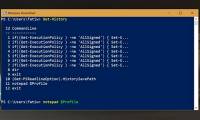
Step 1. Open PowerShell.
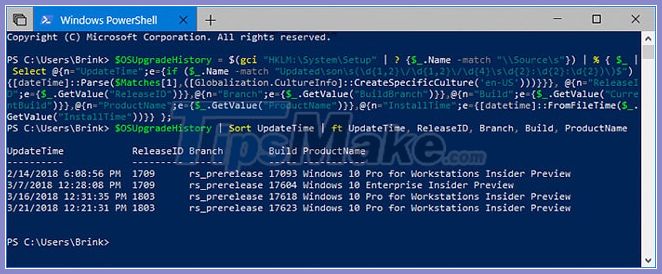
Step 2. Copy and paste the below command into PowerShell and press Enter. This command will collect your PC's Windows upgrade history from the registry and assign it to $ OSUpgradeHistory.
Code:
$OSUpgradeHistory = $(gci "HKLM:SystemSetup" | ? {$_.Name -match "Sources"}) | % { $_ | Select @{n="UpdateTime";e={if ($_.Name -match "Updatedsons(d{1,2}/d{1,2}/d{4}sd{2}:d{2}:d{2}))$") {[dateTime]::Parse($Matches[1],([Globalization.CultureInfo]::CreateSpecificCulture('en-US')))}}}, @{n="ReleaseID";e={$_.GetValue("ReleaseID")}},@{n="Branch";e={$_.GetValue("BuildBranch")}},@{n="Build";e={$_.GetValue("CurrentBuild")}},@{n="ProductName";e={$_.GetValue("ProductName")}},@{n="InstallTime";e={[datetime]::FromFileTime($_.GetValue("InstallTime"))}} };
Step 3. Copy and paste the below command into PowerShell and press Enter. This command will display $ OSUpgradeHistory.
$OSUpgradeHistory | Sort UpdateTime | ft UpdateTime, ReleaseID, Branch, Build, ProductName
Step 4. You should now see Windows upgrade history on your Windows 10 PC.
Was this article helpful?
Your feedback helps us improve.
Related Articles
 How to view update history on Windows 112 minutes read
 Steps to view logs and usage history of windows 10 computers3 minutes read
 How to View Browser History on Mac3 minutes read
 Instructions to view Instagram account history3 minutes read
 How to view command history from previous PowerShell sessions in Windows 102 minutes read
 How to view Windows startup and shutdown history7 minutes read
Reader Comments 0
Sign in with email or Google to join the discussion.