Instructions for using GeoGebra basic
GeoGebra facilitates the creation of mathematical models and geometry for students. GeoGebra is also a lesson preparation tool for teachers to create interactive exercises and questions for students.
Table of Contents
What is GeoGebra?
- Dynamic math software for easy use.
- For learning and teaching at many levels.
- Combining geometry, algebra, tables, calculations, graphics and statistics in 2D and 3D environments.
- Free software available on www.geogebra.org.
More specific:
GeoGebra facilitates the creation of mathematical models and geometry for students. It allows the experience to explore through interactions such as moving objects and changing parameters.
GeoGebra is also a lesson preparation tool for teachers to create interactive exercises and questions for students. You can find free study materials and share your lectures on www.geogbratube.org.
Download GeoGebra to your computer
Or use GeoGebra online
Get started quickly with GeoGebra
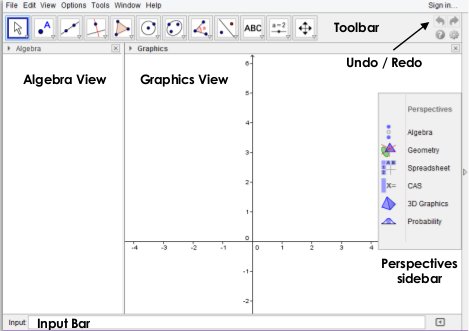
The picture above is the main screen of GeoGebra. Based on the purpose of using GeoGebra, you can choose the equivalent layout from the Perspectives menu. By default, the Algebra View and Graphics View sections are displayed in the GeoGebra window.
The Toolbar bar is a collection of toolboxes, each containing related tools. Thanks to these tools, you can create a lot of different geometric forms in the Graphics View section with just clicks. Also, the corresponding coordinates and equations will be displayed in the Algebra View section. Notice that each section has its own adjustment toolbar.
The Input Bar at the bottom of the GeoGebra window is used to directly enter coordinates, equations, signs, or functions. After pressing Enter , the algebraic representation will appear in the Algebra View section, and indicate the graph displayed in the Graphics View section.
Furthermore, GeoGebra offers 3D and CAS graphics to use GeoGebra's algebraic computer system, and the Spreadsheet View will work with data and statistical concepts, like a probability calculator to calculate and distribute probability graphs.
All parts of GeoGebra are intimately linked, meaning that if you change certain objects, the expressions in the remaining sections automatically change.
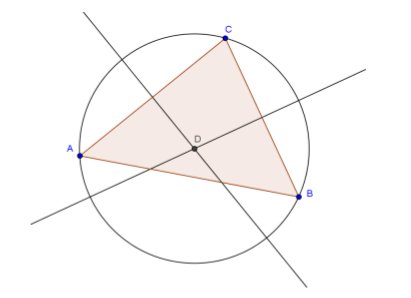
Example 1: Outward circle of triangle.
Exercise: Constructing the triangle ABC and the circumcircle using GeoGebra.
Prepare:
- Start the new GeoGebra window.
- Click on the arrow on the right side of Graphics View to open the Perspectives bar and select Geometry Perspective .
- Familiarize yourself with the tools provided in the Graphics View Toolbar . Hint: You can open the toolbox by clicking on the small arrow at the bottom right of the main toolbar.
Steps to set up:
- Select Polygon from the Toolbar. Now, click three times on Graphics View clockwise to create 3 points A, B, and C. Lock the created triangle by pressing again on point A again.
- Select Perpendicular Bisector and create two bisectors by clicking on the two sides of the triangle. Note: tool can be found in toolbox.
- Using Intersect you can click on the bisector line to create the center of the circle.
- Select Circle with Center through Point . First click on the center of the triangle and the vertices of the triangle in turn to create the circumcircle of the triangle.
- Move tool using mouse to drag vertices of triangle. The structure of the image will change while you move. Note: To move an entire image in Graphics View, select the Move Graphics View tool and drag the image.
Attention:
- There are Undo / Redo buttons on the right of the toolbar.
- Use the Show / Hide Object buttons from the Graphics View Toolbar to hide and show an object. Select all the pictures you want to hide, then go to another tool to apply your changes.
- You can change the shape of the image. (For example: changing colors or borders, hiding / showing labels) is easy to use with Style Bar. Select the object you want to edit and click the small arrow in the upper right corner of the geometry to open the Style Bar.
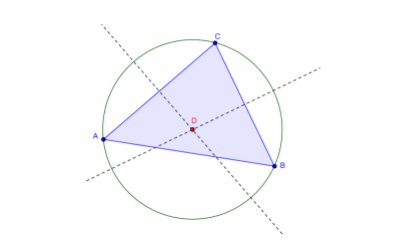
- You can press / show axes and grid of Style Bar with the same way above.
- The Construction Protocol in the menu bar provides a list of all the steps to build. Moreover, you can change the order of setup steps by dragging the lines up or down.
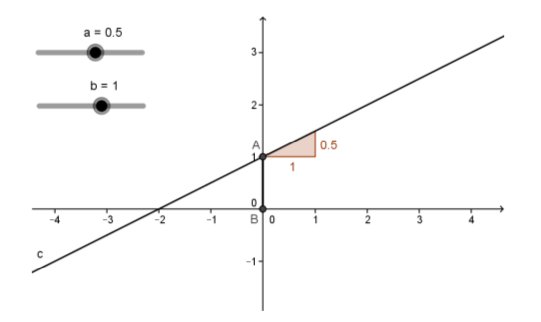
Example 2: Linear equation
Exercise: Use the slider to change the parameters of the linear equation.
Prepare:
- Open a new window of GeoGebra using the File menu.
- Click on the arrow to the right of Graphics View to get the Perspectives sidebar and select Algebra Perspective .
Steps to set up:
- Enter y = 0.8 * x + 3.2 on the Input Bar and press Enter .
- Extensions: Parameters can be changed when you modify the line equation in Algebra View (using the arrow button) or the Graphics View line (using the mouse). Note: Be sure to select the equation or line before setting.
- In Graphics View, use the Delete tool in the toolbox to delete the line.
- Use the Slider tool to create sliders a and b.
- Enter y = a * x + b into the Input Bar and press Enter .
- Select Intersect from Graphics View to create an intersection point between the lines and the horizontal axis.
- Use Point on Object to create point B at the origin.
- Use Segment to draw a line between 2 points A and B.
- Use the Slope tool to create a diagonal.
Attention:
You want to modify the shape of the image using the Input Bar. Select the object you want to edit and then click the small arrow in the upper right corner of Graphics View to open the styling bar.
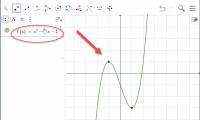
Example 3: Intersection of polynomial functions
Exercise: A Parabal can intersect with the straight-line equation by determining the discrimination solution.
Prepare:
- Start the GeoGebra window using the File menu.
- Select the right arrow of the geometry to open the Perspectives sidebar and select the CAS layout.

Setup steps
- In the CAS section, create a quadratic polynomial by entering f (x): = x ^ 2 - 3/2 * x + 2 on the first line and pressing enter.
- Select the slide tool bar geometry tool and create two sliders a and b. Note: After selecting the geometry, a new window will appear allowing you to specify the slider parameters. Click apply to close the window and a slider.
- In the CAS section, create a straight line equation by entering g (x): = a * x + b in the next line and press enter.
- In the geometry section, use the scroll tool to change the position of the slider a to 0.5 and the slider value of b is 2.
- The CAS part imports h (x): = f (x) - g (x) to determine the difference between the two equations.
- Enter h (x), then select the coefficient tool from the toolbar of the CAS section to find the factor of the polynomial. You can use other factors to determine the origin of h (x).
- Enter solve [h (x)] , then confirm the roots. Note: GeoGebra creates a list of points that can be displayed in the geometry by clicking the object icon below the line number of the CAS part.
- Enter Intersect [f (x), g (x)] to create the intersection of the equations. You can display the intersection point in the geometry by cash selecting the symbol to show / show in the same line number in the CAS section.
- Try to find the intersections of f (x) and g (x) that have in common with the roots of the other function h (x). Change the parameters of the straight line equation to find the values of a and b and they will have two, one or no intersections. Note: Use the scroll tool to change the value of the slider and create a new equation.
Note:
The CAS section allows you to work with fractions, equations or calculations .
Input and auto-complete.
- Enter y = 2x + 1 to determine the equation.
- Enter f (x): = 2x + 1 to specify the name of the equation.
- If you enter parentheses or quotation marks, GeoGebra will automatically insert the corresponding sealed copy.
- While entering a command into the CAS section, GeoGebra will try to complete the command automatically to support the syntax. Note: Select the command you want from the list that appears and press enter to accept the suggestion.
- Toolbar requires three different tools to evaluate your input. "Evaluate" and simplify input with symbols. "Number" calculates the digital input and produces the result in the decimal notation. "Keep input" hold and check input. This tool is useful if you want your input to be simplified automatically. For example, when introducing manipulations of expressions.
- You can only manipulate part of the expression by selecting it and selecting the element tool.
Was this article helpful?
Your feedback helps us improve.
Related Articles
 Guide to graphing geometries using Geogebra software5 minutes read
 Some basic Terminal commands in Linux Mint 118 minutes read
 Instructions for drawing arrows with Gimp2 minutes read
 Microsoft Open Sources 6502 BASIC After Nearly 50 Years – Legendary Language Revives3 minutes read
 Instructions for creating a Home HTTP Server model3 minutes read
 Instructions for creating a Tic-Tac-Toe game using React-Native5 minutes read
Reader Comments 0
Sign in with email or Google to join the discussion.