How to Use FileZilla
When it comes to transferring files to and from an FTP, there are a lot of options out there. One such option, FIleZilla can be particularly enticing, due to its free nature. Follow this guide to get FileZilla connected to your FTP server....
Table of Contents
Method 1 of 3:
Installing and Starting FileZilla
-
 Download the installer. You can download FileZilla for free from the official website. Only download the FileZilla install file from the developer's website; copies with viruses have been found on other sites. Make sure that you download the correct installer for your operating system.
 -
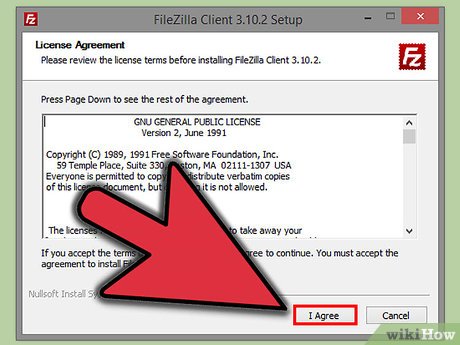 Run the installation process. For Windows, you will need to confirm several screens before the download can proceed. This includes the license agreement, user access, components, and install location. For most users, the default settings should all be fine.
- For Mac OS X, download the appropriate file. Most Macs are Intel-based, so try the Intel option first if you are unsure. The file will extract automatically if downloaded in Safari, and you can run FileZilla by double-clicking the extracted program.
-
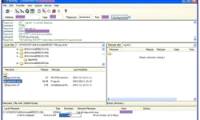
 Run FileZilla. After installation, find your newly installed FileZilla in the Programs list in your Start menu. The program will open with a small welcome window displaying the version information. After closing the window, you will be able to see the FileZilla interface.
- The top pane is the terminal window, where messages pertaining to your connection will be displayed.
- The left pane shows the contents of your computer, laid out in an Explorer-style view. The right pane shows the contents of the server that you are connecting to. When you first start, the right pane will display the message 'Not connected to any server.'
- The bottom pane shows the file transfers that are scheduled to occur.
Method 2 of 3:
Connecting to a Server
-
 Enter your information into the quick connect bar. This is located directly beneath the toolbar, and has fields for the Host, Username, Password, and Port. You will need all of this information in order to connect to a server.
- Port can most often be left blank unless the server is operating on a nonstandard port that needs to be specified. Otherwise, FileZilla will enter the port automatically.
-
 Click Quick connect.. Once you've entered the information correctly, press the Quickconnect button to start the connection process. You will see messages displayed in the top pane as your computer attempts to connect to the server.
- Once you are successfully connected, you will see the file system of the server appear in the right pane.
-
 Add the server to your Site Manager. Quickconnect settings are removed each time the program restarts, so to easily access the server again, you need to save it to the Site Manager. Once connected, click File, then select 'Copy current connection to Site Manager…' This will open the Site Manager with the server details filled in to the appropriate fields. Give the entry a name and close the window to save the site.
Method 3 of 3:
Uploading and Downloading Files
-
 Browse for your files to upload. In the left pane, navigate to the files on your computer that you want to put on the server.
 -
 Browse for the destination. In the right pane, navigate to where you want to place the files. Depending on the permissions you have, you can right-click to create new folders.
- You can click the directory labeled '..' to go back one level.
- Directories that haven't been opened yet will have question marks over their icons. This means that FileZilla cannot tell if the directories have subdirectories. Once you open the directory, the question marks will disappear.
-
 Copy the files. To begin the upload process, simply drag the files from the left pane to their destination in the right pane.. You will see in the bottom pane that the files are queued up for transfer. After the files are finished copying, you can disconnect.
 -
 Download files. Downloading files works like the process above but in reverse. First find the file on the server that you want to download, then navigate to where you want to download to. Drag the file from the right pane into the left pane. They will be added to the queue and you can track their progress in the bottom pane.
Was this article helpful?
Your feedback helps us improve.
Related Articles
 Instructions for setting up individual FTP Server with FileZilla10 minutes read
 Upload files via FTP with FileZilla1 minutes read
 5 ways to use SSH in Windows6 minutes read
 Instructions for configuring FTP server on iPad5 minutes read
 Set up ProFTPd with TLS on Ubuntu 11.044 minutes read
 Instructions for creating a Wordpress blog page16 minutes read
Reader Comments 0
Sign in with email or Google to join the discussion.