Table of Contents
This practical guide walks through how to uninstall old drivers on Windows 10, explains the main requirements, and highlights common issues that may appear along the way.
1. When do you need to delete old drivers?
Windows 10 comes with a reliable driver database from Microsoft and third-party vendors. The Windows system stores all the things related to your drivers inside the DriverStore folder. Its exact location is: %SystemRoot%/System32/DriverStore
Since the files in this directory are important for system operation, you should not change it.
Over time, Windows will continuously install drivers for new hardware, as well as update the latest versions for current devices. However, it does not delete old drivers, making them take up some of your disk space. So we need to do some way to delete the old driver.
2. Clean up old drivers with Storage Sense
Windows 10 has a Storage Sense feature that can automatically delete unnecessary files from the system drive. You can also schedule the cleaning process to keep the system tidy.
Step 1: Open Settings by pressing Windows + I. Or click the gear icon on the Start screen.

Step 2: Go to System.

Step 3: Switch to the Storage tab in the left column. In the right pane, click Configure Storage Sense or run it now.

Step 4: Scroll to the bottom of the window and select Clean now.

This will automatically scan for unnecessary files, including old drivers that are no longer in use.

3. Use Disk Cleanup
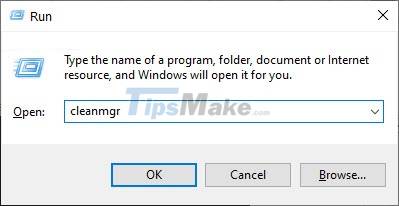
Step 1: Press Windows + R to open the Run dialog >> type cleanmgr.
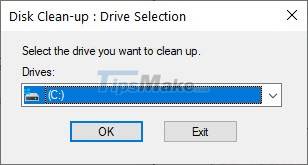
Step 2: Disk Cleanup window will open in C drive, if you save Windows in another drive, or select it. When the correct system drive is selected, press OK.
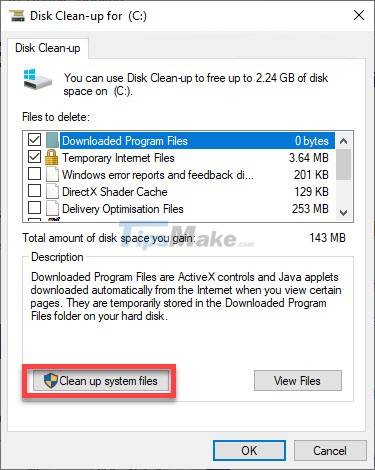
Step 3: Disk Clean-up window appears, click Clean up system files and allow it to run as administrator.
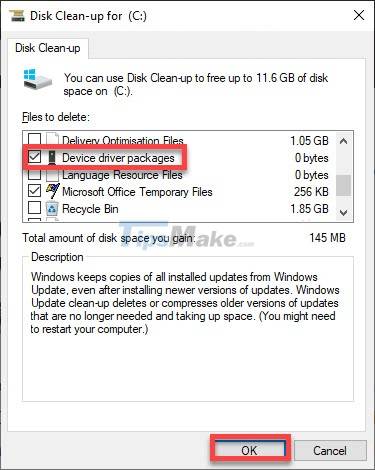
Step 4: The system cleaning components will appear, here you tick Device driver packages and click OK.
4. Uninstall Old Drivers Using PowerShell
Just download and run the script below in PowerShell, you can uninstall old drivers quickly.
Step 1: Download the following PowerShell script: Insert file.
Step 2: Press Windows + X and a menu will appear in the lower left corner, select Windows PowerShell (Admin).
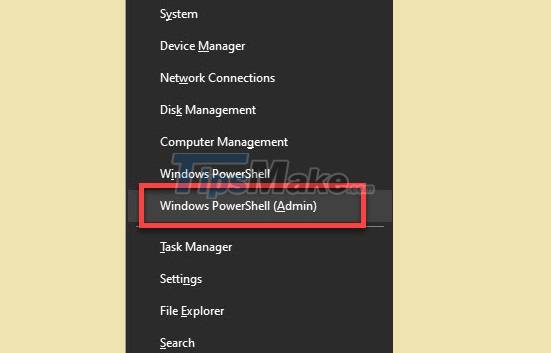
Step 3: When the PowerShell window appears, enter the following command to allow the running of the external script.
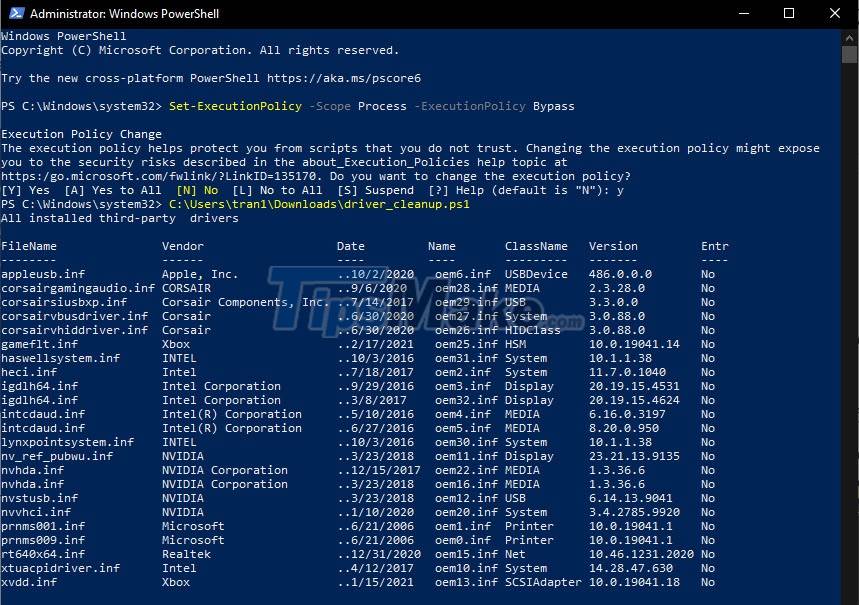
Set-ExecutionPolicy -Scope Process -ExecutionPolicy Bypass

If the current state of access is [N] No. Please enter Y and Enter to agree.
Step 4: Next, run the following command to open the script file in PowerShell.
C:/Users/username/Downloads/driver_cleanup.ps1
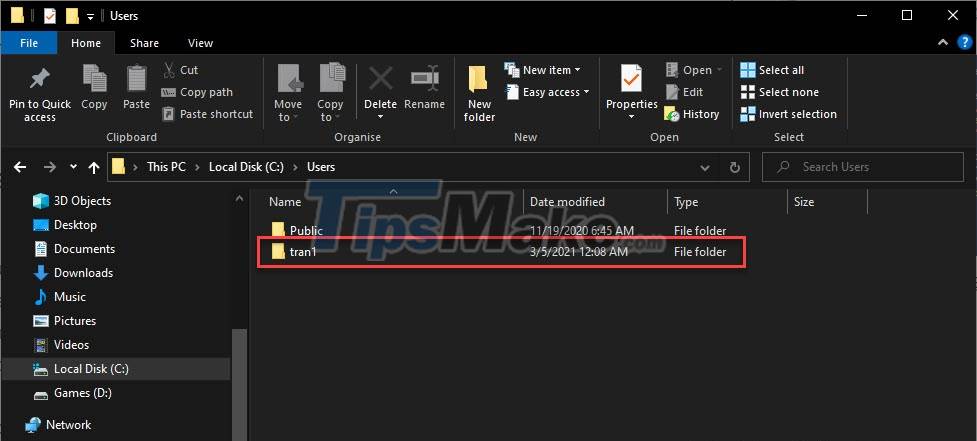
Remember to replace 'username' with the correct user folder on your computer. You can find it by opening File Explorer and navigating to C:/Users.
After entering the command file, the system will automatically delete the old driver.
The above are simple ways to help you uninstall old drivers on your computer to free up space. Hope you are succesful.
Key Takeaways
Use the information above as a practical reference for how to uninstall old drivers on Windows 10. Review each step carefully, confirm any requirements, and choose the option that best fits your situation.
FAQ
What does this guide explain about Uninstall Old Drivers on Windows 10?
It explains the main concepts, practical considerations, and useful steps related to uninstall old drivers on Windows 10 without requiring advanced knowledge.
Who can benefit from learning about Uninstall Old Drivers on Windows 10?
This information is useful for readers who want a clear overview, practical guidance, and reliable steps related to uninstall old drivers on Windows 10.
What should I check before applying this information?
Review the requirements, confirm that your device, software, or situation matches the instructions, and back up important data before making major changes.
Related Articles
 How to Uninstall AMD Catalyst Driver on Windows5 minutes read
 How to Uninstall Nvidia Drivers9 minutes read
 How to Completely Uninstall WSL on Windows 10/114 minutes read
 How to Uninstall and Reinstall Wi-Fi Drivers on Windows 116 minutes read
 How to Uninstall VGA Drivers, Computer Graphics Card Drivers5 minutes read
 How to Install Audio Drivers on Windows Xp3 minutes read
Reader Comments 0
Sign in with email or Google to join the discussion.