How to take Android screenshots from Windows and Mac
Surely everyone has experienced this situation, taking screenshots and then having to go through quite a lot of cumbersome steps with sending that screenshot to a computer and then using it.
Table of Contents
However, you can take Android screenshots right from your computer with the Android Debug Bridge (ADB) tool. In the article below, TipsMake will guide you to use the ADB tool to capture Android screens on Windows and Mac.
Android screen capture on Windows computer
On Windows, you can use Command Prompt to run an ADB command to take a picture of your Android device. You can run a client command to transfer screenshots from your device to your computer.
However, it is best to combine these commands so that they can be operated on a keyboard shortcut. This way, your entire screen capture process is done in just one click.
1. Install ADB and Android device
First you need to install ADB on your PC to execute the command on your phone, follow these steps:
Step 1. Create a folder on your desktop and name it adb .
Step 2. Download free ADB for Windows to your computer here.
Step 3. Extract the files to the adb folder you just created on the desktop.
Step 4. Hold Shift and right click on an empty space in the adb folder , then select Open command window here .
Step 5. Go to Settings> System> Developer options on the Android device and enable USB debugging .

Step 6. Connect the device to the computer using a USB cable.
Step 7. You will get connection instructions on the screen of your phone. Select Always allow from this computer and select OK .
Step 8. Go back to the Command Prompt , type adb devices and press Enter .
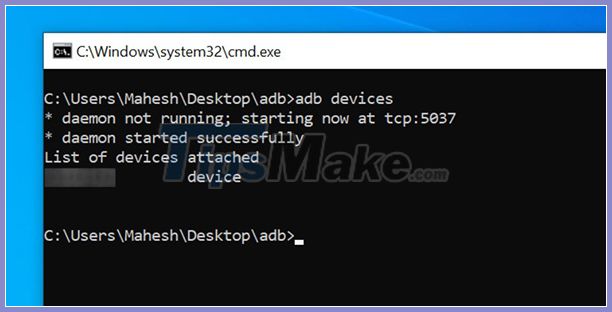
Step 9. At this point, make sure your device appears in the list, if not you need to install the ADB driver.
2. Take a screenshot with keyboard shortcut
Once your computer has recognized the Android device, you can write and save the screenshot commands in a file.
Step 1. Open Start Menu, find Notepad and start the program.
Step 2. Type the following command in Notepad, replace the part with the username on the computer.
cd C:UsersDesktopadb adb devices adb shell screencap -p /sdcard/image.png adb pull /sdcard/image.png C:UsersDesktopStep 3. Press Ctrl + S to save the file.
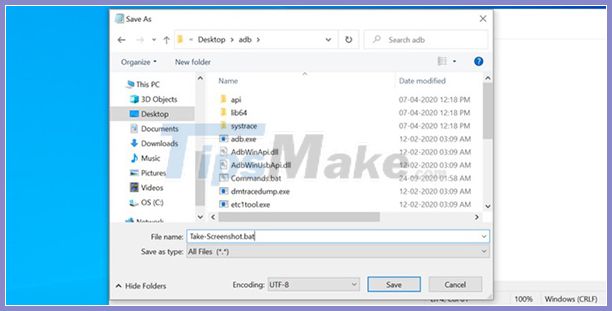
Step 4. In the file saving dialog box, enter Take-Screenshot.bat in the File name field , choose All Files from the Save as type menu , then choose the adb folder as the location, and click Save .
Step 5. Open the adb folder via File Explorer, right-click the just created Take-Screenshot.bat file , select Send to> Desktop (create shortcut) .
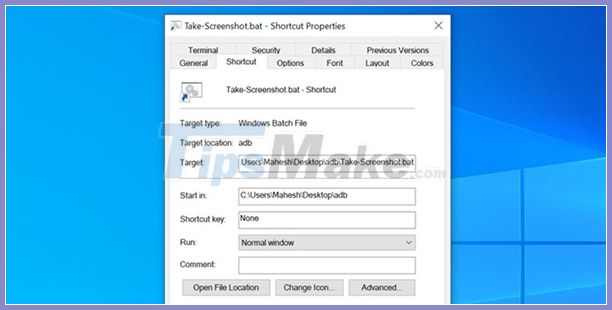
Step 6. Right- click on the shortcut on the desktop just created and select Properties .
Step 7. Move the cursor to the Shortcut key and press the desired shortcut. Then go to Apply> OK at the end.
Step 8. Press the selected key combination every time you want to take a screenshot of your Android device. The screenshot will be saved on the desktop of the computer.
Make sure the Android device is connected to the computer when you do this.
Android screen capture on Mac
In macOS, you can create an Automator service that runs the required ADB commands to capture and transfer screenshots from an Android device to a Mac. You can then assign a shortcut to this service.
1. Install ADB and Android device
The process for setting up ADB in macOS is similar to the process for setting up ADB in Windows.
- Download the free ADB for Mac toolkit and extract it to the adb folder created on your Mac's desktop.
- In Settings> System> Developer options on Android devices and turn on USB debugging .
2. Create an Automator service to take screenshots
Once ADB is installed, you need to create an Automator service to run the screenshot ADB command.
Step 1. Open Automator, choose Quick Action (or Service if you use an older Mac), click Choose .
Step 2. Select files or folders from the Workflow receives selected menu .
Step 3. Select any application from the menu.
Step 4. Drag the Run Shell Script from the Actions menu to the working side on the right.
Step 5. Enter the command into the Run Shell Script on the right. Replace the username component on the Mac.
cd /Users//Desktop/adb/; ./adb devices; ./adb shell screencap -p /sdcard/image.png; ./adb pull /sdcard/image.png /Users//Desktop/Step 6. Press Command + S , save the name Take Android Screenshot and select Save .
3. Create screen capture shortcut
Automator service is now ready to perform screen capture function of your Android device. Next, you need to create a shortcut to make this easier.
Step 1. Click on the Apple logo in the left corner and select System Preferences .
Step 2. Select Keyboard .
3. Select the Shortcuts tab .
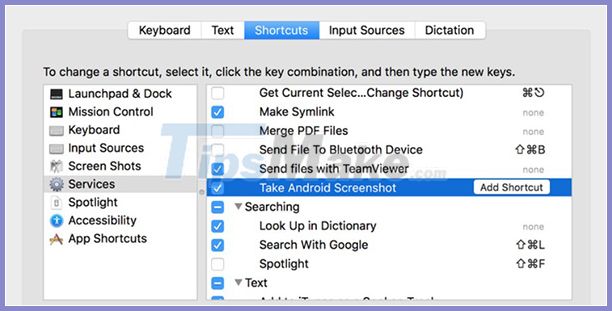
Step 4. Select Services from the left sidebar and find the newly created action (or service) on the right side.
Step 5. Select the column next to the service and press the shortcut you want to use.
Now, every time you want to take a screenshot of Android, press the shortcut created above. It will run the Automator service, take a screenshot, and send it to your Mac desktop.
Was this article helpful?
Your feedback helps us improve.
Related Articles
 Ways to take screen shots of Android phones9 minutes read
 How to Quickly Delete Screenshots from Android Phone9 minutes read
 How to take screenshots Android phone3 minutes read
 How to take scrolling, long screen screenshots in Windows12 minutes read
 3 Quick Ways to Take Screenshots in Windows 83 minutes read
 The Google for Android application is about to edit and share screenshots3 minutes read
Reader Comments 0
Sign in with email or Google to join the discussion.