Table of Contents
Overview
This guide explains how to take photos with your computer in clear, practical terms. It covers the key concepts, recommended steps, common limitations, and useful checks so you can make a better-informed decision.
With the operations of taking photos on Windows in simple ways that you may miss. You want to take photos on the computer with available keys or simple mouse clicks without using any additional software. In this guide, this guide will share and summarize for you the fastest and simplest ways to take photos on the computer.
Ways to take photos on a computer without using software
Taking a photo with a computer is no longer a new feature. It is available on many platforms and devices. However, not everyone knows how to take a screenshot on a computer quickly. Please refer to the latest ways to take a photo on a computer without using software below!
Take photos on a laptop using Windows operating system
This guide explains how to take pictures on your computer. You can apply it to different Windows operating systems, the only difference is the storage location of the camera software. Just find and activate the camera to use it.
- Step 1: Activate the camera
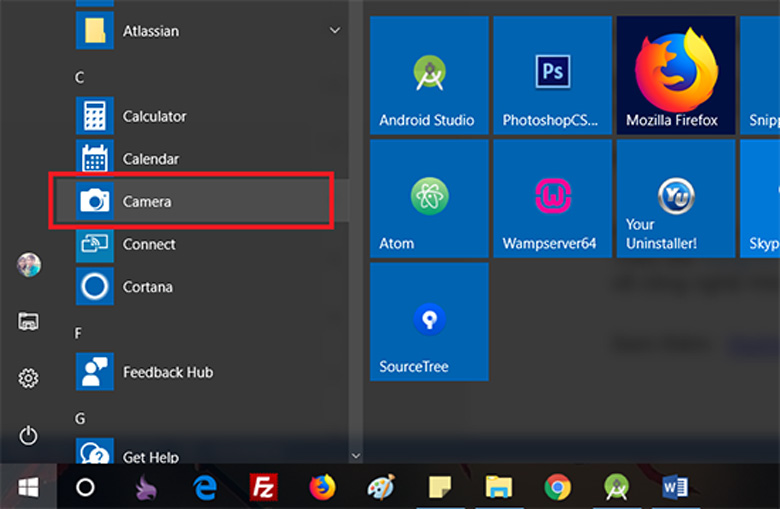
+ Click on the Start Menu icon in the lower right corner of the laptop screen. Or you can use the Windows shortcut key on the keyboard.
+ Find the Camera app or type search in the search bar.
+ If not enabled, Windows will ask you if you want to turn on the camera
+ Click YES to turn on the camera.
+ Windows will ask for location access, you can allow it or not.
- Step 2: Take a photo with your laptop camera.
+ After opening the camera, the light will turn on to indicate that the feature has been enabled.
+ Click on the camera icon or video camera icon to record video with your laptop.
+ Move the computer towards the object you want to capture -> Click the Capture button to capture and save the image.
- Step 3: You can customize the resolution and size of the photo or video as you like.
How to take photos with Photo Booth on Macbook
Apple products often use their own operating systems. Therefore, the way they use and take photos with their cameras is different from other laptop lines on the market.
How to take photos on Macbook:
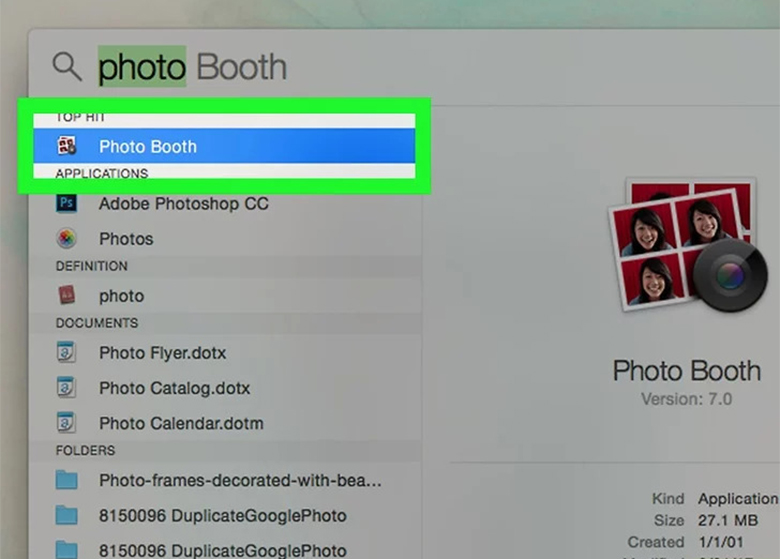
- Step 1: Click Spotlight in the lower right corner of the screen.
- Step 2: Search for "Photo Booth" on the search bar.
- Step 3: Click Photo Booth to open the application -> Photo Booth's working interface will appear on the Mac computer screen.
- Step 4: When the Macbook camera is turned on, the green indicator light next to it will light up and you can see images of objects within the camera range of the device appear on the screen.
- Step 5: Move the computer towards the subject you want to capture -> Find a suitable shooting angle -> Choose the photo capture features as desired.
- Step 6: After finding the desired shooting angle and mode -> Click Capture (red background camera icon with white image) below the screen -> Macbook will take a photo and save it on the device's Photos application.
How to take photos with computer using software
How to take photos using Snagit software
Snagit is a fast and easy screen capture and video recording software. Some of the key features of Snagit include:
- Take screenshots, record videos
- Edit image
- Add text, icons,. to images simply
- Many unique visual effects
Step-by-step guide to taking photos with Snagit software
Step 1: Download and install Snagit software
Step 2: Use the PrtScr shortcut key (when you turn on the Snagit application, pressing the PrtScr key will use the Snagit photo capture tool).
Step 3: The software will allow you to select the area to take a photo. Drag and drop the mouse to select the capture area, then click Capture Image to take the photo.
Step 4: The image editing window appears, you can insert text,. Then press Ctrl + S to save the file and select the folder you want to save it to.
How to take photos with computer using Cyberlink Youcam software
- Step 1: Download and install the software on your computer
- Step 2: Open the software interface.
+ To take a photo: Tap the camera below the screen.
+ To record video: Click on the camera icon -> Click record video.
- Step 3: Set up photo capture mode with laptop camera.
+ Click on the eye icon.
+ Customize brightness, light balance,.
Conclude:
Above is a summary of ways to take screenshots that anyone can easily do. You can use many different ways depending on your preferences. If you have any questions, you can contact this guide via hotline 19001903 for the best advice and support!
Key Takeaways
Use the guidance above as a practical reference for take photos with your computer quickly and. Check compatibility, follow the steps carefully, and verify important details with official documentation when software, security, accounts, health, or purchases are involved.
Frequently Asked Questions
How do I take photos with my computer?
Follow the steps in this guide in order, confirm each setting before continuing, and save, restart, or reconnect the device when the instructions require it.
What should I check before I begin?
Confirm the correct device, account access, software version, compatibility, and a current backup whenever the process could affect files, settings, or security.
What should I do if the process does not work?
Repeat the steps carefully, check for model or version differences, install available updates, and consult the manufacturer's official support documentation.
Was this article helpful?
Your feedback helps us improve.
Related Articles
 How to Easily and Quickly Download Instagram Videos to Your Phone or Computer4 minutes read
 How to Download Photos to Your Computer on Windows and Macbook: Complete Guide14 minutes read
 How to Time Off the Computer Very Quickly and Easily by the Command CMD, No3 minutes read
 Microsoft Applications on iOS and Android Help to Share Files to Computers Quickly4 minutes read
 How to Use Google Photos from AZ for New Users3 minutes read
 How to Copy Photos from Computer to iPhone6 minutes read
Reader Comments 0
Sign in with email or Google to join the discussion.