Table of Contents
This practical guide explains how to set the scroll bar to always show on macos with clear steps and useful context. It also covers common requirements, potential problems, and the details that can help you get better results.
However, if you want the page scrollbars to be visible at all times and want to scroll instantly by clicking on the scrollbars directly, instead of using a mouse or trackpad, learn how to do it right away. this.
Set Up Scrollbars to Always Show on Mac
You just need to follow these steps:
Step 1. Launch System Preferences by clicking the corresponding icon in the Dock, through the Spotlight search bar, or simply by clicking the Apple icon in the menu bar at the top left corner of the screen.
Step 2. On the System Preferences window that appears, click General.
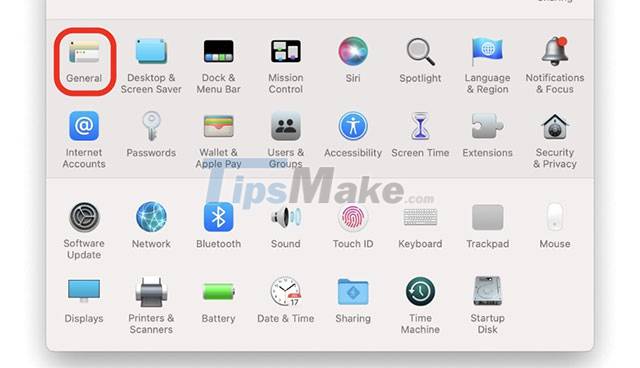
Step 3. On the General page, look for the option called 'Show scroll bars', click on it and select 'Always'.

It's all simply that. From now on, whenever you perform a page scroll on your Mac, whether it's Safari, Notes, or just a PDF document, the scroll bars will always be clearly displayed on the right for you to navigate. work when needed. If you don't want to use your mouse or trackpad to scroll, you can click and drag on the scroll bars to move the display position on any page.
Wish you always have a good experience with macOS!
Conclusion
Understanding Scrollbar makes it easier to compare options, avoid common mistakes, and apply the information in this guide more effectively. Review the relevant requirements before making changes or choosing a solution.
FAQ
How do you set the scroll bar to always show on macos?
Follow the steps in this guide in order, confirm the required settings or tools, and verify the result before making additional changes.
Is it safe to set the scroll bar to always show on macos?
It is generally safe when you follow the recommended instructions, use trusted tools, and avoid changing settings you do not understand.
What should you do if the process does not work?
Recheck the requirements, restart the device or application when appropriate, and review each step for missed settings or compatibility issues.
Related Articles
 How to Scroll Bar Scrolls Horizontally and Vertically in Word and3 minutes read
 The Power of the Scroll Key: A Practical Guide4 minutes read
 How to Make the Scroll Lock Key Useful on Windows 10 PC5 minutes read
 How to Hide, Display Files and Folders on macOS5 minutes read
 How to Use the Touchless Scrolling Feature on Oppo: Step-by-Step Guide4 minutes read
 Show Scrollbars in Word2 minutes read
Reader Comments 0
Sign in with email or Google to join the discussion.