How to scan a hard drive with Error Checking
Scanning your hard drive with the Error Checking tool can help identify and even repair a range of hard drive errors, from file system problems to physical problems such as bad sectors.
Table of Contents
Scanning your hard drive with the Error Checking tool can help identify and even repair a range of hard drive errors, from file system problems to physical problems such as bad sectors.
The Error Checking Tool of Windows is a GUI (graphical) version of the chkdsk command line tool. The chkdsk command is still available and provides more advanced options than Error Checking.
Error Checking is available in Windows 10, Windows 8, Windows 7, Windows Vista and Windows XP, but there are differences, all of which will be detailed in the following section.
Time required : Checking the hard drive with Error Checking is easy, but it can take from 5 minutes to 2 hours or more, depending on the size and speed of the hard drive, as well as the problems found. out.
How to scan a hard drive with the Error Checking tool
Note : Windows 10 and Windows 8 automatically check for errors and will notify you if action is needed, but you can run the manual test whenever you want, as follows:
1. Right-click on the Start button and select File Explorer (Windows 10/8), Open Windows Explorer (Windows 7) or Explore (Vista / XP).

File Explorer is also available through quick search. Windows Explorer, in previous versions of Windows, is also available through Computer or My Computer in the Start menu .
2. Select This PC (Windows 10/8), Computer (Windows 7 / Vista) or My Computer (XP) in the left margin.
Tip : You may need to enable the Navigation panel from the View menu , if you don't see this option. In XP, it is located in View> Explorer Bar> Folders .
3. Right-click or tap and hold the drive you want to check for errors (usually C ) and select Properties.
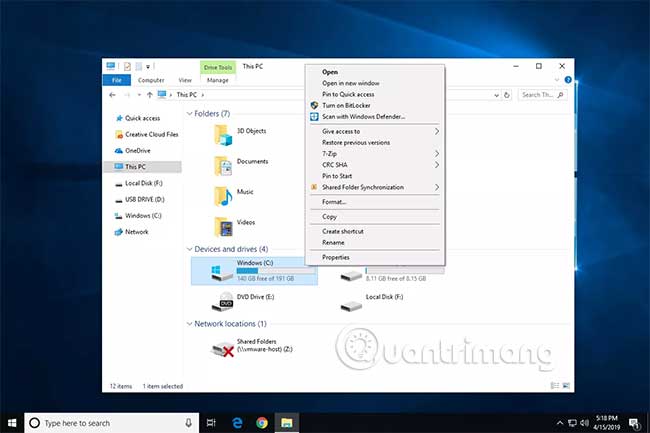
Tip : If you do not see any drives below the title you identified in step 2, select the small arrow on the left to display a list of drives.
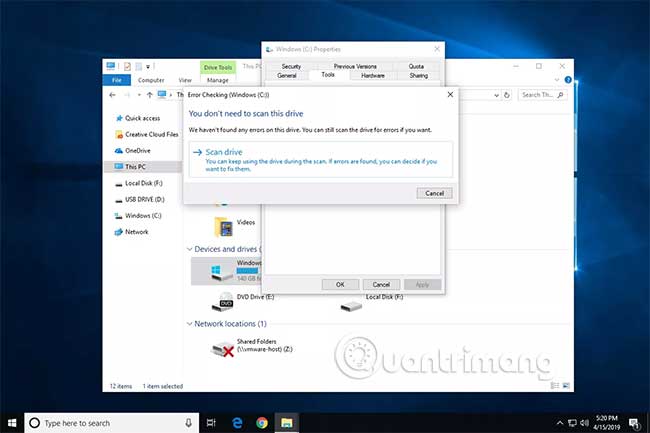
4. Select the Tools tab at the top of the window.
5. What you need to do now depends on the version of Windows you are using:
- Windows 10 & 8: Select Check> Scan drive , then move down to step 8.
- Windows 7, Vista & XP: Select Check now and then continue with step 6.
Tip : Here's how to see the version of Windows in use, if you're not sure about this.
6. Two options are available before you start scanning for Error Checking in Windows 7, Vista and XP:
- Automatically fix file system errors will automatically fix errors related to the file system that the scan detected. The article recommends that you check this option every time.
- Scan for and attempt recovery of bad sectors will perform a search for areas of the hard drive that may be damaged or unusable. If found, this tool will mark those areas as "bad" and prevent the computer from using them in the future. This is a very useful feature but can extend the scan time by more than several hours.
Tip : The first option is equivalent to executing chkdsk / f and the second option is similar to chkdsk / scan / r . Checking both options above is like executing chkdsk / r .
7. Click Start.
8. Wait for Error Checking to scan the selected hard drive for errors. Scanning time depends on the options you use and / or which error is found. Error Checking will fix any errors that the scanning process finds.
Note : If you get the message 'Windows can't check the disk while it's in use' , select Schedule disk check , close any other open windows, and then restart the computer. You will notice that Windows takes longer to boot and a text message appears on the screen when the Error Checking (chkdsk) process is complete.
9. Follow any advice given after the scan. If an error is found, you may be required to restart the computer. If you do not find the error, you can close all open windows and continue using the computer normally.
Tip : If interested, you can find a detailed log of the Error Checking scanning process and what has been fixed, if any. This detailed information can be found in the Application list of the Event Viewer. If you have trouble locating, focus your attention on Event ID 26226 .
Hope you are succesful.
Was this article helpful?
Your feedback helps us improve.
Related Articles
 Change the standby time of CHKDSK hard drive error checking tool in Windows2 minutes read
 Know about bad sectors on your hard drive7 minutes read
 Fix hard drive error still spinning but not receiving5 minutes read
 Check and fix hard drive errors with chkdsk on Windows9 minutes read
 How to fix an external hard drive error is not displayed on the Mac10 minutes read
 How to regain access to the hard drive, fix errors that cannot open the hard drive4 minutes read
Reader Comments 0
Sign in with email or Google to join the discussion.