How to save a location on Google Maps from a screenshot
The screenshot scanning feature in Google Maps lets you easily save locations from your photos.
Table of Contents
The screenshot scanning feature in Google Maps allows you to easily save locations from your photos. All you need to do is take a screenshot with the name or address of the location displayed. The Google Maps app then identifies and extracts the information and adds it to a list in the app. Here's how to save a location on Google Maps from a screenshot.
Instructions for saving locations on Google Maps from screenshots
Note, this feature is currently only available in the US and only applies to the iPhone version of Google Maps.
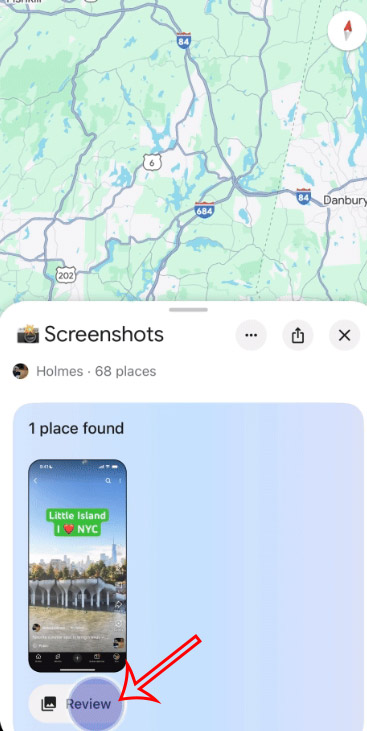
Step 1:
You take a screenshot of the location, location in any interface. Then open the Google Maps application to see the new screenshot, click Review to view the image.
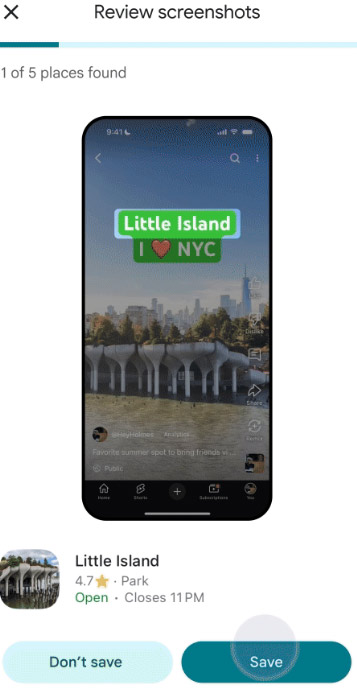
Step 2:
Gemini on Google detects the text in the screenshot then checks and displays the exact real-life location for you to save the location in your Google Maps list. Click the Save button to save the location in your Google Maps application and you're done.
All your saved locations will appear in the Screenshots list. You can then move them to other collections if you want.
Was this article helpful?
Your feedback helps us improve.
Related Articles
 Useful features on the Google Maps app that you don't know yet5 minutes read
 How to view the elevation of a location on Google Maps3 minutes read
 How to turn off Google Maps location notification3 minutes read
 4 things you can do with your Google Maps location history5 minutes read
 Google recently revived a 'dead' feature since 20093 minutes read
 Google Maps displays the battery life on the device when sharing location2 minutes read
Reader Comments 0
Sign in with email or Google to join the discussion.