Table of Contents
Learning how to project a laptop screen on a TV using Wi-Fi display / is easier when the steps are completed in the correct order. Use this guide to prepare, make the changes, and verify the result.
One of the ways of projecting a tablet, phone, laptop screen on a TV screen is Wi-Fi Display or Wireless Display. This is the wireless connectivity standard developed by Intel, which supports transferring content from laptops to TVs that support Widi.
Compared to before to be able to project any content from a laptop device to a computer, we will use HDMI wired connection. And according to the rapid development of technology, many ways of connecting between TV and computer have been born, including Wi-Fi Display. We will not need to prepare an HDMI cable, a quick presentation method. Images and sounds transferred from the computer to the television are always guaranteed to meet users's needs. The steps below explain how to project a laptop screen on a TV using Wi-Fi Display.
Note to readers, to be able to present, the computer is from Windows 7 and above and uses Intel Core i 3, 5, 7 generation 2 and above and uses Intel Wi-Fi card.
How to project a laptop screen on a TV using Wi-Fi Display / Wireless Display / Screen Share
Step 1:
First of all, to check if your computer uses Intel Wi-Fi card, click This Computer Icon (My Computer)> Manage > Device Manager > Network Adapter . Seeing Intel Wireless Means your laptop uses Intel's Wi-Fi card.

Step 2:
On TV we will turn on Wi-Fi Display feature. Depending on the smart TV line, this feature has many different names, such as Widi, Wi-Fi Direct, Wi-Fi Display, Wireless Display, and Screen Share.
You can find them at the interface on the home page of the television or search at the TV settings, along with the password.
Step 3:
Next we will open the Wi-Fi Display feature on the computer.
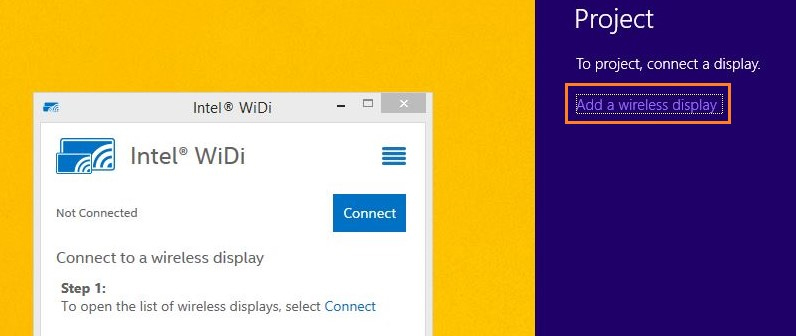
With Windows 7 laptop , we download the Widi software in the link below, then install and open it. Immediately the computer will scan for connected TV, you choose to enter the TV, enter the password (if the device requires) and 2 devices will connect.
- Download Intel WiDi Pro software
With Windows 8 and 8.1 computers :
Open the settings list on the right of the screen, at The Devices menu, Select Project . Then select Add a Wireless Display Then select the TV you want to connect, enter the password (if the device requires) and 2 devices will be connected.
For Windows 10 , you need to see a laptop and a TV that supports Miracast standard. Miracast is a wireless technology used to wirelessly display a computer screen on a Miracast-supported TV or monitor. See the article How to check if a Miracast-enabled Windows computer is available for testing.
How to wirelessly connect a Windows 10 laptop to a TV
1. On a laptop or tablet running Windows 10, navigate to the Settings> System> Display application .
2. In the Multiple displays Section, click the Connect to a wirelessly display link . Windows 10 will then start searching for all available wireless devices and list them in the newly opened Connect Window.

NOTE : If you do not see the Connect to a wireless display link , it may be because your device is not supported by Miracast or has not installed the necessary driver.
3. If you see the TV displayed in the list, click the device to wirelessly connect the Windows 10 laptop to the TV.

If Windows 10 cannot find the TV or monitor, click and the Detect Button in the Multiple displays Section.
Change projection mode settings
By default, when connecting your laptop to a TV or external monitor, Windows 10 uses the projection mode used last time. For example, if you used the TV the last time to extend the screen of a hand-held computer, the next time you use Windows 10 will automatically use the TV as an extended screen when connected to it.
When needed to use the TV screen or change the default projection mode, you can change the projection mode setting and this is how.
1. Navigate to Settings> System> Display And click the Connect to wireless display link To see the Connect Window.
2. Click Change projection mode To select the projection type, it has three modes of Duplicate , Extend And Second screen only For your choice.


Alternatively, you can use the Windows + P Shortcut to open the Project Panel and select the appropriate mode.
How to disconnect from the TV
1. Navigate to Settings> System> Display application .
2. Click the Connect to a Wireless display link To display the Connect Window, then click Disconnect To disconnect the laptop from the TV or display.

Similarly, you can press the Windows + P Key combination to open the Connect Window and click Disconnect Here.
I wish you all success!
- How to project Android screen on Windows 10 with Miracast and Connect
- 8 ways to project your phone screen on a television
- How to project a computer screen to a TV with Chromecast
FAQ
What should I prepare before I project a laptop screen on a TV using Wi-Fi display /?
Review the requirements in the guide, confirm that your device or software is compatible, and save important work before changing settings related to project a laptop screen on a TV using Wi-Fi display /.
Why might project a laptop screen on a TV using Wi-Fi display / not work as expected?
The most common causes are incompatible versions, missing permissions, incorrect settings, or an interrupted internet connection. Recheck each step and restart the app or device when appropriate.
Can beginners follow these project a laptop screen on a TV using Wi-Fi display / steps?
Yes. Follow the steps in order, avoid skipping confirmation screens, and compare your interface with the screenshots because labels may differ slightly between versions.
Related Articles
 How to Connect Laptop to TV? 5 Ways to Connect the TV to Laptop6 minutes read
 Troubleshoot and Share Wireless Internet in Windows 86 minutes read
 How to Connect a Computer Screen to a TV via Wi-Fi Display5 minutes read
 Configure Your Laptop to Be a Wi-Fi Hotspot3 minutes read
 How to Play Wi-Fi on Laptop with MyPublicWiFi - Share Wi-Fi3 minutes read
 Set up Ad Hoc Wireless Network to Play Wi-Fi Without Software12 minutes read
Reader Comments 0
Sign in with email or Google to join the discussion.