How to prevent members from clicking each other out of a group in Microsoft Teams
For example, prevent members from kicking each other out of a group in Microsoft Teams.
3 types of roles in Microsoft Teams
There are three types of roles:
- Owner - The owner
- Member - Member
- Guest - Guest
Owner's rights or abilities in Microsoft Teams
An owner is the administrator of a group, and a group can have multiple owners. Owner account holders have maximum features and permissions. Specifically, the following permissions and capabilities are included in the owner account.
- Create groups and channels
- Join in private chat and channel chat
- Install and uninstall apps, bots and connectors
- Share files with several people in the conversation
- Share chat files with others
- Add and remove any members and guests
- Invite others and can be invited by others
- Delete and edit messages
- Check out your organization chart
- Change group permissions
- Create a new tab
- Handles all mentioned content (@name)
- Emojis, GIFs, etc. can be used.
- Group archive and restore whenever possible
Membership rights and capabilities in Microsoft Teams
A member has fewer options than an owner, but this person can do almost all of the essential tasks in a group. The member account is suitable for someone who is on your project but not an administrator.
- Create groups and channels
- Join in private chat and channel chat
- Share all files on channel and chat file
- Install apps, tabs, bots, etc.
- Edit and delete posted messages
- Find and join public groups
- See organization chart
Guest rights and capabilities in Microsoft Teams
The guest account owner has minimal options, and this role is suitable for people who are not appointed in your organization, but you want to chat with that person. For example, this person could be your business customer, a supplier, or any other outside person. The guest account's powers include:
- Create a channel but not a group
- Can join in private chat and chat on channel
- Share files on channel
- You can invite them through your work or school account for Office 365
- Delete and edit messages
Now, if you have created a group and want to manage permissions for other people (members and guests), the following will be helpful for you.
Permissions available to members and guests in Microsoft Teams
The administrator or owner can manage these permissions for members and guests:
- Allow members to create and update channels
- Allow members to create private channels
- Allows members to delete and restore channels
- Allow members to add and remove apps
- Allows members to upload custom applications
- Allows members to create, update and delete tabs
- Allows members to create, update and delete connectors
- Provides members the option to delete their messages
- Gives members the option to edit their messages
- Allow guests to create and update channels
- Allow guests to delete the channel
In other words, even if the person with a member account has those capabilities, you can still prevent them from using it on your team, for example by preventing members from clicking each other off the group in Microsoft Teams.
How to change permissions in Microsoft Teams
To change or manage roles, permissions, and capabilities in Microsoft Teams, follow these steps:
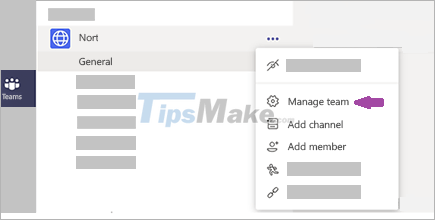
Step 1. Open the Manage team window.

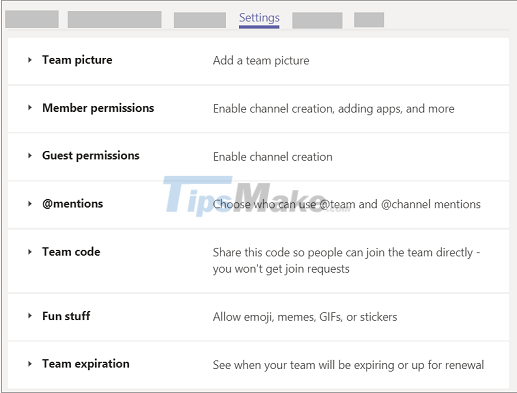
Step 2. Go to the Settings tab.

Step 3. Expand Member permissions and Guest permissions.
Step 4. Add or remove check marks from the checkboxes
To get started, you need to open the Microsoft Teams app or the official website. Then, select a group and click the three-dot button to select the Manage team option.
Then, go to the Settings tab and expand the Member permissions and Guest permissions panels. Here, you can find all the options mentioned above.
Now you need to add or remove ticks from the checkboxes to allow or block permissions.
These settings are group-based. That means you can set different permissions for different groups.
Hope you are succesful.
You should read it
- Slack has 350,000 new users from IBM, the competition with Microsoft Teams is hotter than ever
- Link download Microsoft Teams 1.3.00.3564
- Summary of shortcuts for Microsoft Teams to learn online
- How to use Microsoft Teams online
- Microsoft integrates Teams utilities into Office.com website and Office Windows apps
- How to prevent Microsoft Teams from running in the background after closing
 How to pin files in Microsoft Teams
 How to fix the error of not sending messages on Zalo
 How to turn off notifications when someone in your contacts joins Telegram
 Top 10 Notion Templates are suitable for students and teachers to use
 How to use Breakout Rooms on Microsoft Teams