How to Mute the Microphone on Windows
This wikiHow teaches you how to disable your computer's microphone on Windows. Find the sound icon on your desktop taskbar. This button looks like a speaker icon in the lower-right corner of your desktop next to the Wi-Fi and battery...
Table of Contents
Steps
-
 Find the sound icon on your desktop taskbar. This button looks like a speaker icon in the lower-right corner of your desktop next to the Wi-Fi and battery icons.
 -
 Right-click the sound icon. Your options will pop up.
 -
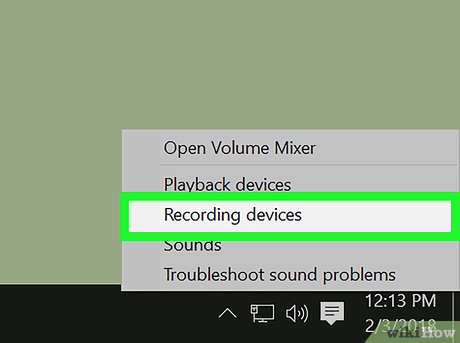 Click Recording Devices on the right-click menu. This will open your Sound settings in a new window, and switch you to the Recording tab. You can see a list of all your audio input devices here.
 -
 Right-click your microphone on the list. Your options will pop up on a new menu.
 -
 Select Disable on the right-click menu. This option will turn off your microphone, and remove it from the Recording list.
 -
 Right-click on the empty space on the Recording list. This will show your list options on a new pop-up menu.
 -
 Click and check Show Disabled Devices. When this option is checked, you will be able to see your microphone on the Recording list even though it's disabled.
- You can right-click your disabled microphone here, and select Enable to turn it back on.
Was this article helpful?
Your feedback helps us improve.
Related Articles
 Windows 11 adds an instant microphone mute key, which is very convenient for those who often video calls3 minutes read
 Video calling applications continue to record audio when you press the microphone off button5 minutes read
 How to test the Windows 10 microphone3 minutes read
 How to mute any application on Windows 103 minutes read
 How to enable microphone in Windows 103 minutes read
 Steps to install microphone on Windows 103 minutes read
Reader Comments 0
Sign in with email or Google to join the discussion.